Rossi 92 Part 2
by Roy
Seifert
Click here to purchase a zip file with this and
all Kitchen Table Gunsmith Articles.
Disclaimer: This
article is for entertainment only and is not to be used in lieu of a
qualified gunsmith. Please
defer all firearms work to a qualified gunsmith.
Any loads mentioned in this article are my loads for my
guns and have been carefully worked up using established guidelines and
special tools. The
author assumes no responsibility or liability for use of these loads,
or use or misuse of this article.
Please note that I am not a
professional gunsmith, just a shooting enthusiast and hobbyist, as well
as a tinkerer. This
article explains work that I performed to my guns without the
assistance of a qualified gunsmith.
Some procedures described in this
article require special tools and cannot/should not be performed
without them.
Warning: Disassembling
and tinkering with your firearm may void the warranty.
I claim no responsibility for use
or misuse of this article. Again,
this article is for entertainment purposes only!
Tools
and firearms are the trademark/service mark or registered trademark of
their respective manufacturers. Click on any
blue text to go to a
product/seller web site.
Note: I wrote this article in 2022 and I'm just
getting around to publishing it.
Introduction
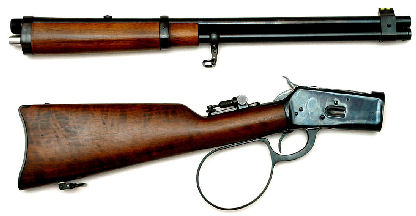
My first Cowboy Action Shooting rifle was a Rossi 92 SRC in .45 Colt.
I believe SRC stands for Saddle Ring Carbine, but my rifle didn’t come
with a saddle ring. The Rossi 92
SRC is a modern copy of the Winchester model 1892 lever-action rifle; the iconic
rifle used in many western movies and TV series.
I purchased this rifle in 2000 for use in Cowboy Action Shooting, but I
retired it for a Marlin 1894CB in .45 Colt.
At one time I had considered trading it for something else, but I just
could not part with this beautiful rifle and its nostalgic action.
As a gunsmithing exercise, I converted the SRC into a takedown rifle
(refer to my article
Building a Lever-Action Takedown Rifle).
Having both a rifle and handgun in the same caliber makes good sense; I only
need to carry one type of ammunition.
I have lever-action rifles and revolvers in .45 Colt, but I wanted a
lever-action rifle to go with my .44 Magnum handguns.
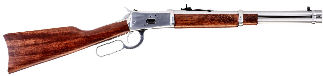
Being a big fan of the cost-effective Rossi 92 rifles, and the ’92
action, I purchased a R92C 16-inch stainless steel carbine in .44 Remington
Magnum. This rifle was built by
CBC, the company that purchased Rossi in 2015.
Other than the safety on the bolt and the front sight, this is pretty
much the same as my other Rossi 92.
I’m glad the front sight is no longer part of the front barrel band.
Because it is now dovetailed into the barrel, I can replace it with
something else more to my liking.
I
have two articles on disassembly/reassembly of the rifle, and slicking up the
action (refer to my articles
Disassembling the Winchester/Rossi 92 and
Slicking Up Winchester/Rossi
92.) I plan on performing
all the same slicking and action work on this rifle as I have done to my other
92, but this time with photos.
Initial Inspection
Well, I must say I was very disappointed with this rifle; it wouldn’t function
right out of the box. I’ve heard
that Rossi/CBC rifles are “project” rifles and require a lot of work to get them
to function properly, but come on Rossi/CBC, you can do better than this!
Shouldn’t it at least function properly out of the box?
Ok, as an amateur gunsmith, I guess this is more of a project rifle than
I had bargained for. I know I can
send it back to Rossi/CBC under warranty, but what the heck, I’d rather do the
work myself and know it was done right, plus Rossi/CBC wouldn’t do everything I
do to slick up this rifle.
Loading Jam
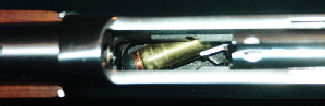
I
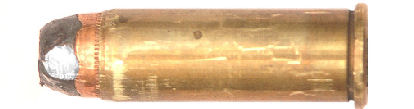
made up some dummy rounds with 240-grain semi-jacketed hollow point bullets.
These bullets would not feed through the loading gate.
The cartridge would get about 2/3 into the loading gate but wouldn’t go
any farther.
I
pushed one round as hard as I could into the magazine tube, and it damaged the
soft lead nose of the bullet. The
inside left of the receiver was rough cast causing the soft lead nose of the
bullet to bind. You can also see
how the case got scratched when it was fed into the chamber.
There are many sharp areas on this rifle that need to be polished.
I
disassembled the rifle and removed the loading gate from the receiver.
I also removed the fore end and magazine tube.
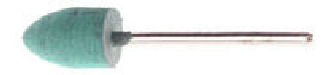
I installed a Cratex bullet-shaped bit onto my high-speed rotary tool,
inserted it carefully into the loading gate opening, and polished the rough
casting on the left side of the receiver in front of the magazine tube.
Cartridges now feed from the loading gate into the magazine tube without
damaging the bullet nose.
Replacing the Follower

While I had the magazine tube disassembled, I replaced the plastic follower with
a brass follower I fabricated on my lathe.
After turning the brass to the dimensions of the plastic follower, I
hollowed it out with a 7/16 square end mill bit.
The follower fit and functioned perfectly.
I also cut 2-inches off the magazine spring to make loading the eighth
round easier.
Lightening the Loading Gate Spring
While I had the loading gate out, I wanted to make it lighter.
Rossi/CBC refers to this part as the spring cover.
I used my high-speed rotary tool and a grinding bit to reduce the width
of the spring, then polished and cold-blued the sharp edges.
I didn’t let the metal get too hot because I didn’t want to damage the
spring tension. It is now much
easier to load a cartridge.
I
normally polish the small ramp on the underside and the front “prongs” of the
loading gate, but this was already done at the factory.
This helps to push an existing cartridge forward into the magazine tube
to facilitate loading another cartridge.
Working the Hammer/Trigger Group
The trigger pull on this rifle was actually not too bad; it broke at 3.5-pounds
with some creep. I wanted to
lighten the pull and remove most of the creep.
To lighten the trigger pull I bent the trigger return spring up just a
bit and reassembled the rifle to test.
I think I got it right the first time.

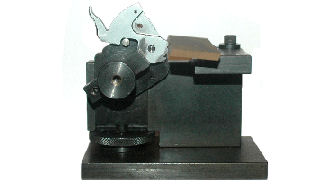
I
removed the trigger from the lower tang and polished both sides with 600-grit
wet/dry sandpaper. Then I placed it
in my Power Custom Series 1 stoning fixture using the 336 adapter.
I polished the sear first with a 600-grit stone, then with a 900-grit
stone. The stones came from the
Boride Engineered Abrasives Gunsmith Action Kit.
I final polished with an extra-fine ceramic stone I purchased from
Brownell’s
#080-721-601WB.
I
reduced the depth of the sear ledge on the hammer by removing 0.010”.
I then installed it in my
Power Custom Series II stoning fixture with the universal adapter.
I marked the ledge with a blue marker and adjusted the jig so I was
polishing the surface flat. I
polished the sear ledge on the hammer first with the hard India stone
#080-815-000WB, then the hard Arkansas stone
#080-815-001WB. I purchased the
stoning fixtures and stones from Brownells.
I
polished the sides of the hammer and inside the lower tang to remove any burrs.
I used a Cratex bit to polish the rounded top of the hammer where the
bolt rides. I applied FG68 oil to
the pivot pins, and SFL-0 grease to the flat part of the trigger where the
trigger return spring rides and rounded top of the hammer.
I applied
Brownells Action Lube Plus to the trigger sear and sear ledge on the hammer.
(Refer to my article
The Search for the Perfect Firearms Lubricants.)
The trigger pull is now a very safe 2-pounds with almost no creep.
It
appears that Rossi/CBC uses a lighter hammer spring because I didn’t need to cut
any coils or replace the spring.
After I polished the bolt and receiver the action was light and smooth and easy
to open, so Rossi/CBC is doing some things right with their rifles.
Feeding Jam

When I move the lever slowly forward the cartridge gets jammed as the case rim
slides up the cartridge guides. If
I continue to move the lever forward, I can feel the ejector being depressed,
but the cartridge won’t move. If I
cycle the action briskly cartridges feed reliably.
I
disassembled the rifle and polished the leading edge of each cartridge guide
with a bullet-point Cratex bit. The
internals of this rifle look like they had a Parkerized finish which was very
rough. After polishing the
cartridge guides, I touched up the exposed metal with cold blue, then oiled them
before reinstalling in the rifle.
While the cartridge guides were out of the rifle, I polished the inside of the
receiver with a 600-grit polishing stone to remove any burrs and high spots.
This allowed the bolt to travel smoothly in the receiver.
Despite all my work, when I cycled the action slowly cartridges would still jam
when fed into the chamber. The more
I cycled the action with dummy rounds, the less this problem occurred.
Eventually I was able to cycle rounds slowly without jamming.
These rifles are really meant to be cycled briskly.
Working the Bolt and Lever Group
First, I worked on the ejector. I
noticed in this new rifle Rossi/CBC milled two notches in the feed ramp to
accommodate the ejector. This
allows the bolt to close smoothly without depressing the ejector when there is
no round in the chamber. I polished
the front of the ejector with a Cratex bit.

Rather than cut the ejector spring, I replaced it with a 0.750” length of 0.232”
diameter 0.036” wire size spring from Browells #71 spring kit
#025-071-000WB.
What works for me is to cut or replace the ejector spring so when I assemble the
ejector, ejector spring and ejector collar in the bolt, the ejector protrudes
1/16” – 1/8” from the front of the bolt.
This makes reassembly of the rifle easier.
When the rifle is assembled, the cam on the front of the lever pushes the
collar against the spring and provides enough tension to eject a cartridge or
spent case. This should be tested
with dummy rounds that have some weight to ensure they are ejected clear of the
rifle.
Polishing the Locking Bolts and Channels
The
locking bolts also appeared to have been Parkerized which makes them rough.
I polished the front and rear edges and inside and outside flats with
600-grit wet/dry sandpaper. I
didn’t want to remove any metal, just polish off the Parkerizing to make the
surfaces smooth. Removing too much
metal from the front and rear edges will alter the headspace of the rifle which
could make it unsafe.
I
used a 320-grit stone to polish the channels in the receiver where the locking
bolts ride, then finished with a 600-grit stone.
I again didn’t want to remove too much metal, just polish the rough
spots.
Polishing the Bolt
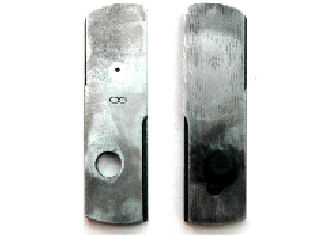
The bolt fit loosely in the receiver but wasn’t very smooth.
I completely disassembled the bolt so I could polish it and clean it.
When I removed the safety, I lost the little detent ball.
In fact, I lost 4 of them!
Long ago I purchased a chrome steel ball set from Amazon, so I had spares.
Good luck finding those little balls on the floor of my shop!
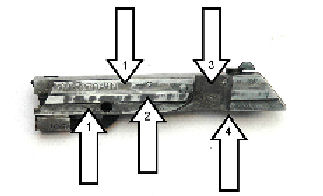
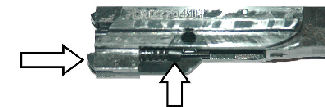
I
used a 320-grit stone to polish the sides of the bolt, then finished with a
600-grit stone. The bolt fit so
loosely in the receiver I didn’t want to remove too much metal; I just polished
off the high spots. I polished the
sides (1), the rails (2), and the bolt lock channels (3).
Notice all the tooling marks in the above photo.
This bolt had some casting flaws, but it functioned correctly.
I polished the underside of the bolt (4) where the hammer rides with a
Cratex bit. While I had the
cartridge guides out of the rifle, I also polished the inside flats and grooves
where the bolt rides with a 600-grit stone.
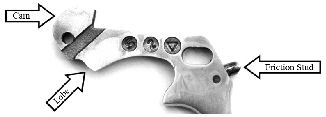
I
polished the front camming surface and lobe of the lever with a Cratex bit and
used a 600-grit stone to polish the top sides of the lever.
The lobe presses against the head of the cartridge resting on the carrier
so it is positioned in front of the loading gate.
This allows another cartridge to be loaded into the magazine tube.
Again, it looked like Rossi/CBC had already done a good job of polishing
here.
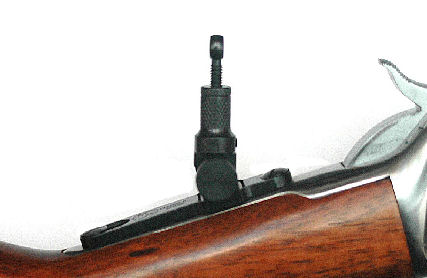
Replacing the Friction Stud Spring

The
friction stud is the small plunger in the lever that keeps the lever closed
(refer to Figure 16 above). The
friction stud spring that came with this rifle was cut too short, so it wasn’t
applying any pressure on the stud.
Either that, or it had lost its temper and didn’t return to its original length.
I replaced it with a 0.520” length of 0.177” diameter 0.022” wire size
spring from Brownells #69 spring kit
#025-069-000WB.
While I had the friction stud out of the lever, I use my rotary tool and a
Cratex bit to polish the end that rides against the lower tang.
The lever now stays locked in place but requires little pressure to open
it.
Slugging the Bore
I really like the Winchester 1892 action, but I continue to be disappointed with
this rifle. I have seen and read
how out of specification these rifles were, but I had to find out for myself.
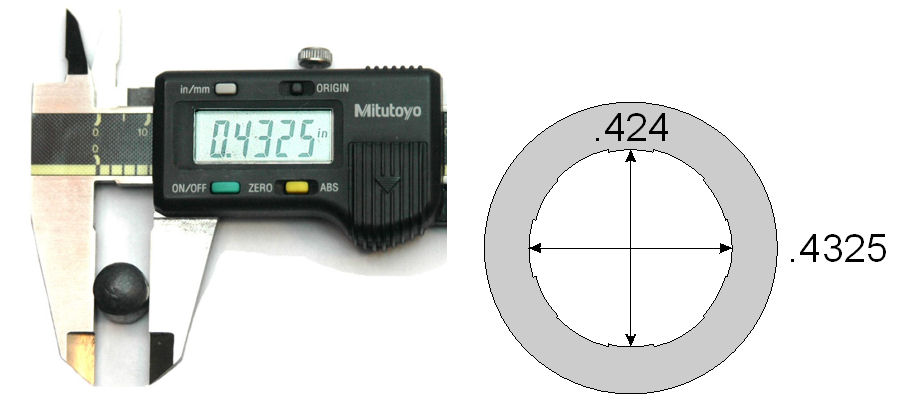
I
oiled the bore and drove a pure lead slug from muzzle to chamber.
The lands measured 0.424” and the grooves measured 0.4325”.
The
SAAMI specification for .44 Remington Magnum rifle is a groove diameter of
0.431”. If I were to shoot a
0.429”-0.430” lead bullet down this 0.4325” bore I would get blow-by, leading,
inaccuracy and velocity loss. It
looks like this rifle will only shoot 0.433” or 0.434” cast lead bullets
accurately. More about this later
in this article.
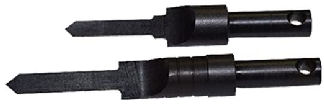
Lapping the Muzzle
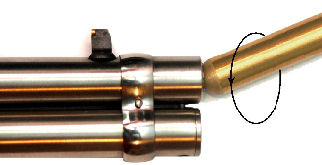
This is something I do to all my guns when I first get them whether they are new
or used. I installed the .44-.50
brass muzzle lap from the Muzzle Lap Set I purchased from Brownells
#080-764-000WB in my drill and applied some 400-grit lapping compound to the
end. I touched the end to the
muzzle and with the drill running at about 500 rpm rotated the drill as shown in
the photo. I replenished the
compound to ensure the lap was cutting.
After about 5-minutes, I cleaned the compound from the muzzle and bore.
The lands and grooves are now nice and sharp at the muzzle which will
help with accuracy.
Working-In the Action
When I reassembled the rifle, I lubricated the sides and top of the lever, sides
of the bolt, bolt locks, bolt lock channels, and bottom of the bolt where the
hammer rides with a very light coat of SFL-0 grease.
I lubricated all the pivot pins with FG68 oil.
I
pretty much drove my wife crazy by continuously cycling the action to break it
in. With the hammer down and the
safety off, I would cycle the action, then carefully lower the hammer and do it
again. To work in the hammer and
sear I put a thick piece of leather in front of the firing pin so the hammer
wouldn’t damage the safety or firing pin.
I cocked the hammer by hand and pulled the trigger.
Cycling Problems
In the process of cycling dummy rounds I had a few double-feeds.
The cartridge stop was not stopping the next round in the magazine tube
from feeding onto the carrier. With
a cartridge already on the carrier, the second cartridge would jam the rifle.
To clear the jam, I had to push the second round back into the magazine
tube with a small screwdriver so the cartridge stop would hold it in place.
I
disassembled the rifle and found that the cartridge stop was binding in the
cartridge guide. I removed the
cartridge guide from the rifle, then removed the cartridge stop pin.
I used a narrow 320-grit stone to polish the channel inside of the
cartridge guide where the cartridge stop rides, and both sides of the cartridge
stop at the pin hole. In the above
photo you can see the bright area on the cartridge stop where I polished.
The cartridge stop now rotates smoothly in the cartridge guide.

I
wanted the cartridge stop to engage more of the case head, so I carefully filed
the tip of the left cartridge guide.
I only removed a few thousandths.
The cartridge stop now covers almost half of the cartridge head ensuring
the next cartridge will not feed onto the carrier thereby jamming the action.
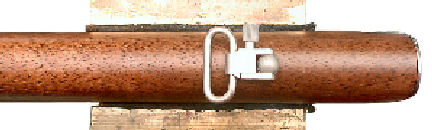
Installing Sling Swivel Studs
Although not 19th century accurate, I wanted to install sling swivels
on this rifle. There are a few ways
to install the front sling swivel stud:
1.
Clamp a stud to the magazine tube.
2.
Install a wood-screw stud in the front hand guard.
3.
Install a machine-screw stud on the rear barrel band.
I decided to go with this option.
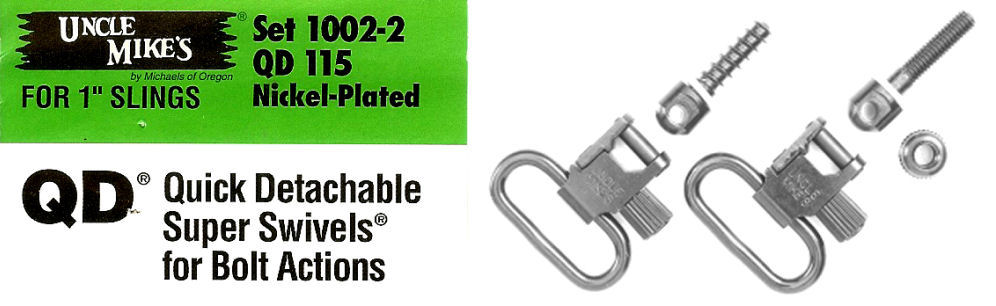
I
found a set of Uncle Mike’s #1002-2 QD 115 nickel-plated 1-inch sling swivels
and studs designed for bolt-action rifles on eBay for a reasonable price.
The wood-screw stud is designed to be
installed in the buttstock, and the machine-screw stud and nut in the fore end
of the stock.
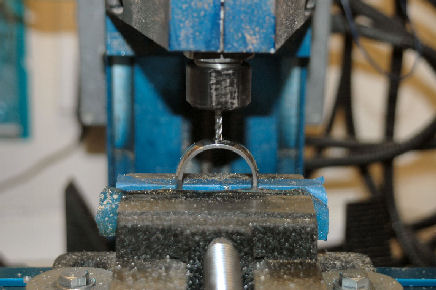
I
removed the barrel bands and carefully marked the center bottom of the rear
barrel band. I milled a 0.159”
hole, then tapped the hole with a 10-32 tap.
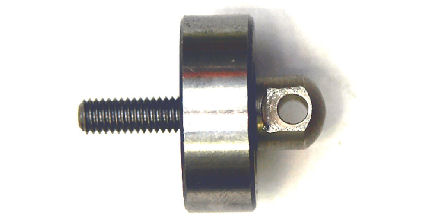
The
machine screw stud was not threaded all the way up to the base of the stud, so I
took a 10-32 die and ran it backwards over the threads to cut threads up against
the stud. I trimmed the shaft with
a Dremel cutoff wheel and installed the stud onto the barrel band with the white
spacer. The spacer ensured I
installed the stud perpendicular to the barrel.
I used a fine sanding drum on my Dremel tool to grind the end of the
shaft flush with the inside of the barrel band.
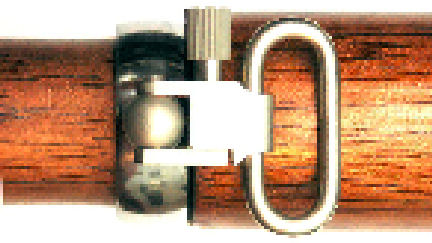
I
removed the stud from the barrel band, cleaned the threads of the stud and
barrel band with acetone, applied some JB Weld epoxy to the threads, then
reinstalled the stud. I allowed the
epoxy to cure for 24 hours, then reinstalled the barrel bands.
For
the rear sling stud, I placed some painter’s tape on the bottom edge of the butt
stock so the center of the tape was 2 1/2-inches above the toe of the butt
stock. The tape helped to prevent
the wood from splintering. I used a
center-punch to mark where to drill in the stock and used the smaller stud base
drill bit to drill into the stock.
I
installed the white spacer, applied some soap to the threads and screwed the
stud into the stock. My rifle now
has quick-detachable sling swivels and studs so I can install a 1-inch sling.
(I later decided to use 1 1/2-inch sling swivels I purchased from
Amazon.com and webbing so I didn’t use the 1-inch swivels.)
Replacing the Front Sight
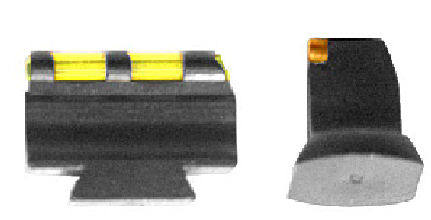
I
replaced the brass-bead front sight with a green fiber-optic front sight.
The original front sight measured 0.436: from the base of the dovetail to
the top of the sight. The depth of
the dovetail measured 0.050”, whereas a normal dovetail measures 0.100”.
The new sight measured 0.448” in height which is ok because I can adjust
the rear sight higher to compensate.
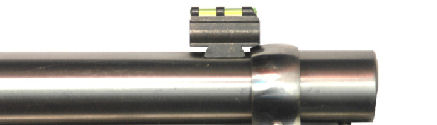
I
had to file the front bottom corner of the sight so it would not contact the
front barrel band. I installed the
sight in the dovetail from right to left.
The sight fit perfectly with no fitting to the dovetail required.
Because the dovetail on the sight was 0.100” high there was a 0.050” gap
below the sight. This is not a
problem for me so long as the sight is tight in the dovetail.
Installing a Marbles Tang Peep Sight
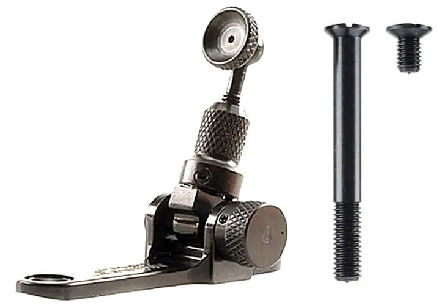
Most of my lever-action rifles have Marbles tang peep sights installed.
I prefer this type of sight because it is both windage and elevation
adjustable, and it’s easier for my older eyes.
I ordered the sight
#140573
and screw set
#239307
from MidwayUSA.com. The screw set
comes with a longer tang screw for the stock, and a second screw for the front
of the sight mount.
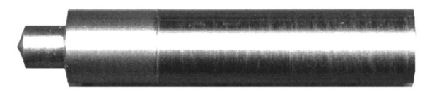
First, I had to make a center punch that would fit tightly in the front hole so
I could mark the tang. I turned the
front of a piece of round steel stock to a diameter of 0.246”, then turned a
point on the end.
I
installed the sight with the longer tang screw and carefully marked the center
of the front hole with the punch I created.
I disassembled the rifle and chucked the upper tang in my milling vise.
I used a center drill to start the hole in the tang, then used a #21
drill bit to finish the hole. I
tapped the hole with a 10-32 tap, then thoroughly cleaned the hole.
I
used Loctite blue on the front screw and installed the sight to the tang.
To get the sight adjusted I had to move it all the way to the right.
It appeared that the rear tang was lower on the left side.
To compensate for this, I added a 0.020” shim to the left side of the
sight base. This allowed me to
adjust the sight almost in the middle.
The width of the front sight is narrower than the dovetail slot so I
drifted the front sight almost to the left edge of the slot.
For
target shooting and sighting-in, I use the target aperture.
For field or quick target work I remove the aperture and use it as a
ghost-ring sight. This setup works
perfectly for my eyes.
Removing the Rear Sight
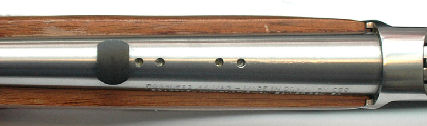
I
removed the rear sight by drifting it from left to right.
To my surprise, when I removed the sight, I found four scope base
mounting holes. I tried to plug the
holes with 6-48 plug screws from the
Pachmyer screw set
I purchased from Amazon, but the holes were too shallow.
I didn’t want the plug screws above the barrel to catch on my hands or
clothing, so I left the holes empty.
I installed a Williams dovetail slot blank I purchased from MidwayUSA.com
#383424
which you can see in the above photo.
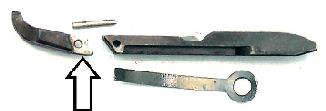
Searching for the Right Bullet Mold
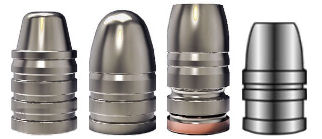
I
have several .44 bullet molds in my collection but none of them would be
accurate in this rifle with the oversized bore.
In the above figure, from left to right:
1.
Lee
429-255-SWC – This is a 255-grain semi-wadcutter (SWC) .429” bullet which is no
longer being produced by Lee. I
probably purchased this sometime in 1977 or 1978.
2.
Lee
429-240-2R – This is a 240-grain round nose (RN) .429” bullet.
I’m not sure why I purchased this or what I would use it for.
3.
Lee
C430-310-RF -This is a 310-grain wide flat nose (WFN) gas check .430” bullet.
4.
Lyman 429421 – This is a 240-grain semi-wadcutter .429” Keith-style bullet.
Lyman says this drops a .431 bullet; still too small for this barrel.
The
semi-wadcutter bullets have a sharp edge on the first driving band which could
cause feeding problems in this rifle, so I discounted those.
The round nose bullet would feed perfectly, but probably wouldn’t have
the best performance. The 310-grain
wide flat nose bullet would probably be the best choice, and I already know they
feed reliably in this rifle, but I see two problems with this bullet.
It is too narrow for this barrel, and even if I lapped the mold to expand
it, the gas check probably wouldn’t be wide enough to seal the bore.
I
thought seriously about modifying one of the cavities of the 310-grain WFN mold
by milling out the gas-check to the same diameter as the driving bands, then
lapping the cavity to increase the diameter.
Or I could mill away the gas-check and “Beagle” the mold.
Beagling the mold involves placing aluminum tape between the mold
cavities so the mold is wider thereby increasing the diameter.
Unfortunately, this causes the bullet to be out of round so I chose not
to do this. You can look up both
methods on YouTube.
For
a brief moment I also considered paper-patching my undersized bullets, but
because these will be loaded in a tubular magazine, and require a heavy crimp,
loosely crimped bullets would probably move back into the case, and heavily
crimped bullets would ruin or strip off the paper patch.
I
also thought about making my own bullet mold, but by the time I purchased all
the supplies I needed, I probably could purchase a ready-made mold for the same
price and avoid the labor. The
method for making a bullet mold can be found on YouTube:
https://www.youtube.com/watch?v=gCh2TkMDcEo
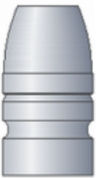
Searching the Internet, I found
NOE
Bullet Molds
located in Provo, UT. They produce
a .434” 298-grain flat nose 2-cavity bullet mold that would work perfectly for
this rifle.
NOE
434-298-FN-AV2 The front shoulder of
the first driving band is not sharp so it should feed reliably, and it is a
plain-base bullet, so I don’t have to worry about a gas-check being too small.
I can size this bullet down to .430” for my S&W 629 snubby, or leave it
as is for this rifle.
Oversize Gas-Checks
I
wanted to add a gas-check to these bullets so I can shoot them at higher
velocities and not worry about leading.
Regular store-bought .44 gas-checks would be too small for this
plain-base bullet, so I decided to make my own gas checks that would fit.
I found a video on YouTube by Dima Prok how to make your own gas check
forming dies:
https://www.youtube.com/watch?v=Rj4QUvSG7Ho&t=553s
He
refers to a set of plans that I downloaded from
CastBoolits.Gunloads.com.
Following the plans, I purchased some 7/8”-14 threaded rod and 1” 1045 steel bar
off eBay and turned the parts on my lathe.
The materials cost me $30.00, whereas a prefabricated die would cost me
$130+.
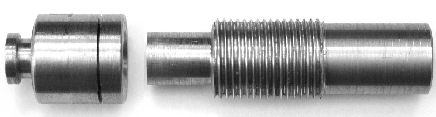
Purchasing a Lube/Sizer Die
Now
that I have a .434” bullet mold, I needed a lube and sizing die to go with it.
I purchased a 0.434” Lyman lube/sizing die on eBay which Lyman no longer
makes. I now have a bullet mold and
lube/sizer die that matches this rifle.
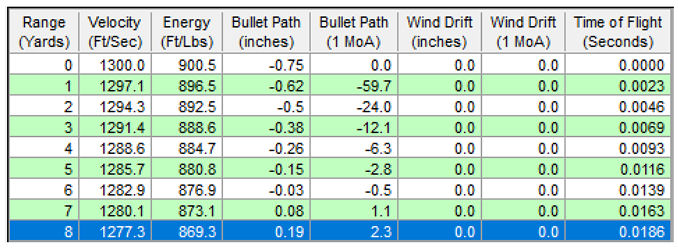
Laser Bore-Sighting
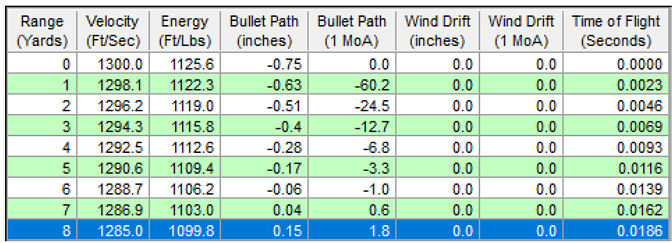
I
calculated the bullet path for a velocity of 1,300 FPS sighted-in at 100-yards.
At 8-yards (24-feet) the bullet is 0.150-inches above the line of sight.
I installed my laser bore sight in the muzzle if the rifle using the
appropriate adapter (I hate the in-chamber bore sights!) and adjusted the rear
sight until the laser dot was just slightly above the front sight.
The laser dot represents the bullet.
I can easily find 24-feet in my house so I don’t have to go outside.
Using the same velocity for Remington SMJHP bullets, the change in bullet path
isn’t that different. This load
functions perfectly in my Desert Eagle .44 Magnum, and I would like to use it in
my S&W 629 Trail Boss and this rifle as well.
Summary
Rossi/CBC rifles were originally imported by Interarms of Alexandria, Virginia
until 1997 when Rossi/CBC formed BrazTech to import their rifles into the United
States. In 2015 Companhia
Brasileira de Cartuchos (CBC) Purchased Rossi/CBC/Taurus and their 92 rifles
have been marked with CBC. It seems
to me that the quality of CBC rifles has gotten worse!
When I first tried to cycle this rifle out of the box it was very stiff
and would not load rounds through the loading gate.
Now, with the hammer down against the bolt I can cycle the action with my
little finger, and rounds feed and eject reliably.
These Rossi/CBC “project” guns can be made to function smoothly and
reliably with a little work and some tools.
Changing or modifying the springs has the largest impact on improving
these rifles.
Steve Young has an excellent video on how to improve the function and
reliability of the Rossi/CBC 92.
Click on the link
here to go to Steve’s web site
www.stevesgunz.com or you can send your rifle to him and he will do the work
for you. Steve has an excellent
reputation with the Cowboy Action crowd.
This rifle makes a great companion to my S&W 629 Trail Boss, but only if I shoot
copper-jacketed bullets. So now I
can use the same cartridge and load for both.
Addendum 2022
Although I really like the ’92 action, I was so bothered by the out of spec
barrel I purchased a Marlin 1894 .44 magnum rifle.
Although this rifle was a “Remlin” it did not have any of the problems of
earlier Remington-built Marlin rifles.
(Refer to my article
Slicking up a Marlin 1894.)
Because this rifle has a barrel with the correct specification I’ll use
this with my .44 Magnum revolver.
|
