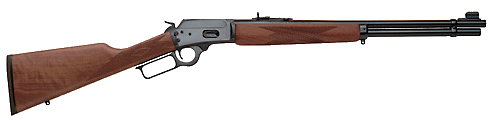
Slicking Up a Marlin 1894 .44 Magnum or I bought a "Remlin!"
by Roy
Seifert
Click here to purchase a zip file with this and
all Kitchen Table Gunsmith Articles.
Disclaimer: This
article is for entertainment only and is not to be used in lieu of a
qualified gunsmith. Please
defer all firearms work to a qualified gunsmith.
Any loads mentioned in this article are my loads for my
guns and have been carefully worked up using established guidelines and
special tools. The
author assumes no responsibility or liability for use of these loads,
or use or misuse of this article.
Please note that I am not a
professional gunsmith, just a shooting enthusiast and hobbyist, as well
as a tinkerer. This
article explains work that I performed to my guns without the
assistance of a qualified gunsmith.
Some procedures described in this
article require special tools and cannot/should not be performed
without them.
Warning: Disassembling
and tinkering with your firearm may void the warranty.
I claim no responsibility for use
or misuse of this article. Again,
this article is for entertainment purposes only!
Tools
and firearms are the trademark/service mark or registered trademark of
their respective manufacturers. Click on any
blue text to go to a
product/seller web site.
Introduction
I have several Marlin lever-action rifles in my collection:
-
1895CB .45-70 built in
2006
-
1894CB .45 Colt built in
2000
-
39A .22 S/L/LR built in
1947
-
336 .30-30 WCF built in
1976
I
wanted to add an 1894 .44 Remington Magnum to the list, but I was concerned
about quality. In 2008 Remington
Arms Company, Inc. acquired Marlin.
The story goes that the tooling was worn out, and since the Marlin staff was let
go, the technical knowledge was not passed on to Remington.
For about 4 years Marlin lever-action rifles built by Remington had many
quality problems. Poor fit and
finish, misaligned barrels, cycling problems, etc.
After their teething problems, the quality of Remington-built Marlin
rifles greatly improved. This rifle
I purchased is brand new, and I’m pleased to report it doesn’t have any of the
problems the early Remington-manufactured Marlins had.
In fact, I think it’s better than some of my other JM Marlin lever-action
rifles! As of the date of this
article Remington has filed for bankruptcy, is restructuring as RemArms, and has
sold manufacturing of Marlin rifles to Ruger.
Initial Inspection
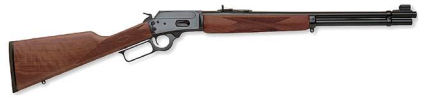
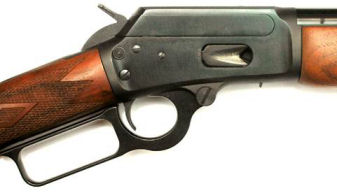
Despite the horror stories, I purchased a Marlin 1894 .44 Magnum rifle.
It came with a California-mandated lock, and to my surprise, an offset
hammer spur for use with a scope! I
was very pleased with the overall fit, finish, and quality of this rifle.
The action was stiff, which was to be expected with a new rifle, but it
loaded and cycled dummy rounds perfectly.
The loading gate opening was smoothed and did not bite my thumb nor
scratch brass when loading cartridges.
The bluing was beautiful and matched my other Marlin lever-action rifles.
The trigger pull was crisp with just a hint of creep and broke at a
little over 4 pounds.
Based
on my research, this rifle may have been manufactured in June of 2019.
There are two letters stamped on the left side of the barrel in front of
the receiver: PN.
A post on the Marlin Firearms Collectors Association forum
http://www.marlin-collectors.com/forum/viewtopic.php?t=25792 indicated the
following:
1st
letter = Month: B-Jan L-Feb A-Mar C-Apr
K-May P-Jun O-Jul W-Aug D-Sep E-Oct R-Nov X-Dec
2nd
letter = Year: E-2010 F-2011 G-2012
H-2013 I-2014 J-2015 K-2016
I
extrapolated that the letter N would be 2019.
Would a distributer keep a rifle in stock for over a year and a half?
Possibly, I really don’t know.
What’s important to me is that this rifle was built 10-years after the
Remington problems.
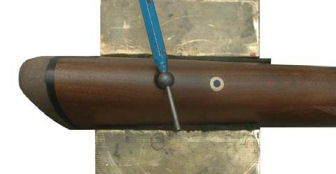
I did
find one minor fitment problem; the sling swivel stud on the butt stock was not
parallel to the rifle; it was crooked!
This is no big deal for me, I can turn it being careful not to split the
stock, but it’s this small attention to details that continue to plague
Remington. The stud was very loose
in the butt stock, so I added two white washers that come with sling swivel
studs to tighten it up. I didn’t
want to add epoxy to the threads in case I have to remove the stud someday.
Notice in the above photo that the stock was finished with the Marlin
bullseye in place which discolored the white.
Details, details, details!
Cycling the Action
As mentioned before, the action was a little stiff.
I sat in front of the TV watching movies and cycled the action a couple
hundred times driving my poor, patient wife crazy.
I could already feel the action getting smoother as the parts got
burnished and mated together. This
also put wear-marks on the bluing so I could tell where to polish or add
lubricant. I plan to polish the
internals and tweak the springs as I have done to my other Marlin lever-action
rifles (refer to my articles
Tuning the Marlin 1894 for Cowboy Action Shooting and
Building a Backpacker
“Scout” Rifle.)
I
noticed that when I pulled the trigger and let the hammer down slowly with my
thumb, the hammer rubbed against the trigger about 1/4-inch before striking the
firing pin. When I reduced the
full-cock notch on the hammer this problem went away.
When I closed the bolt there was a hesitation when it rode over the
hammer. Either the hammer or the cam
on the bottom of the bolt will need polishing and maybe recontouring.
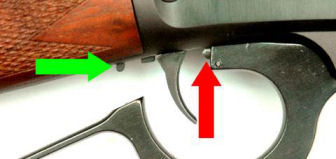
Working on the Trigger Safety Block Spring
NOTE: This process
must be performed first before adjusting the finger lever plunger spring.
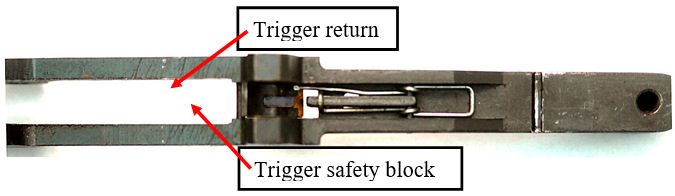
I
removed the trigger guard plate from the bottom of the receiver.
I was pleased to find that all the screws on this rifle were installed
with Loctite blue. The trigger
safety block spring performs two functions; it activates the trigger safety
block (bottom leg in the above photo) and is the trigger return spring (top leg
in the above photo). This spring is
very stiff by design but can be lightened.
I used a dental pick and a small screwdriver to carefully bend up each
leg so there wasn’t so much tension on the trigger or trigger safety block.
Both still functioned as designed, but the trigger pull was lighter.
This was a trial-and-error process; each leg of the spring must still
provide tension.
Polishing the Internals
To my surprise, I had to do very little polishing to improve the action.
I was very pleased and impressed by the amount of polishing already
performed on this rifle.

The
finger lever plunger keeps the lever in place when the action is closed and
prevents the lever from opening when loading cartridges.
The two angled surfaces were somewhat polished but still had some tooling
marks. This was much better than
other Marlins I own. I removed the
pin that holds the plunger in the lever.
Note how this pin comes out; it must be reinstalled exactly as it came
out. One side of the plunger is flat
for the retaining pin that prevents it from coming out during operation.
I polished the two angled surfaces with 400-grit wet/dry sandpaper placed
on a flat surface until the tooling marks were completely removed.
I used a 400-grit polishing stick to gently round the sharp edge at the
tip of the plunger. I oiled the
plunger and reinstalled it in the lever with a new spring (see below).
The
trigger safety block prevents the trigger from being pulled when the lever is
open and the bolt is out of battery.
When the lever is closed and the bolt is in battery, the trigger safety block is
depressed so the trigger can be pulled.
The finger lever plunger keeps the lever closed which keeps the trigger
safety block depressed, but its spring must be strong enough to overcome the
pressure of the trigger safety block spring.
If the finger lever plunger spring is not strong enough, the lever won’t
stay closed. Now that I have reduced
the tension on the trigger safety block spring, I can install a lighter finger
lever plunger spring.
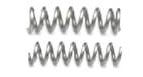
I
didn’t want to modify the factory spring (top), so I cut a length of 0.148-inch
outside diameter spring from Brownells compression spring pack #71
025-071-000 to the same length as the factory spring.
I then cut 1/2-coil at a time and installed it in the finger lever and
tested it until I got what I wanted.
The lever is now easier to open and close and stays closed when loading
cartridges.
The
spring on the ejector was already set from the factory so the ejector would not
put so much pressure on the bolt. I
used a Cratex bit to polish the tip that rides in a notch in the bolt.
The ejector notch in the bolt was already polished smooth so most of the
tool marks were gone.

After
cycling the action many times, I noticed two parallel wear marks on the face of
the hammer. These are two raised
areas on the hammer which reduce friction between the hammer and bolt when the
action is opened.
To
eliminate the hesitation from the bolt cam riding over the hammer when I closed
the action, I first removed the rear half of the firing pin from the bolt by
removing the rear roll pin. I used a
narrow 400-grit polishing stone to polish a bevel in the sharp edge in front of
the cam. I also polished the cam
with a Cratex bit. Now, when I close
the bolt, it slides smoothly over the hammer with almost no hesitation.
I reassembled the bolt and lubricated the top, bottom, hammer cam and
ejector groove with SFL-0 grease. I
didn’t perform any other polishing to the bolt because it already slid smoothly
in the receiver.
Working on the Sear
Caution, this work should not be performed without the proper tools to prevent
rounding the sear which could cause the rifle to become unsafe.
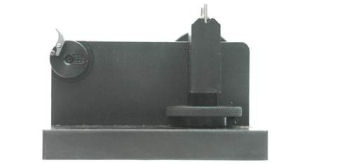
I
installed the Marlin 336 Adapter I purchased from MidwayUSA.com
#917687 on the Power Custom Series I Stoning Fixture I also purchased from
MidwayUSA.com
#743549. I adjusted the guide so
my 900-grit polishing stone was polishing the sear surface flat.
I polished the sear until it was mirror smooth, then applied Brownells
Action Lube Plus
#083-050-002 to the sear surface.
Action Lube Plus is my preferred lubricant for hammer and sear surfaces.
This
tool has been one of my better investments.
When I perform an action job on one of my guns, I purchase the
appropriate adaptor for the fixture.
This fixture has paid for itself repeatedly and has allowed me to remove creep
and smooth the action on many of my guns.
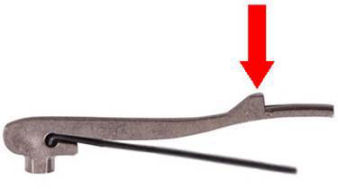
Working on the Hammer
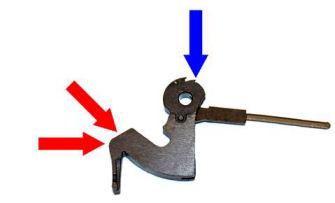
The
hammer required a little bit of work to make it smoother, and to make the
trigger pull crisper. I used a
Cratex bit and my Dremel tool to polish the face and top curve of the hammer as
indicated by the red arrows in the photo above.
The full-cock notch (blue arrow) measured 0.030” which made the trigger
pull long with some creep. Using a
220-grit polishing stick, I reduced the depth of this notch to 0.018” which made
the trigger pull nice and crisp with no creep, but still safe.
I was careful not to reduce the depth of the notch too much, otherwise
the sear could contact the half-cock notch and break it when the hammer was
released. I applied Brownells Action
Lube Plus to the sear notch, FG-68 oil to the pivot pin hole and hammer strut
pivot, and Brownells Oxpho-Blue to the exposed metal.
After working on the sear and hammer, the trigger pull was crisp with no
drag and measured 3-pounds. This
also eliminated the problem of the hammer touching the trigger.
Lapping the Muzzle
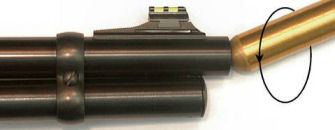
When I
acquire a new or used gun, I always lap the muzzle.
This removes any imperfections in the crown and makes the rifling at the
muzzle nice and sharp which enhances accuracy.
I installed the .44-.50 brass muzzle lap from the Muzzle Lap Set I
purchased from Brownells
080-764-000WB in my drill and applied some 400-grit lapping compound to the
end. I touched the end to the muzzle
and with the drill running at about 500 rpm rotated the drill as shown in the
photo. I replenished the compound to
ensure the lap was cutting. After
about 3-minutes, I cleaned the compound from the muzzle and bore, and applied
Brownells Oxpho-Blue liquid
082-024-004WB to the exposed metal.
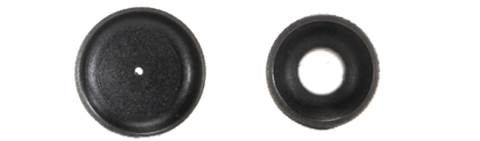
Replacing the Magazine Tube Follower
This rifle came with a hard plastic red magazine tube follower.
I’m sure it was made red so someone looking in the action could see that
the magazine tube was empty of cartridges.
I decided to replace the plastic follower with a brass one.
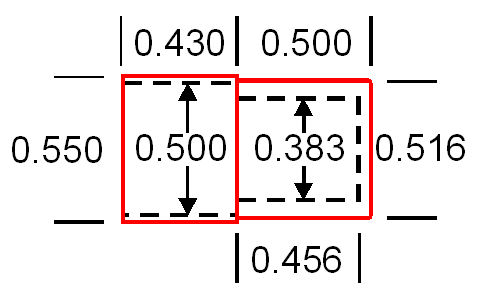
I
carefully measured the original follower and came up with the dimensions shown
in the above figure. I turned a
piece of 5/8” brass rod to the outside dimensions shown, then rounded off the
front edge with a file. I parted the
follower from the rod stock then turned it around in the lathe.
I used a 3/8” square end mill to hollow out the follower to a depth of
0.880”, then used a 7/16” square end mill to hollow out the rear to a depth of
0.430”.

I
removed the magazine tube plug screw and magazine tube plug being careful not to
let the magazine spring fly out and removed the barrel band screw.
I removed the factory plastic follower and replaced it with the new brass
follower. I cut 14 coils off the
magazine spring and reassembled the magazine tube.
The new follower works perfectly, and all ten .44 magnum cartridges feed
smoothly, even with heavy 310-grain bullets.
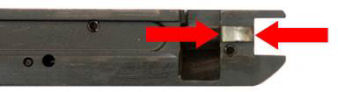
Replacing the Finger Lever Screw
There have been times when I had to disassemble a Marlin lever-action rifle in
the field but didn’t have any screwdrivers.
Because I shoot light loads in my Marlin 1894CB .45 Colt, the chamber
doesn’t seal completely so soot got down into the magazine tube and bound up the
follower during a cowboy match. I
had to disassemble the rifle and clean the magazine tube during the match.
I now carry a set of screwdrivers in my range bag, and after a range
session, I clean the magazine tube of any lever-action rifle I used.
The
magazine tube is often overlooked by shooters and never cleaned.
Powder residue attracts moisture which can cause the magazine tube to
rust. I purchased my .45-70 Marlin
1895CB and Winchester 1897 shotgun used, and both had rust in the magazine
tubes. Fortunately, I was able to
eliminate the rust and save both.
There
is a seller on eBay that sells a finger lever takedown screw that replaces the
factory screw. Instead of a flush
screw head that requires a screwdriver to remove, the head is wide and nicely
knurled so it can be removed by hand.
I removed the factory screw, oiled the shaft of the takedown screw, and
installed it finger tight. The part
fit perfectly and made disassembly for cleaning quick and easy.
I think I’m going to purchase one for all my Marlin lever-action rifles.
Adding
a Rear Peep Sight and Green Fiber Optic Front Sight
I never did like the semi-buckhorn sights that come on lever-action rifles.
I much prefer a peep sight, and so do my old eyes.
All my lever-action rifles except my 336 have
Marbles tang
peep sights installed. My 336
has a
Williams Ace in the Hole peep sight which comes with a Picatinny rail.
I decided to install a Williams Fool Proof receiver sight which has
micrometer click adjustments. I
don’t plan to use this rifle for cowboy shooting so it doesn’t matter what peep
sight I use.
I use
a peep sight as a ghost-ring sight because I seem to be able to pick up a sight
picture quicker with this arrangement.
I remove the aperture and use the large opening.
For fine or target shooting I replace the aperture.
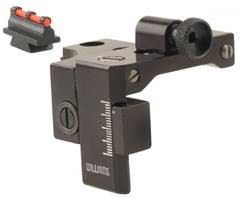
I
purchased a
Williams FP 336 peep sight that came with two different styles of red fiber
optic front sights. This peep sight
is designed to be installed in the two rear scope mount holes in the receiver.
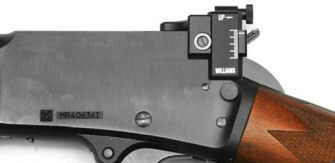
However, with the sight mounted in this location the aperture sits on top of the
hammer requiring installation of the offset hammer spur.
I really didn’t like the looks of this installation, so I decided to move
the sight forward on the receiver.
This meant I had to drill and tap an 8-40 hole in the receiver to accept a screw
in the forward mounting hole of the sight.
I
completely disassembled the receiver and removed the magazine tube and fore end.
I reinstalled the trigger guard plate so I wouldn’t crush the receiver in
my vise. I used two blocks of wood
to mount the receiver in my milling vise and leveled the top of the receiver.
I put painter’s tape on the wood so it wouldn’t mar the finish on the
rifle. I used wood blocks because
the receiver is not flat; there are two flares at either end for the stocks.
I centered the quill on the front hole of the two rear scope mount holes,
then moved the milling table 0.500-inch as measured with a dial indicator.
I used
a 1/8-inch square end milling bit to plunge-drill the hole, then finished with a
#29 drill bit. I tapped the hole
with an 8-40 tap, then removed all the swarf from the receiver.
To my surprise, there were no burrs on the inside of the receiver.
I completely reassembled the rifle and
put Loctite 242 (blue) on all the screws just like they did at the factory.
(Refer to my article
Using Loctite® Products.)
I
cleaned both mounting holes with acetone, then installed the sight and screws
with blue Loctite. I left the 8-40
plug screw in the rear scope mount hole.
Notice in the above photo the aperture does not interfere with the hammer
spur, and to me the installation looks cleaner and is more functional.
I realize mounting the sight in this position reduced the sight radius by
1/2-inch, but it is still longer than the barrel-mounted rear sight.
I have seen other people move the sight to the front two scope-mount
holes, but that would reduce the sight radius even more, but I like my solution
better.
Many
years ago, I purchased a Lyman #2 peep sight that I never used.
That sight came with three apertures: standard,
hunting and target. I no longer have
the sight, but I still had the target and hunting apertures.
These apertures have the same thread diameter and pitch as the Williams
FP sight. The hunting aperture is
short, so the knurling just touches the frame of the sight.
This is not a problem, but I probably won’t use this aperture.
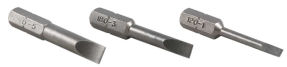
I
purchased three bits from Brownells to fit the screws in the sight.
240-5 for the windage and elevation adjustment screws,
180-3 for the locking cam screw on the left side, and
120-1 for the small set screws.
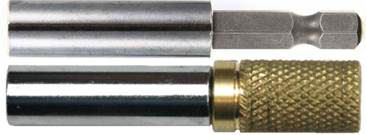
I
needed something to use as a small screwdriver with the bits.
I took a 1/2” piece of brass round stock and drilled a hole in the center
with a #G drill bit. I pressed the
brass onto the hex portion of a hex bit extension.
I knurled the brass to make it easier to hold.
The screws in the sight don’t require much torque; they just need to be
finger tight. I carry the bits,
screwdriver, and apertures in a pouch attached to the sling (see below).
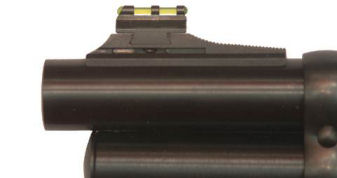
The
Williams sight came with two red fiberoptic front sights:
one for the Marlin 1894 and 336, and a longer one for the model 1895.
I never liked red because I seem to lose it in the background; I prefer
green. Many years ago, I purchased
both red and green 1/16” fiber optic rods from
OakridgeStores.com. I have yet
to use the red, but I use the green all the time.
I cut the red rod on the sight in half and removed the pieces from the
sight. I cut a piece of green rod
and inserted it into the front sight.
With 1/16-inch exposed from the rear I used a flame to melt the rod into
a ball being careful not to set the plastic rod on fire.
I clipped the other end so 1/16-inch was exposed and melted that end so
the rod was tight in the sight.
I
mounted the rifle in my padded vise and drifted the factory front sight out of
the dovetail from left to right. The
new sight was tight in the dovetail so I used a 65-degree dovetail file I
purchased from Brownells
#080-648-165WB to reduce the dovetail in the sight (not the sight base on
the rifle) until I could install the sight halfway into the dovetail by hand.
I installed the new sight from right to left and drifted it into the
dovetail until it was centered.
Making
a Sling Pouch
I
wanted to keep all my sight tools in one place, so I used some scrap chap suede
and made a small pouch that slides onto the sling.
The pouch is 2 1/2” x 2 1/2” and holds the spare apertures, mini
screwdriver, and bits. Now if I need
to adjust the Williams FP sight in the field, I have the tools handy.
Slugging the Bore
I thoroughly oiled the barrel and drove a pure lead slug through the barrel.
The barrel slugged at 0.431”.
.44 Magnum rifle barrels tend to be a bit larger than revolver barrels.
To shoot lead bullets accurately in this rifle they should be sized to
0.432”. SAAMI specifications show
.44 Magnum revolver barrels should be 0.429” and rifle barrels should be 0.431”.
This rifle will shoot jacketed bullets with no problems, but undersized
lead bullets can cause excessive leading and inaccuracy.
Searching for the Right Bullet Mold
I have
several .44 bullet molds in my collection but none of them would be accurate in
this rifle. In the above figure, from
left to right:
1.
Lee
429-255-SWC – This is a 255-grain semi-wadcutter (SWC) .429” bullet which is no
longer being produced by Lee. I
probably purchased this sometime in 1977 or 1978.
2.
Lee
429-240-2R – This is a 240-grain round nose (RN) .429” bullet.
I’m not sure why I purchased this or what I would use it for.
3.
Lee
C430-310-RF -This is a 310-grain wide flat nose (WFN) gas check .430” bullet.
4.
Lyman
429421 – This is a 240-grain semi-wadcutter .429” Keith-style bullet.
The
semi-wadcutter bullets have a sharp edge on the first driving band which could
cause feeding problems in this rifle, so I discounted those.
The round nose bullet would feed perfectly, but probably wouldn’t have
the best performance. The 310-grain
wide flat nose bullet would probably be the best choice, and I already know they
feed reliably in this rifle, but I see two problems with this bullet.
It is too narrow for this barrel, and even if I lapped the mold to expand
it, the gas check probably wouldn’t be wide enough to seal the bore.
I
thought seriously about modifying one of the cavities of the 310-grain WFN mold
by milling out the gas-check to the same diameter as the driving bands, then
lapping the cavity to increase the diameter.
Or I could mill away the gas-check and “Beagle” the mold.
Beagling the mold involves placing aluminum tape between the mold
cavities so the mold is wider thereby increasing the diameter.
Unfortunately, this causes the bullet to be out of round so I chose not
to do this. You can look up both
methods on YouTube.
For a
brief moment I also considered paper-patching my undersized bullets, but because
these would be loaded in a tubular magazine, and require a heavy crimp, loosely
crimped bullets would probably move back into the case, and heavily crimped
bullets would ruin or strip off the paper patch.
I also
thought about making my own bullet mold, but by the time I purchased all the
supplies I needed, I probably could purchase a ready-made mold for the same
price and avoid the labor. The
method for making a bullet mold can be found on YouTube:
https://www.youtube.com/watch?v=gCh2TkMDcEo
Searching the Internet, I found
NOE Bullet Molds located in Provo, UT. They
produce a .434” 298-grain flat nose 2-cavity bullet mold that would work
perfectly for this rifle. The front
shoulder of the first driving band is not sharp so it should feed reliably, and
it is a plain-base bullet, so I don’t have to worry about a gas-check being too
small. I can size this bullet down
to 0.430” for my S&W 629 Trail Boss, or size it down to 0.432” for this rifle.
Oversize Gas-Checks
I wanted to add a gas-check to these bullets so I could shoot them at higher
velocities and not worry about leading.
Regular store-bought .44 gas-checks would be too small for this
plain-base bullet, so I decided to make my own 0.434” gas checks that would fit.
I found a video on YouTube by Dima Prok how to make your own gas check
forming dies:
https://www.youtube.com/watch?v=Rj4QUvSG7Ho&t=553s
He
refers to a set of plans that I downloaded from
CastBoolits.Gunloads.com.
Following the plans, I purchased some 7/8”-14 threaded rod and 1” 1045 steel bar
off eBay. The materials cost me
$30.00, whereas a prefabricated die would cost me $130+.
Inside the forming die is a post that I turned to 0.434” diameter.
I place a piece of aluminum or copper sheet in the slit in the forming
die, raise the ram of my single stage die so the cutter can cut a disc.
As I continue to raise the ram the disc is pressed against the post
forming the gas-check. A narrow
constriction inside the cutter strips the gas-check off the pin and prevents it
from falling back into the forming die.
Reaming a Lube/Sizer Die
Now that I have a .434” bullet mold, I needed a lube and sizing die to go with
it. I had a Lyman lube/sizing die in
0.430” which I opened up to .432”. I
tried doing this on my lathe, but this die is hardened, and I didn’t have a
carbide boring bit small enough to fit in the hole.

I cut
a slit in a piece of 3/8” wooden dowel to hold my sandpaper.
I cut a piece of 220-grit sandpaper, put one edge in the slot and wrapped
it around the dowel. I chucked the
die in my lathe and the dowel in the drill chuck in my tail stock and ran it
back and forth in the die. When the
grit became worn or full, I turned it around and used the other end.
When that end became full/worn, I folded the sandpaper in half and used
both sides. I continued reaming with
220-grit sandpaper until the diameter was 0.4315”.
I finished polishing with 400-grit wet/dry sandpaper until the diameter
measured 0.432”, and final polished with 600-grit wet/dry sandpaper.
I now have a bullet mold and lube/sizer die that matches this rifle.
Bore
Sighting
I load the NOE bullet with 18.4 grains of AA#9.
This is a maximum load that moves out at 1,300 FPS from a 7 1/2-inch
Ruger Blackhawk. From a 20-inch
barrel I estimate the velocity will increase to approximately 1,500 FPS so that
is the number I used for my calculations.
The
ballistic coefficient for this bullet is .253 so if this cartridge is sighted-in
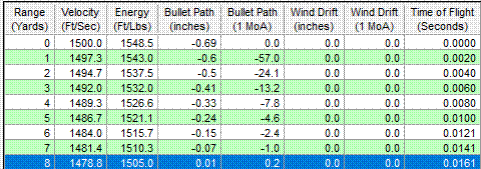
at 100-yards, it will cross the line of site at 8-yards, which is 24-feet.
My indoor bore sight target is set at 25-feet, which means I only have to
adjust the sights so the laser dot is on the sight, not above or below it.
This
rifle comes with a folding semi-buckhorn rear sight.
I didn’t want to remove this sight so I adjusted it so the front sight
was touching the laser dot at 25-feet.
I folded down the sight and adjusted the Williams sight so the front
sight was again touching the laser dot.
This should at least get me on paper at 100-yards.
Summary
I once again would like to state how pleased I am with this rifle.
The fit and finish were beautiful, and it functioned right out of the
box, unlike the CBC Rossi 92 I purchased.
All the screws were installed with thread-locker to prevent them from
coming loose. I performed some minor
polishing and tweaking to smooth and lighten the action, but nothing like I have
done with other Marlin lever-action rifles in the past.
This is a working gun, not a cowboy action gun, so I wanted it to be
smooth and reliable.
|