Adding a Lanyard Ring to a Ruger® Blackhawk®
by Roy Seifert
Click here to purchase a
CD with this and all Kitchen Table Gunsmith Articles.
Disclaimer:
This article is for entertainment only and is not to
be used in lieu of a qualified gunsmith.
Please defer all firearms work to a qualified
gunsmith. Any loads
mentioned in this article are my loads for my guns and have
been carefully worked up using established guidelines and
special tools. The
author assumes no responsibility or liability for use of
these loads, or use or misuse of this article.
Please note that I am not a professional gunsmith,
just a shooting enthusiast and hobbyist, as well as a
tinkerer. This
article explains work that I performed to my guns without
the assistance of a qualified gunsmith.
Some procedures described in this article require
special tools and cannot/should not be performed without
them.
Warning:
Disassembling and tinkering with your firearm may
void the warranty. I
claim no responsibility for use or misuse of this article.
Again, this article is for entertainment purposes
only!
Tools
and firearms are the trademark/service mark or registered trademark
of their respective manufacturers.
The
lanyard and lanyard ring have been around almost as long as
handguns themselves. Originally,
mounted cavalry used the lanyard to prevent the soldier from
losing his gun. The
lanyard was looped around the waist or shoulder and
connected to a ring mounted to the bottom of the grip frame.
Many manufacturers who produced revolvers for the
military often included a lanyard ring per government
specification. Colt,
being one such manufacturer, produced many of its guns for
the military with lanyard rings including black powder
revolvers, Single Action Army models, and the 1911.
The early 1911 models produced for the military had a
lanyard ring on the bottom of the main spring housing.
Modern shooters are rediscovering the value of the
lanyard so some after-market 1911 parts makers are producing
main spring housings with a lanyard ring.
The
single action revolver is the perfect gun for carrying in
the woods while hunting or backpacking.
However, the gun can still work itself free in heavy
brush even when carried in a well-secured holster.
A lanyard connected to a belt and lanyard ring can
help prevent losing, and perhaps never recovering, a
valuable firearm. I
have a stainless steel Ruger® Bisley Blackhawk® with a 5
1/2“ barrel that I plan to carry as a backup when I go hog
hunting. I
certainly don’t want to risk losing it in the woods, so I
installed a lanyard ring.
One
of the easiest ways to install a lanyard ring to a revolver
is to attach a sling swivel stud to the bottom of the grip
frame. First, I
made sure my revolver was not loaded, then disassembled it
enough to remove the grip frame.
(Refer to my article
Ruger
Single-Action Revolver Disassembly/Reassembly and Spring
Replacement.) I
removed all loose parts from the grip frame, i.e. hammer
strut, mainspring, and mainspring seat, trigger return
spring and pivot pin and set them aside.

I
purchased a package of Uncle Mike’s 7/8” nickel machine
screw sling swivel studs.
The stem of these studs is not threaded all the way to
the top, so I used a 10-32 die to finish cutting threads to
the base of a stud.
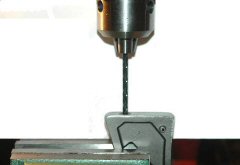
I
put the grip frame upside down in my machinist vise and used a
#21 drill to drill a hole.
The location of the hole is not critical, so exact
measurement is not necessary.
However, I did locate the hole towards the rear of the
grip frame, and centered it on the width by eye.
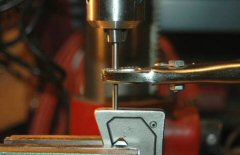
I
then used a 10-32 tap to thread the hole.
I made sure to use plenty of cutting oil to lubricate
the tap. I always
use my drill press and vise grips to ensure the tap starts
straight. I
tighten the chuck just enough to keep the tap straight, but
still allow it to rotate freely. After
threading the hole, I thoroughly cleaned off all traces of oil
and cutting chips.
I
cut the stem of the stud to 1/4” in length using a cut off
wheel and my high-speed rotary tool.
I put a drop of blue thread-locker on the threads, then
installed the stud. I
had to install a flat washer because the threads were cut in
such a way that the hole in the stud did not properly align.
With the flat washer in place, the hole in the stud now
aligned parallel to the frame.
To
finish my lanyard ring installation, I installed a one inch
split key ring into the hole in the sling swivel stud.
I can now attach a spring hook to the ring, which in
turn is connected to a lanyard.
Typically I use a length of 1 1/2“ nylon webbing with
a plastic spring hook looped over my left shoulder. The
plastic spring hook connects to the lanyard ring.
I got this idea from Junior Doughty’s excellent web
site The
Frugal Outdoorsman. In
fact, you can purchase ready-made slings from Junior, just
click on the link.
|
