Adding Camouflage Using Hydrographics
by Roy Seifert
Click here to purchase a
CD with this and all Kitchen Table Gunsmith Articles.
Disclaimer:
This article is for entertainment only and is not to
be used in lieu of a qualified gunsmith.
Please defer all firearms work to a qualified
gunsmith. Any loads
mentioned in this article are my loads for my guns and have
been carefully worked up using established guidelines and
special tools. The
author assumes no responsibility or liability for use of
these loads, or use or misuse of this article.
Please note that I am not a professional gunsmith,
just a shooting enthusiast and hobbyist, as well as a
tinkerer. This
article explains work that I performed to my guns without
the assistance of a qualified gunsmith.
Some procedures described in this article require
special tools and cannot/should not be performed without
them.
Warning:
Disassembling and tinkering with your firearm may
void the warranty. I
claim no responsibility for use or misuse of this article.
Again, this article is for entertainment purposes
only!
Tools
and firearms are the trademark/service mark or registered trademark
of their respective manufacturers.
Introduction
This year during the last week of January my mom turned 90,
so the entire family got together to celebrate this happy
occasion. Everyone in the family knows that I am a “gun
guy” so it was only natural that my 22-year old nephew,
Nathan, came to me with a gun question. He wanted to go
duck hunting with some of his friends in the fall and asked
me what shotgun to buy. My somewhat glib response was
anything that would go bang and kill a duck! After a brief
moment of confusion he then asked me what brand of shotgun I
would recommend. I told him Remington, Mossburg, Browning,
Winchester – just to name a few – all made fine shotguns; it
would really depend on what he could afford. I made it
clear to him, however, that it’s not the gun that’s
important; it’s the man behind the gun. I once made fun of
a friend for shooting a short, youth model, single shot
.410-gauge shotgun. He never missed with that little gun
and put me in my place by consistently beating me at
shooting clay pigeons! It turns out he grew up on a farm
using that gun since he was a child so he had many years of
practice; and it showed.

I own
three 12-gauge Winchester model 1300 shotguns; one is a
Defender model that I use for three-gun competition, and the
other two are field-grade. So how did I wind up with two
field-grade guns? When I purchased the 1300 Defender I
wanted to use it for turkey hunting so I went down to my
local gun store and found a 1300 12-gauge barrel for $79.
Unfortunately it wouldn’t fit on the Defender because the
Defender had a longer magazine tube. I then found a
field-grade 1300 on
Gunbroker for $179 and won the bid. (I couldn’t believe
no one else bid on it!) Years later I found a complete 1300
field gun receiver also on Gunbroker that did not have a
barrel. I already had the barrel so I purchased the
receiver for $150 knowing that I could sell the complete gun
later. I decided to gift this second gun to Nathan – how
many of us received our first gun as a gift from a father,
uncle, or mentor – but I wanted to prepare it for him for
duck hunting by adding camouflage. There are a number of
methods to camouflage a gun; some good and others not so
good:
|
Method |
Advantages |
Disadvantages |
|
Paint |
Easy to apply, stencils are available for more
realistic patterns, protects from rust and corrosion
|
Permanent, not realistic pattern, can be messy to
apply, any rust left on the gun will continue to
corrode under the paint |
|
Slip-on/wrap around cover |
Not permanent, various patterns, easy to apply and
remove |
Can get in the way of moving parts, sights, and
ejection ports |
|
Tape |
Easy to apply, fits to the form of the gun, not
permanent, can be replaced with different realistic
patterns depending on hunting environment |
Leaves sticky residue |
|
Heat-shrink wrap |
Not permanent, uses heat to shrink the wrapping to
fit shape of gun, realistic patterns, can be
replaced with different patterns |
Time-consuming to remove, does not protect metal
parts from rust if left on
|
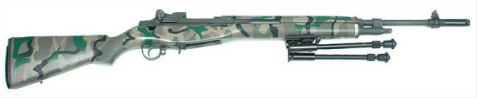
I painted
a camouflage pattern on a synthetic stock for my M1A. I
made my own stencils to get the pattern I wanted and used
camouflage spray paint I bought at the hardware store. It
came out looking pretty good, although somewhat WWII-ish,
but that convinced me that painting my own pattern was not
the way to go. Watch the move Shooter with Mark
Wahlberg and notice how he uses camouflage paint and natural
leaves and sticks as stencils to apply a camouflage pattern
to a sniper rifle.
(Photo courtesy StumpJumper)
RusticMan.com and
StumpJumper have great articles for painting a reed
pattern onto a shotgun. Stump has graciously allowed me to
publish his instructions; refer to my article
DIY Camouflage for a Shotgun.
Hydrographics
A very popular method for adding camouflage to a gun is
using hydrographics, sometimes called liquid printing, water
printing, or water transfer imaging. Many firearms
manufacturers are using this method to enhance their factory
guns. A film is produced by printing a camouflage pattern
onto a water-soluble backing. A piece of film is cut to the
desired size and placed into a tank of water which causes
the backing to dissolve leaving the pattern floating on top
of the water. A chemical activator is sprayed onto the
pattern which causes the ink to turn to liquid, then the
prepared part is dipped into the liquefied pattern causing
it to wrap itself around the part. After the now
camouflaged part is dried it is coated with a clear coat to
protect the finish. This camouflage method is permanent,
but the patterns are very realistic, and the clear coat
protects the gun so you never have to keep the outside oiled
or worry about rust. One major advantage to this method is
that you are not limited to camouflage patterns. I’ve seen
guns finished with skulls, flames, carbon fiber, wood grain,
pretty much any pattern you can think of.
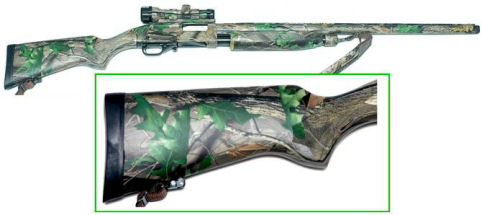
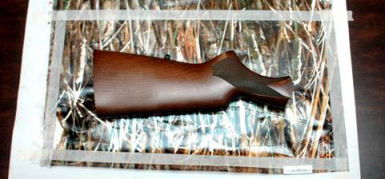
My first
Winchester 1300 field gun I sent away to
Bell and Carlson to have them apply a Realtree®
Hardwoods Green hydrographics camouflage pattern for turkey
hunting. The gun came out beautifully as you can see from
the above photo. I sent them the gun complete with scope
mount and scope and they coated everything. Unfortunately
they no longer offer this service. Being an amateur
gunsmith and willing to try and learn new things I thought
if I could get the materials I could probably do this
myself.
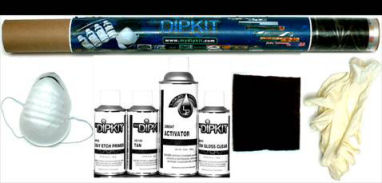
I did
some research on the Internet and found a company that sells
a do-it-yourself hydrographics kit called
MyDipKit. They have many different patterns to choose
from including 58 camouflage patterns. The complete kit
comes with four spray cans; primer, base coat color,
activator, and clear coat finish, latex gloves, a brown
coarse scrub pad, mask, and a sheet of the pattern film.
They have three different kits to choose from; I chose the
“designer” kit which comes with 2.5 square meters of film.
This provided plenty of film to cover the gun and enough to
practice, learn, and make mistakes.
(Pattern courtesy MyDipKit)
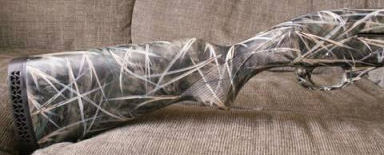
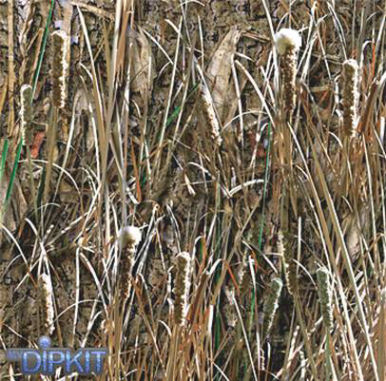
For
ducking hunting in a marsh environment I chose the Vzion
Outdoors® Boggy Vision ® pattern shown in the figure above.
I chose this pattern because duck hunting usually takes
place in a marshland environment. If you look closely at
the above pattern you can see there is a right-side-up,
which meant I couldn’t cover both sides of a part with one
dip because one side would have the pattern upside down.
Would ducks notice the difference…of course not, but I
would, so that meant I would have to do half of each part at
a time.
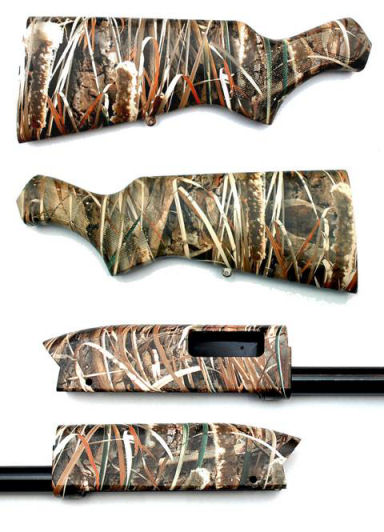
Disassembling the Gun
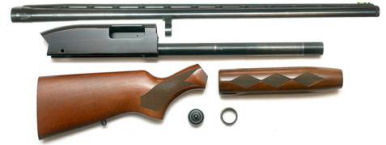
First I
completely disassembled the gun into the major components I
planned to dip. The magazine tube will be masked off since
it will not receive any camouflage. The ring at the bottom
right is the slide arm cap. This cap holds the fore end
onto the slide arm extension.
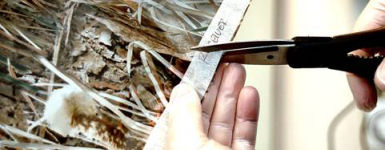
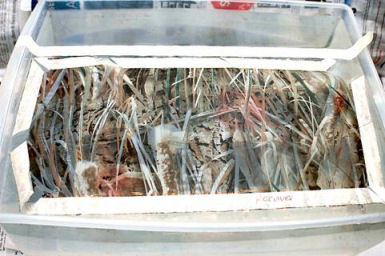
Cutting
the Film

I then
cut out the sheets I needed to cover each part of the gun.
There needed to be enough film to cover the piece with some
leftover. Per the instructions I used masking tape to
create a frame, then cut out around the frame. I put a
piece of white poster board behind the film when laying it
out for cutting to make it easier to see. My cutting table
is brown which made the film very difficult to see; it is
camouflage after all! The film was not wide enough to cover
the entire barrel so I laid the barrel onto the film at an
angle so I could cut one long piece.
Practicing and Learning
So now I had a lot film leftover, so I cut some 4x4 squares
to use for practice. MyDipKit has a number of excellent
videos that I studied thoroughly before attempting this
project. I also did a search on YouTube for “hydrographics”
and found many helpful videos there. The last thing I
wanted to do was mess up Nathan’s gun so I performed some
practice dips. MyDipKit sells some plastic forms for
testing and displaying your work, but I didn’t want to spend
the $25, so I decided to perfect my skills using empty cat
food cans. These cans are small and round which gave me
plenty of opportunity to practice; and besides they were
free!
A quick
trip to Walmart got me a large plastic storage bin, masking
tape – both 0.7” and 1.4” wide, and some Play-Doh. The
storage bin was a Sterilite® 41-quart under-bed box model
#1860 that measured 36” x 17” x 6”. Although it is only
6-inches deep, because I’m doing only half of a part at a
time it should be ok to use for my dipping tank.
The
process was pretty straight forward:

Step 1. Prepare
the Part
a. Clean
thoroughly and remove any grease and oil
b. Mask
off any areas not to be covered.
c. Scuff
with the included scrub pad. This will remove any finish
and allow the primer paint to stick. . The blued parts I
scuffed with 120-grit sand paper, then degreased with
acetone. The smooth areas of the wood I sanded with
220-grit sand paper but I did not touch the checkering.
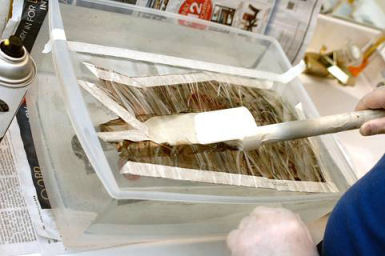
d. Spray
with a light coat of the included gray primer and allow to
dry for 1 to 2 hours. Apply the base coat of paint within
24 hours.
e. Lightly
scuff and apply the base coat of spray paint. Multiple
light coats are better than one heavy coat which could run.
Allow to dry for 1 to 2 hours.
f. Make
sure you have some method of holding the part for dipping
that won’t interfere with the surface to be covered. For
large, square items like plastic lids you can install a
masking-tape handle on the inside. Different sizes of
wooden dowel make great handles.
Step 2. Set
Up the Dipping Container
a. The
dipping container should be large enough to allow the film
to expand, and deep enough to submerge the entire part.
There should be about one inch of space around the film. It
is important that the film be allowed to expand, otherwise
you will get air bubbles.
b. Fill
the container with lukewarm water until it is about one-inch
below the top. The water should be between 70 and 80
degrees; measure with a cooking thermometer.
c. If
the container is larger than the film piece, add a
masking-tape border to the top of the water about one-inch
larger than the film. Use a piece of paper cut to the same
size as the film to create the border.
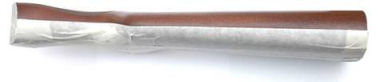
Step 3. Prepare
the Film – The film has a water-soluble backing so do not
get the film wet or expose to a high-humidity environment.
Keep any unused film in the shipping tube it came with.
a. Roll
out the film with the ink-side up.
b. Lay
the part to be dipped onto the film.
c. Layout
a masking tape frame onto the film leaving enough film so
the part will be covered when dipped.
d. Cut
out around the masking-tape frame
Step 4. Processing
– Here is where the fun begins and where the most problems
can occur
a. Cut
slits in the masking-tape frame to allow the film to
expand. Cut each corner and the center of each side. For
long pieces cut multiple slits. Cut completely through the
tape and into the film.
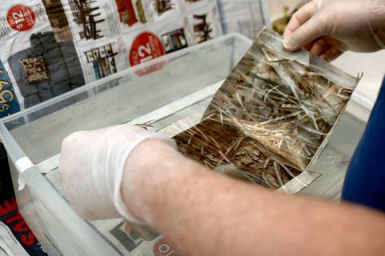
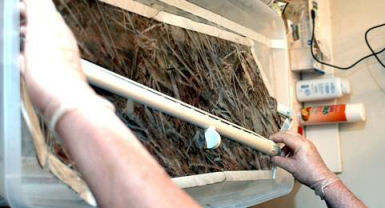
b. Holding
the film by each corner and folded up like a sling, slowly
immerse it into the warm water. Do NOT get any water onto
the ink side of the film or it will not stick to the part.
The film should float on top of the water.
c. Wait
60 seconds to allow the backing to dissolve; use a timer to
time accurately.
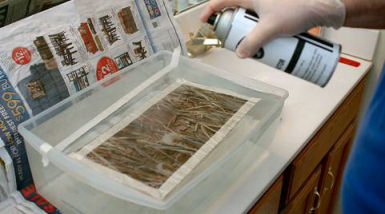
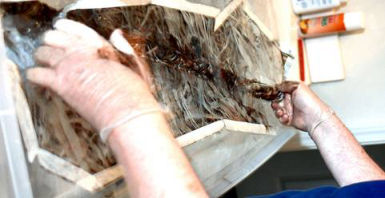
d. Spray
a thin coat of activator evenly onto the film. The film
will start to expand, but won’t expand any farther than the
edges of the dipping tank or masking-tape border which you
laid on top of the water. After about 15 to 20 seconds the
film will take on a glossy appearance and turn to liquid
ink. Here is where most people have problems because they
either spray on too much activator, or don’t apply it
evenly.
Step 5.
Immerse
the Part
a. Wear
vinyl or latex gloves as the ink will get onto your hands.
b. Hold
the part at a 30-40 degree angle and slowly submerge the
part into the liquid ink. The angle will prevent
air-bubbles from forming.
c. Once
the part is completely submerged give it a gentle shake to
remove any excess liquid ink. Don’t touch the sides or
bottom of the tank as the liquid ink could rub off.
d. Remove
it from the water and allow it to sit for 60 to 90 seconds.

Step 6.
Rinse the
Part
a. Do
not touch or rub any part that has been covered or it will
come off.
b. After
the part has been dipped rinse with warm or hot running
water until the covered part is no longer glossy in
appearance.
c. The
part must be completely free of any residue left from the
printing process, otherwise the clear-coat finish will not
adhere properly. Any area that still appears glossy can be
re-rinsed.
d. Allow
to air dry thoroughly, although I found a hair dryer helps
to speed up the drying process.
Step 7.
Apply Top
Coat
a. Apply
the included clear-coat finish. Spray with light, even
passes.
b. Apply
multiple thin coats to achieve the desired appearance.
c. Allow
to dry before using. Clear coat finishes harden over time
and should be completely cured after about 14 days.
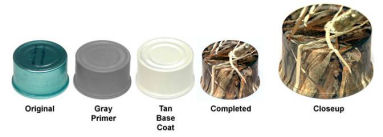
Following
the above process I first removed the excess glue from the
can where the label was attached. I used some acetone which
also removed much of the paint. I then sprayed the can with
the gray primer and let it dry for 1 hour. After the primer
dried I sprayed the can with the tan base coat. Although
the can said tan, it was very light, more of a beige. This
base coat provides the background color where the pattern
would otherwise be clear. By changing the color of the base
coat you can change the color of the pattern. MyDipKit
doesn’t sell a green paint, but their instructions state
that a good quality automotive paint will work. Someday I
will purchase some green automotive touch-up spray paint and
try this pattern with green just to see how it looks.

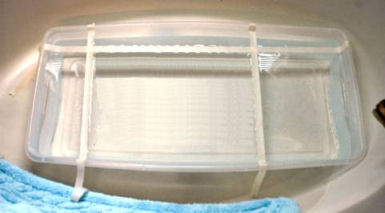
I
“borrowed” one of my wife’s small storage bins and used it
as a dipping tank. I followed the process for my test can
and I was very impressed with the result as you can see from
the photo.
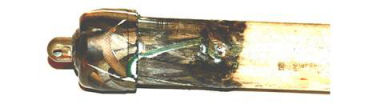
Ok, that
came out pretty good. Now I wanted to try it with a small
part. I decided to try it with the magazine end cap. I
screwed the cap onto a wooded dowel to use as a
painting/dipping tool. The dowel also prevented overspray
and film from getting inside the cap. After spraying with
primer and base coat I scratched off a mark so I would know
where the top of the cap was after tightening it on the
gun. I prepared the film as before and dipped the prepared
cap. As you can see from the above photo it came out very
nice once again. I discovered through trial and error that
if the piece of film is too large it will build up on the
part. However, it won’t stick to itself so the excess comes
right off during the rinsing process.


I decided
to completely assemble the slide arm in order to get a
contiguous pattern on both the wooden forearm and slide arm
cap. I masked the slide arms and top of the slide arm tube
with masking tape, and used a wooden dowel covered with
masking tape to fill the front hole. The dowel allows me to
hold the assembly while dipping. I had to dip the slide arm
assembly twice because it didn’t cover the top edges the
first time. The second time I dipped it half-way into the
ink then rolled it to cover the other half. This ensured
everything was completely covered.
As stated
before I masked and covered half of the butt stock and
receiver at a time because I didn’t want half of the pattern
to be upside down. The results are shown in the above
photo.

The
barrel presented a little bit more of a challenge. Since
the film was not wide enough to cover the barrel in one
piece, I laid the barrel on the film at an angle and cut out
the piece I needed. That left a lot of wasted film on the
corners of the diagonal cut.
I removed
the fiber-optic bead, plugged the barrel with a tapered
wooden dowel, and plugged the chamber with a cork. I used
masking tape to mask off the end of the choke tube and the
end of the barrel where it fit into the receiver. The
masking tape also helped hold the dowel and cork in place.
I then went over the barrel with 120-grit sand paper, then
cleaned it with acetone to remove all grease and sanding
residue.
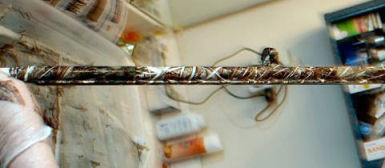
When the
film was ready I dipped the right side of the barrel
half-way into the film, then rotated it to the left side and
finished dipping. I took the barrel outside and used my
garden hose to rinse it off. Unfortunately I had some gaps
on the right side, probably because I didn’t move the barrel
at the same time that I rotated it. Still, it came out
pretty good.

Here is
the finished shotgun ready for duck season. This was my
first attempt at hydrographics so it’s not perfect, but as
my friend Chilli Ron said, it's a tool for hunting, not a
work of art! Happy birthday Nathan.
|

