Making a Cartridge Check Gauge
by Roy Seifert
Click here to purchase a
CD with this and all Kitchen Table Gunsmith Articles.
Disclaimer:
This article is for entertainment only and is not to
be used in lieu of a qualified gunsmith.
Please defer all firearms work to a qualified
gunsmith. Any loads
mentioned in this article are my loads for my guns and have
been carefully worked up using established guidelines and
special tools. The
author assumes no responsibility or liability for use of
these loads, or use or misuse of this article.
Please note that I am not a professional gunsmith,
just a shooting enthusiast and hobbyist, as well as a
tinkerer. This
article explains work that I performed to my guns without
the assistance of a qualified gunsmith.
Some procedures described in this article require
special tools and cannot/should not be performed without
them.
Warning:
Disassembling and tinkering with your firearm may
void the warranty. I
claim no responsibility for use or misuse of this article.
Again, this article is for entertainment purposes
only!
Tools
and firearms are the trademark/service mark or registered trademark
of their respective manufacturers.
Introduction
If you shoot a lot like I do then you are probably also a
reloader. If you only shoot factory ammo then you either
don’t shoot very often, or you’re in a higher income bracket
than I am. Shooting factory ammo has some advantages over
reloading; it is very reliable and very consistent. You
almost never have a failure to feed, failure to fire, a
squib or over-charged round with factory ammo. A squib is a
round that has little or no powder in it. When factory ammo
is fired through a chronograph the velocity often has a very
low standard deviation. Standard deviation is a statistical
value that shows how much variation or "dispersion" exists
from the average. The smaller the standard deviation value
the more consistent the load, which results in better
accuracy. A standard deviation value of 10 or less is
considered excellent for ammunition, and factory ammo often
reads way below this value. But for me I just can’t afford
to throw 2, 3, 4 or more quarters downrange every time I
pull a trigger.
Reloading
is not only cheaper than purchasing factory ammo, but there
is a certain zen to the repetitive processes involved. With
reloads you can tailor your loads to your particular gun and
need, whereas with factory ammo what you buy is what you
get. However, reloaded ammo can have many problems
including those mentioned above.
Raised
Ring of Lead
Most semi-auto pistol cartridges use rimless cartridges
which headspace on the mouth of the case. Although it looks
like the case has a rim, this is actually the extractor
groove. When I first started reloading semi-auto pistol
rounds with lead bullets I quickly discovered a problem.
Most pistol caliber seating dies have a built-in taper to
apply a taper crimp to the case mouth. At the time the
crimp was applied the lead bullet was still being pushed
into the case which caused a ring of lead to be pushed ahead
of the case mouth. This problem did not occur with jacketed
bullets, and was a non-issue with revolver cartridges.
Chamfering the inside of the case mouth reduced this
somewhat, but it didn’t eliminate it. The cartridge would
headspace on that ring of lead instead of the case mouth,
which prevented the slide from going completely into
battery.
This was
a constant problem for my lead pistol reloads until I
discovered the
Lee Precision factory crimp dies. Although this
requires a separate step, the case is crimped after the
bullet is completely seated so there is no ring of lead
causing the cartridge to headspace incorrectly.
Cartridge
Check Gauge
The final quality control step I perform to my hand-loaded
ammunition is to see if it will fit in the chamber of the
gun in which I plan to shoot it. This will find any bulged
or out or spec cases, or in the case of lead reloads for
pistol calibers, improper headspace caused by a raised ring
of lead. I do this by using a cartridge check gauge.
Whether
you know it or not, every gun comes with a built-in
cartridge check gauge; it’s called the chamber! Revolvers
come with 5 or 6 chambers in the cylinder, and pistols and
rifles come with one in the barrel.
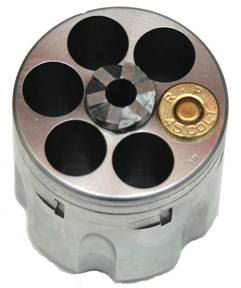
To use a
revolver cylinder to check loaded ammo I first measure each
chamber to find which one is the tightest. If my reloads
will drop into the narrowest chamber with no friction, then
they will fit in all the other chambers. If I’m using a
single-action revolver cylinder, I remove the cylinder from
the frame. If I’m using a double-action revolver I’m very
careful; safety first, last, and always. I drop the
loaded round into the tightest chamber and if it fits, I
remove it immediately and put it in my ammo box.
I DO NOT SWING THE CLINDER CLOSED
WITH THE LOADED ROUND IN THE CYLINDER. If I was to
close the cylinder I have now loaded the revolver, which
should never be done unless ready to fire. If the cartridge
does not seat completely in the tightest chamber, I set it
aside to rebuild it later.
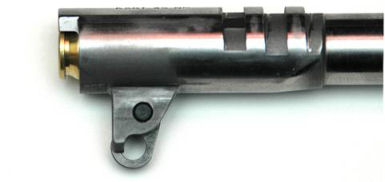
For a
semi-automatic pistol I use the barrel as the chamber check
gauge. Most modern pistols allow you to remove the barrel.
I shoot a lot of .45 ACP so I use one of my 1911 barrels.
The process is the same; drop a loaded round into the
chamber; if it drops in without any friction, and sits flush
or below the barrel hood then it passes. If I am checking
cartridges in a pistol with a fixed barrel like a Walther, I
remove the slide and drop the cartridges into the chamber.
Again, if the cartridge fits with no friction and flush or
below the barrel hood the round passes.
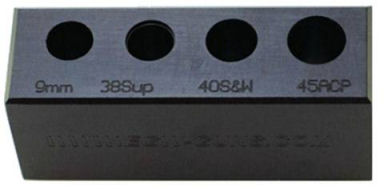
EGW makes
a four-caliber cartridge check gauge available from
MidwayUSA product
#744135. Drop the reloaded cartridge into the
appropriate hole, if it drops in with no friction and fits
flush with the top of the gauge it’s good to go. They make
one for revolver calibers as well.
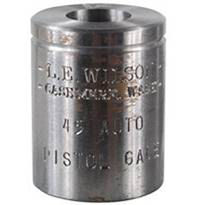
L. E.
Wilson also makes a cartridge check gauge for many
individual calibers also available from
MidwayUSA. Type in “cartridge check gauge” in their
search field and you will see all of the choices available.
Making a
Cartridge Check Gauge
One of the potential problems I see with these stand alone
gauges is that the hole is not the same size as the chamber
of the gun in which the ammo is to be used. I decided to
make my own chamber check gauge for .45 ACP that would match
all of my .45 ACP chambers.
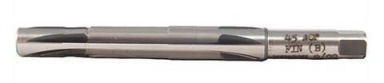
How would
I know the gauge would match all of my .45 ACP chambers?
Long ago I purchased a .45 ACP chamber finish reamer from
Brownells
#513-051-451. I used this reamer in all of my .45 ACP
barrels and cylinders to ensure all of the chambers were of
the same dimension. Back in 2011 I purchased a Rock Island
Armory M1911A1 as a gift for my son, but the slide would not
go into battery with most of my reloads, and even some
factory ammo. It turned out the chamber was way undersized
so I used this reamer to finish the chamber and bring it to
the proper dimensions (refer to my article
Reaming a .45 ACP Chamber). Using this same reamer
to make my gauge will ensure the rounds will fit in all my
.45 ACP guns.
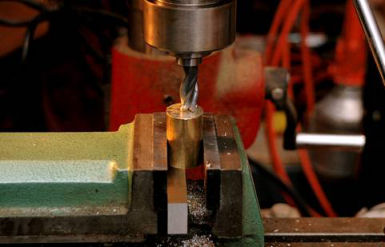
I
purchased a one-inch diameter brass rod 6-inches long from
OnlineMetals.com. I took a hacksaw and cut off a piece
1 3/8” long. I cut it just a little longer than it needed
to be because I can’t make a straight cut freehand. I
mounted it in a machinist vise mounted to my table-top
milling machine and used a 1/2” square end milling bit to
square off the cut edge. The square piece of metal you see
below the brass rod in the above photo is a parallel. It is
cut perfectly square to ensure the piece I’m milling is
straight and square.
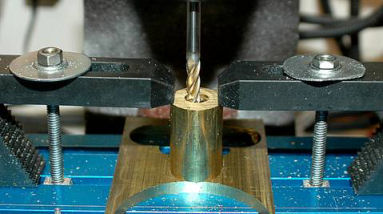
I marked
the center of the piece then milled a 0.4515” hole through
the center using a 0.250” square end milling bit. The front
of the chamber reamer measured 0.451” so I wanted the hole
to be just a bit larger so the reamer would turn, but not
wobble.
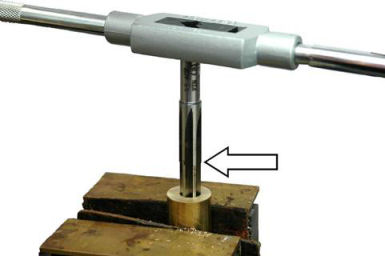
I set the
brass piece upright in a padded vise and used a large tap
handle to begin cutting the chamber. I made sure everything
was lubricated before cutting. Brass is much softer than
steel so I had to be careful I didn’t cut too deeply. The
reamer was designed for a 1911 barrel; the lip in the center
of the reamer indicated by the arrow in the above photo is
meant to touch the barrel hood indicating the chamber was
cut to the proper depth.
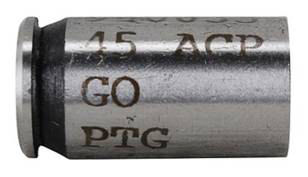
I marked
the reamer at the approximate position where I wanted to
stop reaming. When I got close to that mark I used a .45
ACP go headspace gauge to monitor my progress. When the
headspace gauge fit flush with the top surface of the brass
I was finished.
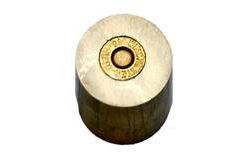
Now I can
take a couple boxes of reloaded ammo and an empty cartridge
box, sit in front of the TV, and check my reloads. If the
cartridge seats smoothly in the gauge, and sits flush with
the top, and it doesn’t have a high primer which I check by
running my finger over it, I put it in the completed box.
If the cartridge doesn’t seat smoothly and fully into the
gauge, or has a high primer, I set that round aside to
rework it.
Summary
Ok, so purchasing the reamer, the brass, and other tooling
is way more expensive than the $20 for the EGW or L.E.
Wilson gauges. But since my gauge matches all of my .45 ACP
chambers, I know if a cartridge fits in my gauge, it will
also fit in all of my .45 ACP revolvers and pistols. So why
not just spend the $20 for the EGW gauge and ream it with my
reamer? The 6-inch brass rod cost more than that. I plan
to use that brass rod for other projects so it was actually
cheaper to fabricate my own. The reamer has more than paid
for itself since I saved the labor of having a gunsmith fix
my son’s 1911 chamber and ream my other chambers. So all in
all I believe I’m ahead of the game.
|