Reaming
a .45 ACP Chamber
by Roy Seifert
Click here to purchase a
CD with this and all Kitchen Table Gunsmith Articles.
Disclaimer:
This article is for entertainment only and is not to
be used in lieu of a qualified gunsmith.
Please defer all firearms work to a qualified
gunsmith. Any loads
mentioned in this article are my loads for my guns and have
been carefully worked up using established guidelines and
special tools. The
author assumes no responsibility or liability for use of
these loads, or use or misuse of this article.
Please note that I am not a professional gunsmith,
just a shooting enthusiast and hobbyist, as well as a
tinkerer. This
article explains work that I performed to my guns without
the assistance of a qualified gunsmith.
Some procedures described in this article require
special tools and cannot/should not be performed without
them.
Warning:
Disassembling and tinkering with your firearm may
void the warranty. I
claim no responsibility for use or misuse of this article.
Again, this article is for entertainment purposes
only!
Tools
and firearms are the trademark/service mark or registered trademark
of their respective manufacturers.
I recently
purchased a Rock Island Armory 1911 .45 for my son which I
will give to him for Christmas.
The price was right, but like most things in life, you
get what you pay for! The
gun was functional, but quality and attention to detail were
poor. For example,
I had to replace the sear and disconnector to get a decent
trigger pull, and the feed ramp was milled off-center from the
frame.
I took it
out to the range to make sure it didn’t have any other
problems and noticed that the chamber seemed to be very tight
because the slide would not go into battery with many rounds.
When I returned home I took it into my shop and began
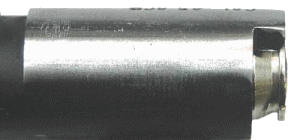
checking headspace. As
you can see from the above photo rounds would not fully seat
into the chamber. For
proper headspace, the case head should sit flush, or a little
below the rear edge of the barrel hood.
If I tried to press the cartridge deeper into the
chamber it would become wedged and difficult to remove.
My guess is that the manufacturer was using a worn-out reamer
that was undersized. The solution was to ream the
chamber to proper dimensions.

I purchased
a .45 ACP chamber finishing reamer from Brownells
#513-051-451. Although
this tool is somewhat expensive, I have used it a number of
times to correct the chambers in poor-quality, after-market
barrels.
I
disassembled the pistol and placed the barrel in a padded vise
with the chamber up (vertical).
I coated the reamer with cutting oil and placed it into
the chamber. Using
a tap wrench I turned the reamer clockwise (reamers and cutters
should never be turned backwards as this could damage the
cutting teeth). I
immediately could feel the reamer cutting steel!
I removed the reamer after about 5 turns; it is better
to go slow than cut too deeply.
The reamer teeth were filled with chips and steel dust
indicating that it was doing its job.
I cleaned the barrel and reamer with brake parts
cleaner and checked cartridge fit.
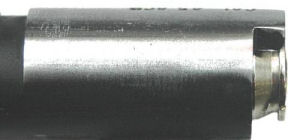
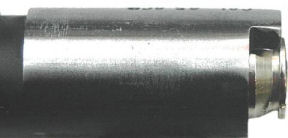
I continued
to cut and check cartridge fit until the reamer just touched
the lip in front of the chamber.
I didn’t want to change the headspace; I just wanted
to ream the chamber. Now
cartridges seat fully and to the proper depth in the chamber
as you can see from the above photo.
Even rounds that I had set aside that wouldn’t
chamber during the range session now chambered properly.
This pistol should now feed much more reliably.
|