Refinishing a 100 Year Old Winchester 97 Shotgun
by Roy Seifert
Click here to purchase a
CD with this and all Kitchen Table Gunsmith Articles.
Disclaimer:
This article is for entertainment only and is not to
be used in lieu of a qualified gunsmith.
Please defer all firearms work to a qualified
gunsmith. Any loads
mentioned in this article are my loads for my guns and have
been carefully worked up using established guidelines and
special tools. The
author assumes no responsibility or liability for use of
these loads, or use or misuse of this article.
Please note that I am not a professional gunsmith,
just a shooting enthusiast and hobbyist, as well as a
tinkerer. This
article explains work that I performed to my guns without
the assistance of a qualified gunsmith.
Some procedures described in this article require
special tools and cannot/should not be performed without
them.
Warning:
Disassembling and tinkering with your firearm may
void the warranty. I
claim no responsibility for use or misuse of this article.
Again, this article is for entertainment purposes
only!
Tools
and firearms are the trademark/service mark or registered trademark
of their respective manufacturers.

Introduction
I recently modified a 100 year old Winchester model 1897 for
competition (refer to my article
Modifying a Winchester 97 for Competition). This
gun was originally built in 1907 which made it over 100
years old, and functioned flawlessly during a Wild Bunch
Match. Some people may balk at the fact that I made changes
to this old gun, but for me this is a shooter, not a
collectable wall-hanger, so I had no problem making those
changes.
As with
many original Winchester 97’s that I’ve seen, most of the
bluing had worn off and whatever was left had taken on a
brown patina. Also, due to years of poor care, the exterior
metal was pitted from rust. I decided I wanted to refinish
this old gun and make it look as close to brand new as I
could get. Re-bluing the metal will also protect it from
further corrosion.
Refinishing Plan
This was probably my most ambitious project to date. I have
refinished stocks (refer to my article
Modernizing a Winchester 37) and cold-blued
receivers (refer to my article
Restoring a Ted Williams Model 100 .30-30), and I
have Parkerized complete guns (refer to my article
Reactivating a Springfield 1903-A3 Drill Rifle), but
this will be the first time I refinish an entire blued gun.
My refinishing plan was as follows:
-
Remove all the old external bluing
-
Polish the metal
-
Re-blue the exterior metal surfaces with
Dicropan IM®
-
Strip
the wood
-
Cover
the gray epoxy seam where I repaired the stock and
action slide handle
-
Finish the wood with
Birchwood Casey® Tru-Oil®.
Dicropan
IM® is the same bluing process I used to refinish a Ruger
.45 ACP cylinder (refer to my article
Refinishing a .45 ACP Conversion Cylinder with Brownells
Dicropan IM®). It is a rust bluing process which is
much more durable than cold bluing and when done correctly
the results are beautiful.
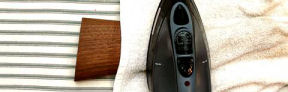
Practice
Before working on the gun itself I practiced on the piece I
had left over from shortening the barrel. Since this piece
of barrel had the same finish problems as the rest of the
gun I could work out my metal refinishing process.
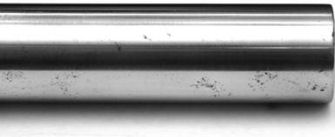
I first
polished the barrel with 220-grit wet/dry sand paper. This
removed the old bluing but left behind pits that I couldn’t
remove as you can see from the above photo. I used a small
wire brush and my Dremel tool to remove the corrosion buried
in the pits. I then polished with 320-grit paper, then
finished with 400-grit paper. I final polished with
400-grit Polish-O-Ray I purchased from Brownells
#080-505-400 and a felt buffing wheel attached to a hand
drill. The Dicropan IM® instructions recommend this as the
final polish prior to bluing.
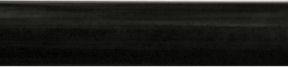
I
performed the Dicropan IM® process 5 times to get the
darkness of bluing I wanted. The barrel section came out
looking beautiful and the bluing was nice and even. The
above photo appears to have streaks, but this was caused by
the lighting I used for the photo.
Although
time-consuming, the Dicropan IM® bluing process is pretty
easy, and as mentioned before, the results are beautiful and
durable (the following steps are a summary; refer to the
Dicropan IM® instructions for the complete process):
Step 1.
Polish
the metal
Step
2.
Degrease
with acetone or Brownells TCE
Step 3.
Immerse
in boiling water for 5-minutes
Step 4.
Card off
any rust
Step 5.
Apply
coat of Dicropan IM® for 60-seconds; throw away the
applicator
Step 6.
Immerse
in boiling water for 15-minutes
Step 7.
Remove
from water and allow to dry
Step 8.
Card off
any rust; throw away the degreased steel wool used for
carding
Step 9.
Apply
coat of Dicropan IM® for 60-seconds
Step 10.
Immerse
in boiling water for 5-minutes
Step 11.
Remove
from water and allow to dry
Step 12.
Card off
any rust with a second piece of degreased steel wool
Step 13.
Repeat
Steps 9-12 until desired color is achieved
Step 14.
Coat with
a water-displacing oil
Refinishing the Metal
I completely disassembled the shotgun into its major
components. I unscrewed the action slide sleeve screw cap
with a special spanner wrench I purchased from Brownells
#080-548-012 and removed the action slide handle from
the action slide.
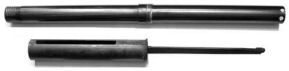
I started
with the magazine tube and action slide. I performed the
metal preparation as described in the practice section
above. I did not refinish the entire action slide; only the
arm that engages the carrier. The arm has the Winchester
name and model stamped into the metal and is the only part
of the action slide that is visible. I taped a wooden plug
into the threaded end of the magazine tube, and a rubber
cork into the plug end. The wooden plug was long enough so
I could use it as a handle and not touch the metal. After
the parts were blued I thoroughly cleaned and oiled the
insides to remove any rust that had formed from immersing
them in the hot water. The inside of the magazine tube was
already rusted and pitted when I first purchased the gun so
I didn’t want any additional rust to form.
The
magazine tube was too long to fit into any of the pots we
had in the kitchen so I purchased a black iron bluing tank
from Brownells
#082-003-664. This tank was so long that I had to set
it diagonally across the right-rear and front-left burners
of my gas stove. The stove was just barely hot enough to
bring the water up to a slow boil, but that was enough to
refinish the metal parts. For the smaller parts I used a
regular stainless-steel pot.
To
prepare the receiver I first removed all of the small parts
and placed them in plastic bags labeled “L” or “R” so I
wouldn’t get them mixed up. I used a 10-inch mill bastard
file to draw-file the flats to remove most of the pits and
scratches. I then wrapped various grits of wet/dry sand
paper around the file to remove the filing marks and polish
the metal. I started with 220-grit, then 320-grit, then
finished with 400-grit. The rounded areas of the receiver I
shoe-shined with strips of wet/dry sand paper starting with
the 220-grit and finishing with the 400-grit. I had to be
very careful not to damage the serial number on the
receiver. Damaging or altering the serial number is
illegal. Fortunately the serial number and inspector’s mark
were stamped deeper than the pits so they were still clearly
visible. I finished polishing with the 400-grit
Polish-O-Ray and a felt buffing wheel.
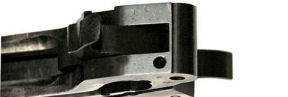
The rear
of the receiver that mated with the butt stock had the
deepest pits. This seems to make sense to me since the
shooter’s hand would constantly be in contact with that part
of the receiver leaving body oil behind and causing rust.
You can
see in the above photos that I didn’t remove all of the
pits. Some of them were very deep and I didn’t want to
weaken the receiver by removing too much metal.
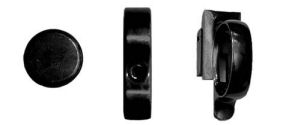
Next I
refinished some of the smaller parts:
-
Magazine Band
-
Magazine Plug
-
Trigger Guard Bow
As before
I couldn’t remove all of the pits but the Dicropan IM®
bluing process comes out beautifully dark and even.
Finally I
refinished the barrel assembly. I prepared the metal as
mentioned before. I wore a filter over my nose and mouth so
I wouldn’t get metal and sandpaper bits in my nose and
lungs. I removed the brass bead for polishing, then
replaced it for bluing.

I plugged
the breech and muzzle with wooden dowels, and again used my
long iron bluing tank on my kitchen stove for the heated
water. The Dicropan IM® instructions say to apply the
solution in a “slurry” which seems to give the most even
result. I used cotton balls stuffed into the toe of a nylon
stocking and liberally applied the Dicropan IM®. The barrel
came out dark and even after only five applications.
For small
parts such as pins and screws, the trigger, hammer, and top
of the carrier I cold-blued with
Birchwood Casey® Perma Blue®. I cleaned the part with
acetone then suspended it in the cold-blue solution for just
a couple of seconds. I didn’t have to remove the old bluing
as the Perma Blue® left a deep blue/black finish right over
the old bluing.
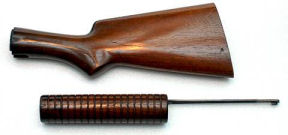
Stripping
the Wood
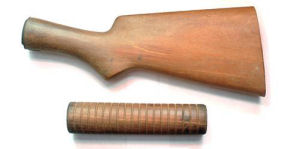
While the
gun was completely disassembled I used
Klean-Strip® KS-3 premium stripper I purchased from my
local home improvement store to remove the old oil and
finish from the butt stock and action slide handle. I
applied three coats of stripper and let each coat stand for
15-minutes before removing. As you can see from the above
photo there are still a couple of dark areas on the wrist
and action slide handle that still have oil from years of
handling. I applied two additional coats of stripper, then
scrubbed the wood with a scrubbing pad and mineral spirits.
After
stripping the wood I steamed out as many dents as I could by
laying a wet towel on the wood and pressing a hot iron to
the towel. I went over the entire butt stock, but couldn’t
remove all of the dents or scratches. Everyone tells me
this gives the stock character! After the wood dried I
sanded it with 600-grit sand paper to remove any “feathers”
raised by the steaming process.
I applied
three coats of
Birchwood Casey® Tru-Oil® allowing each coat to dry for
six hours. I have always liked the smooth, semi-glossy
finish Tru-Oil imparts to the wood as you can see from the
above photo. As mentioned before you can still see some
dents, gouges, and scratches but what do you expect from a
100-year old stock?
Replacing
the Action Slide Stop

About 2
1/2-inches from the end of the magazine tube was a small
piece of metal with two screws. This piece of metal
prevented the magazine tube from coming out of the barrel
assembly too far. My gun had one screw missing so I decided
to replace the entire slide stop. I removed the single
screw and slide stop, drilled out the two holes in the
magazine tube with a #43 drill bit, then tapped each hole
with a 4-40 tap.
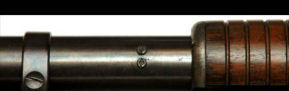
I took
two 4-40 hex-head screws and cut the head in half then used
a Dremel cutoff wheel to cut a notch in the top of the
head. I had to cut the heads in half so they would pass
under the barrel when the magazine tube was rotated for
disassembly. I then cut the threaded part so only 1
1/2-threads were left. I then installed them in the
magazine tube holes with Loctite blue. I tested my fix by
loading six dummy shells in the magazine tube to ensure
nothing was binding on the ends of the screws. This was a
very elegant fix; the screws do not contact the barrel when
rotating the magazine tube, and the magazine tube does not
come out too far when disassembling the shotgun.
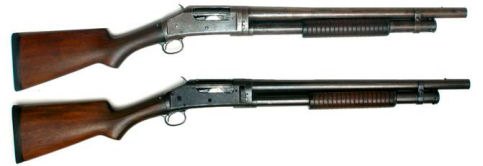
Above is
a photo of the completed restoration project, but it really
doesn’t show the proper beauty of the gun. The metal parts
still have many pits leftover from years of neglect and
rust, but the new bluing will help prevent any additional
rust or corrosion from forming, and it really does make the
gun look beautiful again. A couple of my shooting buddies
asked if it was a Chinese copy, but I told them it was a
restored original Winchester ’97 built in 1907. The bluing
should last for many years and many matches and I can be
proud to show off the work I did to restore this old gun.
I
discovered after some trial and error that the first
application of Dicropan IM® seems to be the most important.
The trick is to use a large applicator and apply a lot of
solution. I tried using large gun cleaning swabs but they
didn’t apply enough solution to get the bluing even.
Eventually I used cotton balls stuffed down into the toe of
a nylon stocking and tied off and cut the top off of the
stocking so I had a nice large swab. This applied a large
amount of bluing solution during the initial application
which meant I only needed to perform the apply/boil/card
process 5 times.
|
