Repairing a Phoenix
Arms HP22
by Roy
Seifert
Click here to purchase a zip file with this and
all Kitchen Table Gunsmith Articles.
Disclaimer: This
article is for entertainment only and is not to be used in lieu of a
qualified gunsmith. Please
defer all firearms work to a qualified gunsmith.
Any loads mentioned in this article are my loads for my
guns and have been carefully worked up using established guidelines and
special tools. The
author assumes no responsibility or liability for use of these loads,
or use or misuse of this article.
Please note that I am not a
professional gunsmith, just a shooting enthusiast and hobbyist, as well
as a tinkerer. This
article explains work that I performed to my guns without the
assistance of a qualified gunsmith.
Some procedures described in this
article require special tools and cannot/should not be performed
without them.
Warning: Disassembling
and tinkering with your firearm may void the warranty.
I claim no responsibility for use
or misuse of this article. Again,
this article is for entertainment purposes only!
Tools
and firearms are the trademark/service mark or registered trademark of
their respective manufacturers. Click on any
blue text to go to a
product/seller web site.

Introduction
I have been researching the validity of carrying a .22LR pocket pistol and
whether it would be effective as a defensive round.
Personally, being shot with any caliber I think would be a deterrent.
A YouTube video by A Cut Above really got me thinking about
carrying a .22LR pistol. His video
can be found here:
https://www.youtube.com/watch?v=uV-WEyIyrWQ&lc=z22ozft5nv2jvtwjg04t1aokgmnm5oywdb0slqrllh3nbk0h00410
Another YouTube video by Beyond Seclusion convinced me to add a .22LR
pistol for everyday carry (EDC):
https://www.youtube.com/watch?v=s6vkBt-XUoA
In this video he shoots .22LR bullets through a stack of denim, beef
bones, beef meat into beef lung. I
was very impressed with the penetration of the rounds, although he was at a very
close range.
Some
of the other reasons I decided to carry a .22 LR were:
-
Light recoil
-
Availability of ammo – I
have plenty of .22 ammunition in my ammo safe that I’ve purchased over the
years. Not hoarding during this ammo
shortage
☹, but just a box here
and there.
-
Light weight of the
loaded gun
So, I
started searching for a suitable .22 LR pocket pistol that would fit my needs.
Most guns I found were either $300 or more or were too large for my
needs. I was seriously considering a
Walther PPK/S, but they were around $350 and up.
Phoenix Arms HP22
I was searching Gunbroker.com and found
a broken Phoenix Arms HP22. The
seller disclosed that the hammer would not stay back.
Looking at the schematic on the Phoenix
Arms web site (www.phoenix-arms.com) I
guessed the problem was either the hammer, sear, or sear spring.
Phoenix Arms sells these parts as well as spare magazines.
Because I am not the original owner with a warranty card on file, their
lifetime warranty does not apply. I
could send it back to the factory and have them fix it for a $50 service fee,
but what’s the fun of that!
This
gun has a varied reputation; some people hate it, but some say it’s one of their
favorites. After I repair it, I’ll find
out for myself.
Disassembly and Inspection
When I purchase a used gun I always disassemble and clean it.
As usual, this gun was dirty and dry like most used guns I acquire.
I completely disassembled the gun, gave it a thorough cleaning with Ed’s
Red, dried it, then lubricated it with SFL-0 grease on the slide rails and other
friction points, and FG-68 oil on the pivot points.
(Refer to my article
The Search for the Perfect
Firearms Lubricants.)
The
grip screws were damaged, so I ordered new ones direct from Phoenix Arms.
I also noticed that the recoil spring was bent and kinked, so I ordered
an extra power recoil spring from M•Carbo (see below).
Modifying the Magazine

The
top front of the magazine would bind when I inserted it into the grip.
The magazine body had a small blob of weld at the seam causing the
magazine to bind. I took a fine file
and filed the weld seam smooth so it would easily slide into and out of the
grip. I touched up the exposed metal
with Brownells
Oxpho-Blue liquid.
I
purchased a new magazine from Phoenix Arms, but the follower and base pad were
made of plastic. This magazine was
too light to fall out of the pistol.
The original magazine was all metal and freely dropped from the pistol.
I purchased another all-metal magazine off eBay.
The plastic one is my backup/spare.
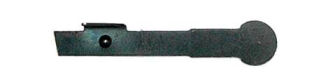
Repairing the Hammer Not Cocking Problem
To my
surprise, when I removed the grip panels, I discovered the side legs were broken
off the sear. No wonder the hammer
would not stay cocked; there was nothing for the sear spring to engage!
When I examined the sear, the metal was ragged where the legs would have
been indicating they were broken, not cut.
Did someone break these off on purpose to disable the gun, or was this
just a malfunction of the part? I
ordered a new sear direct from Phoenix Arms.
First,
I removed the sear spring and promptly lost it!
Then I drove out the sear pin from left to right and removed the old
sear. I installed the new sear and
fixed it in place with the sear pin.
I added a drop of FG-68 oil to lubricate the pivot point, and put some Brownells
Action Lube Plus on the sear edge.
Making
a New Sear Spring
I lost
both the original sear spring and the one I purchased from M•Carbo so I had to
fabricate a new spring. The sear
spring from M•Carbo wouldn’t fit the HP22, but in the process of bending it to
fit I lost it. I took a length of
0.024-inch spring steel and wound two coils around the shank of a small awl.
I then bent it to fit and installed it in the gun.
The coiled part sits above the frame so when compressed by the grip panel
it cannot rotate. It seems to work
fine so I’ll see how it holds up under fire.
Sear
Not Resetting
With the new sear and sear spring installed I could manually cock the hammer and
it would stay cocked. However, if I
tried to cock the hammer by cycling the slide, the sear would not catch on the
hammer. Because this is a new sear,
I’m guessing it was a bit long from the factory.
Also, when I pulled the trigger, I had some hammer push indicating that
the sear was not ground at the proper angle.
Hammer push happens when the sear pushes the hammer back against the
mainspring causing a very heavy trigger pull. When
ground properly the sear should slide off the hammer ledge smoothly.
I
installed the hammer and sear pins outside the frame so I could see their
relationship. Now I can see the
proper angle for grinding the sear.
I
marked the sear with a red marker and scribed a line to indicate the proper
angle. I installed the sear in my
vise so the scribed line was parallel with the vise jaws.
I used a 400-grit stone to polish the sear across the vise jaws so the
sear was at the proper angle. I
constantly tested the sear and discovered that I had to rotate the sear more
counterclockwise to eliminate the hammer push.
Removing metal from the sear accomplished two things; it cut the sear at the
proper angle to eliminate hammer push and reduced the length of the sear so the
hammer would lock in place when the slide was opened.
With the sear cut at the proper angle the trigger pull was nice and
smooth.
Reducing the Sear Ledge on the Hammer
I used
a 400-grit polishing stick to reduce the sear ledge on the hammer.
I removed 0.010-inch from the ledge, then lubricated it with Brownell’s
Action Lube Plus.
Modifying the Quirky Safety
This gun has one of the quirkiest safeties I’ve ever seen; probably because it
was manufactured in California! With
the safety up in the safe position, the sear is blocked, preventing the hammer
and trigger from moving, and the magazine can be removed.
When the magazine is removed you cannot disengage the safety.
With the magazine inserted and the safety down in the fire position, the
magazine cannot be removed! I
wanted to be able to remove and install a magazine without having to worry about
the position of the safety and be able to engage and disengage the safety
without needing to have the magazine installed.
With
the safety up and blocking the sear the slide can be retracted only about 1/4”
to check if there is a round in the chamber.
With the slide retracted moving the safety in the up position locks the
slide open.

The
safety has 4 lobes that function as follows:
-
In the up or safe
position this lobe prevents the slide from opening.
If the slide is pulled to the rear moving the safety up locks the
slide open with this lobe. This is
manual; there is no last round hold open on this pistol.
-
In the up or safe
position this lobe blocks the sear so the hammer and trigger cannot move.
-
In the down or fire
position this lobe sits in a notch in the magazine release button and
prevents the magazine from being released.
-
The safety spring rides
in the two detents which locks the safety in the safe or fire position and
prevents it from moving.
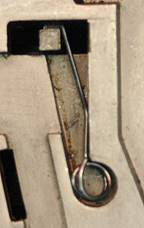
I
first modified the safety by cutting off and polishing lobe #3 as shown in the
above photo. This allowed me to
remove the magazine with the safety on or off.
Since I am not the original owner of this pistol the factory warranty
does not apply so I’m not worried about voiding the warranty.
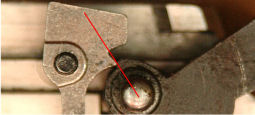
The
extra power recoil spring I purchased from M•Carbo (see below) was too long to
allow the safety to lock the slide open.
I used a file to remove 1/16” from the right side of lobe #1 indicated by
the arrow in Figure 7 and now I can lock the slide open with the safety.
I also
removed the safety block by lifting it up and out of the gun.
Apparently, this was supposed to be staked in place, but I was able to
remove it. This piece prevents the
safety from being engaged with the magazine removed.
This is a factory part and is not available for purchase.
With this part removed the safety still blocks the sear, but now I can
move the safety regardless of whether I have a magazine installed.
Improving the Firing Pin Block Safety
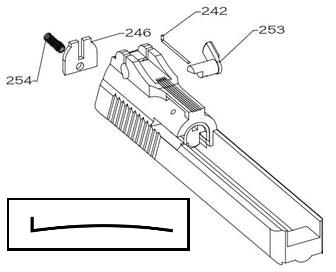
The
firing pin block safety on the slide (253) was very loose and sloppy, and I was
afraid it would engage under fire.
Couch Ninja Warriors has a YouTube video describing this same problem
https://www.youtube.com/watch?v=K8ZEPYmxneg&t=201s.
This safety is held in place with a
small, straight spring (242). I
removed the rear plate set screw (254) and moved the rear plate (246) down to
expose the end of the spring. I used
the smallest jeweler’s flat-blade screwdriver to lift the spring out of the
recess, then removed it with a pair of needle-nose pliers.
I put a slight curve in the spring (see insert) so it would set more
firmly against the safety. I removed
the safety, cleaned and oiled the recess in the slide, then reinstalled all the
parts. Now the safety positively
clicks in place and does not move around.
Polishing the Disconnector Channel
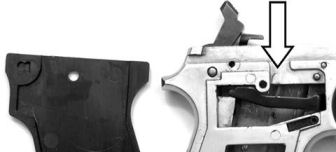
The
next problem I found was that the disconnector would not always reset.
It looked like it was binding between the frame and the grip.
I removed the right grip panel and disconnector and used a narrow
320-grit polishing stick to polish the channel in the frame.
It
looked like someone missed a pin and punched a divot in the frame, which you can
clearly see in the above photo. This
created a burr in the magazine well that caused the magazine to bind.
I used a flat jeweler’s file to remove the burr on the inside of the
frame, then polished with a 320-grit polishing stick.
I also
polished the inside of the plastic grip panel with 400-grit wet/dry sandpaper to
ensure it was smooth and flat. I
added a drop of oil to the disconnector channel and disconnector pivot pin,
reinstalled the grip panel, and everything worked as it should.
Polishing the Feed Ramp
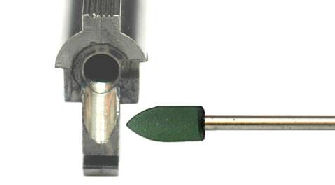
I used
a 1/4-inch Cratex bit and my Dremel tool to polish the feed ramp.
I ran the Dremel at a slow speed and moved the bit up and down the ramp.
It didn’t take long for the ramp to become polished.
Improving Reliability

M•Carbo (www.mcarbo.com) sells replacement
springs to improve the functionality and reliability of the HP22A.
Please note these parts are for the HP22A/HP25A, NOT the HP22.
Even though these springs are only for the HP22A, as clearly stated on
the M•Carbo web site, I wanted to try them anyway.
The
trigger spring kit consists of a lighter trigger return spring and sear spring,
and an extra power recoil spring which should last longer than the factory
spring and will help reduce battering of the slide and frame.
They have a YouTube video showing how to install these parts:
https://www.youtube.com/watch?v=bbPRDWzZcpY
The
extra power recoil spring was a bit too long for the HP22; it wouldn’t allow the
slide to come back far enough for the safety to lock it open.
I modified the safety as described above so I could lock the slide open.
With the new spring in place the gun fed and ejected rounds reliably, and
I hope it will allow me to shoot high velocity ammo.
This gun does not have a last round hold open feature.
The
HP22 doesn’t have a trigger return spring.
The metal around the pivot pin hole in the HP22 trigger is solid.
The metal around the HP22A trigger pivot hole has been milled to accept
the trigger return spring. To use
the M•Carbo trigger return spring I had to order a new trigger from the factory.
The new trigger came with the trigger bar
and trigger spring already installed.
I removed the HP22 trigger, then installed the HP22A trigger and M•Carbo
trigger return spring. This
increased the trigger pull by a few ounces, but now the trigger returns
positively.
After
the action work and with the new trigger return spring installed the trigger
pull now measures 4-pounds. The
disconnector functions as it should, and the hammer stays cocked when I rack the
slide. I pulled the bullet and
powder from a .22 LR cartridge and loaded the empty case in the chamber.
When I pulled the trigger the primer compound fired so everything is
working as it should.
Dry
Firing
I downloaded the manual from the Phoenix Arms web site and it clearly says do
not dry fire this pistol. If the
firing pin block safety is off, I can understand because the firing pin will
dimple the top of the chamber. But
if the firing pin block safety is on this may damage the hammer.
I folded a narrow piece of leather back on itself and placed it in front
of the firing pin. This acts as a
buffer so I can safely dry fire the pistol.
Summary
I’m sure whoever owned this pistol before me got very frustrated with all the
problems. Maybe that’s why the sear
legs were broken off to prevent someone else from using this faulty pistol.
However, with some new parts and polishing I was able to return it to
usable condition.
For
the money that I spent for parts I probably could have purchased a new HP22A.
But for me, part of the fun of gunsmithing is diagnosing and repairing
problems, and I now have a fully functioning, reliable, .22 LR carry pistol.
Addendum
About 2 weeks after publishing this article I
found the original sear spring. That was quite a miracle finding that
small part on the floor of my shop. I replaced the homemade sear spring
with the original factory spring. This increased the trigger pull by a few
ounces, but not enough to matter to me.
|