Pressure Testing Homemade .45 Colt Shotshells
by Roy Seifert
Click here to purchase a
CD with this and all Kitchen Table Gunsmith Articles.
Disclaimer:
This article is for entertainment only and is not to
be used in lieu of a qualified gunsmith.
Please defer all firearms work to a qualified
gunsmith. Any loads
mentioned in this article are my loads for my guns and have
been carefully worked up using established guidelines and
special tools. The
author assumes no responsibility or liability for use of
these loads, or use or misuse of this article.
Please note that I am not a professional gunsmith,
just a shooting enthusiast and hobbyist, as well as a
tinkerer. This
article explains work that I performed to my guns without
the assistance of a qualified gunsmith.
Some procedures described in this article require
special tools and cannot/should not be performed without
them.
Warning:
Disassembling and tinkering with your firearm may
void the warranty. I
claim no responsibility for use or misuse of this article.
Again, this article is for entertainment purposes
only!
Tools
and firearms are the trademark/service mark or registered trademark
of their respective manufacturers.
Introduction
I was surfing the Internet one day and found a YouTube video
by MannyCA on how to make .45 Colt shotshells using tools
and materials I already had on hand; the link to the video
is below.
Making .45 Colt Shotshells by MannyCA
WARNING: These loads are
over-pressure loads and should only be used in Ruger or
Contender handguns!
He also
has a video on shooting these homemade shotshells showing
their effectiveness. Handgun caliber shotshells can be very
effective against rats, snakes and other small varmints if
you get close enough. Often times you are right on top of a
snake before ever seeing it, which makes it close enough for
these shotshells to be effective. That’s why they are
sometimes called snake shot. When I hike through the woods
I carry a .45 Colt Ruger Blackhawk revolver and usually my
first two rounds are shotshell loads.
Assembling the Loads
Following MannyCA’s video I made my own .45 Colt shotshell
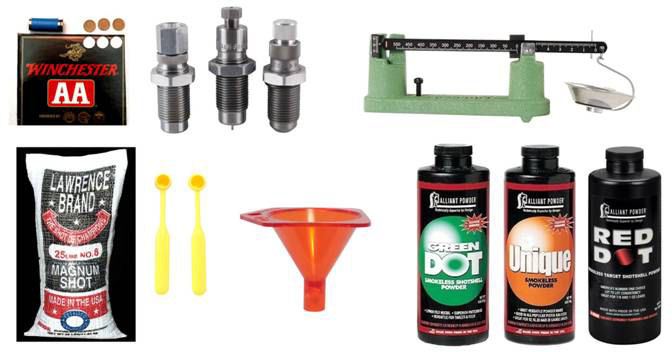
loads using the following materials:
-
Stiff
Cardboard – Any source of stiff cardboard will work; I
used a 12-gauge shotshell box, but cereal boxes and
canned beverage boxes work great as well.
-
Wad
Cutter – This is made from a resized and sharpened .45
Colt shell casing. I resized a case, then sharpened the
mouth with my chamfering tool and wrapped some blue
painter’s tape around it so I wouldn’t mistake it for a
reloadable case. I was surprised just how tightly my
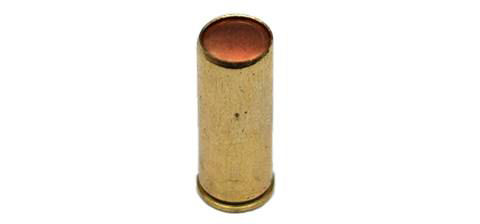
cardboard wads fit in the case!
-
Standard .45 Colt Reloading Dies
-
Reloading Press
-
Powder – For my test loads I used Unique, Red Dot and
Green Dot.
-
#8
shot – 160 grains
-
Dippers
-
Powder funnel
-
Scale
– beam or digital to weigh powder and shot
-
Gas
Checks (optional) – The gas check is used to cap the
shot, but you can use a cardboard wad as well.
I had all
these materials at home already so I didn’t have to go out
and buy anything. MannyCA used 9.5 grains of Unique, but I
wondered why he used this amount and if this load generated
excessive pressure. He was shooting them out of a Ruger
Blackhawk, the new mid-size model, so even if the pressure
was beyond the SAAMI maximum, it might not be a problem for
the Blackhawk. The online
Alliant Powder reloading manual gives 8.5 grains of
Unique for a 230 grain cast lead bullet as maximum at 850
feet per second, but did not provide any pressure data.
Since the shotshell uses only 160 grains of shot, 9.5 grains
of Unique might be alright; but how would I know without any
data? And what about other powders; would there be pressure
issues using other powders? I had 8-pound kegs of both Red
Dot and Green Dot so I decided to test some shotshell loads
using these other powders. My theory was that there would
be a pressure spike to get the shot column moving out of the
case, but would drop off quickly once the shot spread out.
I also thought that the pressure spike would be lower for
shot than for a solid bullet because gas would escape around
the shot once it left the case. (Wow was I wrong on that
theory; read on!) The only way to know was to perform
pressure testing.
Powder
Volume
I started with MannyCA’s recipe of 9.5 grains of Unique. I
discovered that Lee powder dipper 1.3cc threw about that
amount of powder. I wanted to keep the volume of powder the
same because I wanted it to take up the same amount of space
in the case, or less. Different powders have a different
load density; in other words, the same weight of different
powders will take up a different amount of space (have a
different volume). Looking at it the other way; the same
volume of different powders will have different weights.
I used
the 1.3cc Lee dipper because that left me enough space in
the case to load 160 grains of #8 shot and cap it with a .45
gas check. Using the 1.3cc Lee dipper gave me the following
powder weights:
|
Powder |
Weight (grs) |
|
Unique |
10.0 |
|
Red Dot |
8.5 |
|
Green Dot |
9.5 |
I
backed-off the Unique weight to 9.5 grains to match
MannyCA’s load and used a powder scale to accurately measure
the powder. These were the starting weights of powder with
which I performed my pressure measurements.
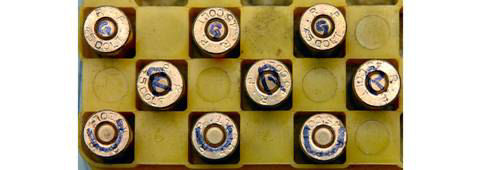
Although
I used the same size dipper for each load, I discovered that
9.5 grains of Green Dot filled the case too much so I had
trouble seating the gas-check on top. If I was to use this
load I would probably back this off to 8.5 grains. As you
can see in the above photo, each load is labeled; U for
Unique, R for Red Dot, and G for Green Dot.
Installing a Strain Gauge
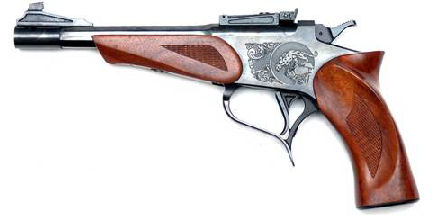
I found a
used
Thompson/Center Contender® with a .45 Colt/410 barrel on
Gunbroker for a very reasonable price. Not only will
the Contender allow me to attach a strain gauge over the
chamber, I can purchase additional barrels to test other
calibers, not to mention it’s a fun gun to shoot.
When I
performed the pressure measurements for my .45 Colt hog
loads I attached a strain gauge to the barrel of my
Marlin 1894 Cowboy rifle. Because the .45 Colt case is
so short most of the chamber was under the receiver threads
so I could only measure pressure at the mouth of the case,
not over the center of the case as recommended.

I
fabricated a strain gauge assembly by attaching 30-gauge
wires and a connecter to a strain gauge. Rather than using
the 28-gauge stranded wire which had a tendency to break
(refer to my article
Strain Gauges for Chamber Pressure Measurements) I
used 30-gauge solid wire-wrap wire available from
Radio Shack. I placed a dab of Armstrong A-12 epoxy on
the soldered ends of the strain gauge and on the back of the
connector to act as strain relief so the wires wouldn’t
break during handling.
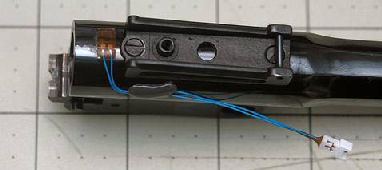
I removed
the rear sight blade assembly and attached the gauge to the
Contender barrel over the chamber using JB Weld epoxy. I
couldn’t get it over the center of the chamber because of
the rear sight base. Even though I had covered the soldered
connections on the strain gauge with A-12 epoxy, I was
careful not to get any JB Weld on those connections because
JB Weld has iron in it so it is not electrically insulated.
The A-12 epoxy didn’t seem to harden; it stayed tacky which
is why I decided to use the JB Weld. The blob of epoxy on
the side of the barrel in the above photo acts as strain
relief so I’m not moving the wires on the strain gauge
connections.
Measuring
Pressure
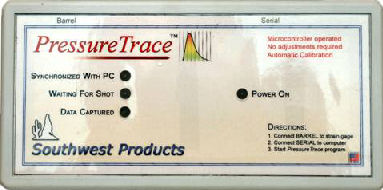
The
strain gauge is connected to the excellent
PressureTrace™ device available from
Recreational Software, Inc., which in turn is connected
to my laptop via the serial RS232 port. I have the older
RS232 version; the newer version connects to a computer via
a wireless Bluetooth connection. The Pressure Trace device
measures and amplifies the slight voltage change in the
strain gauge caused by the barrel expanding when a round is
fired. The software running in the laptop converts that
reading into pressure in PSI and graphs it on the display.
The SAAMI
maximum pressure for .45 Colt is 14,000 PSI so I wanted my
shotshell loads to be at or below this figure. That would
make them safe in both the heavier Rugers and Contenders,
and lighter Colts and Colt clones.
I first
calibrated the Pressure Trace device by firing a
verification load of 5.4-grains of Titegroup powder under a
230-grain cast lead round nose bullet. This is my normal
cowboy load that chronographs at 740 feet per second. All
of my reloading manuals show .45 Colt loads in copper units
of pressure (CUP) so I made an assumption. Since the SAAMI
maximum pressure for .45 Colt is 14,000 PSI my cowboy load
should be below that since it is far from the maximum load
of 6.5-grains of Titegroup. I did a rough ratio and
proportion calculation and assumed that if 6.5-grains of
Titegroup equaled 14,000 PSI (just a guess on my part since
no pressure data was available), then 5.4-grains would equal
in the neighborhood of 11,600 PSI.
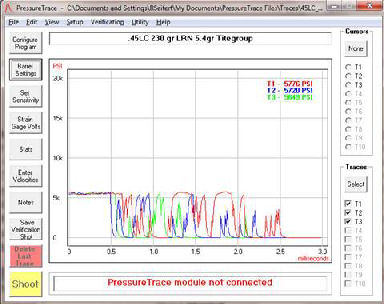
My cowboy
loads averaged 5,719 PSI. This makes sense since test
barrels have a very tight chamber which generates higher
pressure readings. My Contender has a commercial chamber so
the readings would be lower. Once the device was calibrated
I began testing my shotshell loads.
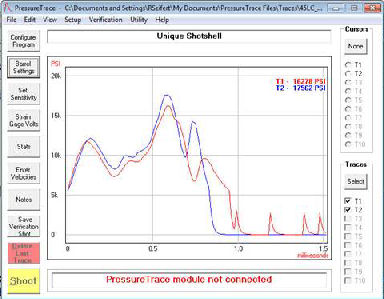
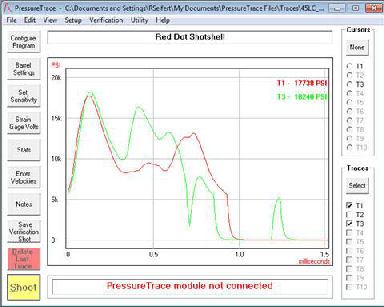
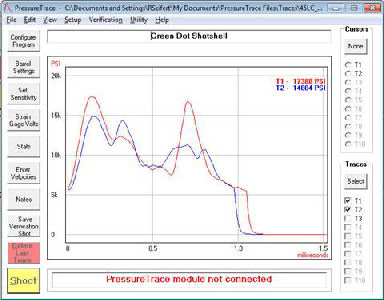
I fired
three loads of each different powder to get an average
pressure reading. I eliminated the highest of the three
readings; the results are in the following table.
|
Powder |
Weight (grs) |
Pressure (PSI) |
|
Unique |
9.5 |
16,920 |
|
Red Dot |
8.5 |
17,989 |
|
Green Dot |
9.5 |
16,136 |
To my
surprise all three loads were over the SAAMI maximum
pressure of 14,000 PSI! This is probably safe in Ruger
single-actions and Contenders, but not for an original Colt
that was designed to shoot only black powder, low-pressure
loads. I would even question using these loads in modern
Colt clones! I would probably reduce each load by at least
1.0 full grain to get them within the SAAMI maximum pressure
specification.
Summary
I have a personal philosophy to never shoot someone else’s
reloads, nor use someone else’s handload recipe. I have had
problems in the past with other people’s reloads; I damaged
my son’s M1 Garand barrel because we were shooting gun show
reloads (refer to my article
Rebarreling Two M1 Garands). Reloading manuals
contain safe handload formulas that have been thoroughly
tested and should be followed; not someone’s personal pet
load. Pet loads should be verified against published
reloading data. Someone’s personal recipe may just be a
recipe for disaster!
|
