Improving a .30
Carbine Super Blackhawk
by Roy
Seifert
Click here to purchase a zip file with this and
all Kitchen Table Gunsmith Articles.
Disclaimer: This
article is for entertainment only and is not to be used in lieu of a
qualified gunsmith. Please
defer all firearms work to a qualified gunsmith.
Any loads mentioned in this article are my loads for my
guns and have been carefully worked up using established guidelines and
special tools. The
author assumes no responsibility or liability for use of these loads,
or use or misuse of this article.
Please note that I am not a
professional gunsmith, just a shooting enthusiast and hobbyist, as well
as a tinkerer. This
article explains work that I performed to my guns without the
assistance of a qualified gunsmith.
Some procedures described in this
article require special tools and cannot/should not be performed
without them.
Warning: Disassembling
and tinkering with your firearm may void the warranty.
I claim no responsibility for use
or misuse of this article. Again,
this article is for entertainment purposes only!
Tools
and firearms are the trademark/service mark or registered trademark of
their respective manufacturers. Click on any
blue text to go to a
product/seller web site.
Introduction
I have many Ruger revolvers in my collection, most are in .45 Colt, but I also
have two Single Sixes in .22/.22 WMR.
As a member of the Ruger Revolvers Only Facebook group I see many
posts about the .30 Carbine Blackhawk.
I thought this would be an interesting revolver to own, especially since
I own a commercial M1 carbine. Since
both take the same cartridge, it would be very handy to have when hog hunting or
in a SHTF situation. I found a used
.30 Carbine Blackhawk on Gunbroker for $479 plus $10 shipping, and the dealer
took a credit card with no additional fees.
After paying the $30 transfer fee from my FFL dealer I am now the new,
proud owner. The serial number
indicates it was built in 1997.
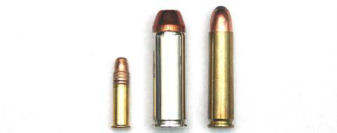
.30
Carbine
The .30 Carbine cartridge was developed by Winchester and is basically a rimless
.30 caliber version of the old .32 Winchester Self-Loading cartridge of 1906
made for the Winchester Model 1905 rifle. The
.30 Carbine is more powerful than its parent cartridge and has more muzzle
energy than a .357 magnum.
This
cartridge was designed for use in the M1 Carbine rifle, which was issued to
infantry officers, machine gun, artillery and tank crews, paratroopers and other
line-of-communications personnel in lieu of the larger, heavier M1 Garand.
It was meant to replace the M1911 handgun for those personnel.
Some people believe that the .30 Carbine was designed for use in pistols
because of its relatively straight case and the rounded nose of its bullet.
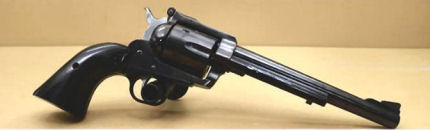
Initial Inspection
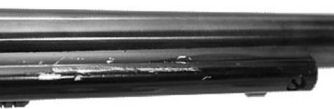
The
gun was in pristine condition except for the ejector rod housing which was
scratched and marred. This was
disclosed by the seller, which is probably why no one else wanted to buy it.
It looked like a previous owner had dropped it against something.
This housing was made of aluminum, but I had a blued steel housing I
purchased from Brownells
#850-200-200 which took me all of 5 minutes to install.
I cleaned and oiled the barrel under the housing and the housing itself
and installed the retaining screw with a drop of Loctite blue.
The gun came with some very fat grips made from some artificial material.
There were some imperfections and blemishes on the grips, but they were
just too fat for my hands.
To my
surprise, the gun was clean, but not up to my standard.
In fact, one chamber was still dirty because a cartridge would not
chamber all the way. I ran a bore
brush then a cleaning patch soaked with Ed’s Red through the barrel and each
chamber. I also cleaned the base pin
channel in the cylinder. I dried
everything off, then ran an oily patch through the chambers and barrel, followed
by a dry patch.
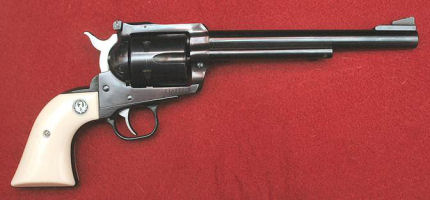
I had
a set of white polymer grips with Ruger medallions, but I don’t remember from
where I purchased them. These are
standard sized grips and make a very nice contrast to the blue/black gun as you
can see in the above photo. I may
eventually replace the aluminum grip frame with a steel one.

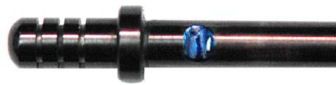
This
gun came with a very odd ejector rod.
Two sides of the rod were milled flat and the end was flat.
Looking at the end it looked like a quarter of a pie.
I posted this on Facebook in the Ruger Revolvers Only group and
the answer came back that this was required on large-frame Blackhawks that use
small diameter cartridges so the rod doesn’t touch the cylinder when ejecting a
spent case.
Installing a Belt Mountain Base Pin
In my collection of Vaquero/Blackhawk spare parts I have two blued Belt Mountain
Base Pins. These pins are slightly
larger than a factory base pin which is supposed to eliminate cylinder wobble
which could result in some accuracy improvement.
I had originally purchased them for my blued 4 5/8 Vaqueros, but I sold
those two guns in favor of stainless steel 5 1/2 Vaqueros.
However, being a packrat, I kept the two Belt Mountain base pins and
decided to install one on this Blackhawk.
The
Belt Mountain base pin must be fitted in four places; the hole in the front of
the frame, the hole in the rear of the frame where it touches the transfer bar,
the hole in the cylinder, and the notch for the base pin latch.
To test for fitting, I removed the ejector rod housing, factory base pin,
the cylinder, and the base pin latch.
The
holes in the frame and cylinder measure 0.250; 1/4 inch.
The Belt Mountain base pin fit in the
cylinder and front frame hole perfectly.
However, the rear hole in the frame had a small burr that prevented the
base pin from being installed correctly. I
used a small, half-round jeweler’s file to remove the burr and the pin fit
through the frame perfectly.
The
base pin latch would not fit in the notch in the base pin.
Following the instructions, I used a blue marker to mark the notch,
installed it in the revolver, and tested the base pin latch for fit.
If it was tight, I used a mallet with a nylon head to gently tap on the
base pin latch, then tap the threaded end to free it from the notch.
When I removed the base pin there was a white mark where the latch was
contacting the notch. This told me
where I had to remove metal. I used
a half-round jeweler’s file to carefully remove a small amount of metal at the
mark. I remarked the notch with a
blue marker and again tested for fit.
I continued to mark, test and file until the base pin latch fit into the
notch. I polished the notch with
400-grit wet/dry paper, then cold blued with Brownell’s Oxpho-Blue #082-024-004.
Finally, I replaced the factory base pin latch spring with a Wolff extra-power
base pin latch spring I purchased from MidwayUSA.com
#469178. I reinstalled the base
pin latch, spring, and nut and everything was working properly.
Installing a Lighter Trigger Return Spring

I
disassembled the revolver and replaced the heavy factory trigger return spring
with a Wolff reduced power trigger return spring purchased from MidwayUSA.com
#436652 (refer to my article
Ruger® Single-Action Revolver
Disassembly/ Reassembly and Spring Replacement).
This can greatly reduce trigger pull weight.
After I replaced the spring, the trigger pull weight went from 4 lbs. 2
oz. to 2 lbs. 2 oz.; almost half of the factory pull weight.
Some people perform a “poor man’s action job” by lifting one leg of the
factory trigger return spring off the trigger spring retaining pin, but the
loose leg can interfere with the hammer spring.
The correct method is to replace the spring with a lighter one.
Replacing the hammer spring with a reduced power hammer spring can also
reduce trigger pull weight, but light primer strikes can affect accuracy, so I
left the factory hammer spring in place.
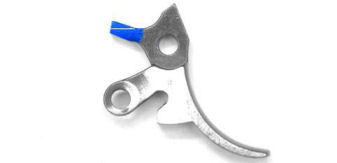
Installing a Half-Cock Hammer
All
Ruger Blackhawks, large-frame Vaqueros, and Single-Six revolvers have the same
problem; if the cylinder is rotated backwards against the pawl, the chambers are
not aligned with the loading gate.
This can be corrected by installing a Power Custom half-cock hammer.
With the hammer in the half-cock position the pawl is raised just enough
so when the cylinder is rotated backwards a chamber is aligned with the loading
gate and ejector rod.
I
purchased the hammer from MidwayUSA.com
#439111. This is a special-order
item, but it arrived in only one week.
I have installed these hammers on both of my large-frame Ruger Vaqueros
(refer to my article
Installing a Half-Cock Hammer in an Old Model Ruger® Vaquero®).
This time, the hammer came with the proper installation instructions.
The
hammer is a drop-in part, but the trigger and transfer bar both need to be
modified. If you don’t want to mess
with the factory trigger, MidwayUSA.com sells the hammer with a new trigger and
Wolff spring kit
#345935, but the transfer bar still needs to be modified.
This full kit is more expensive, but I
wanted to do the gunsmithing myself and save some money.
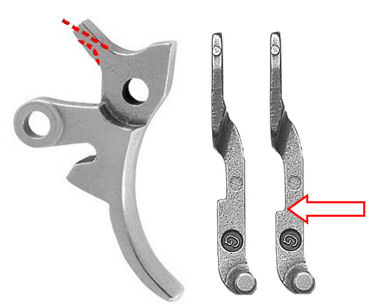
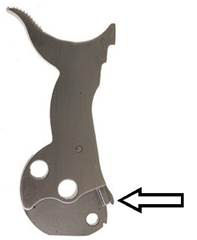
The
following modifications need to be performed to the factory trigger and transfer
bar:
-
The top of the trigger sear needs to be milled so the sear is 0.040” thick
to fit into the half-cock notch.
-
The bottom of the trigger sear needs to be radiused to fit in the curve of
the hammer.
-
The safety notch in the transfer bar needs to be lengthened by 0.090” –
0.100” so the loading gate can be opened with the hammer in the half-cock
position.
I
coated the sear with a blue marker and scribed the trigger down to where I would
have to mill. I used a 0.250 milling
bit to mill off the excess metal from the top of the trigger.
I
radiused the bottom of the sear with a small grinding bit and my high-speed
rotary tool. I was careful not to
overheat the trigger because I didn’t want to ruin the heat treating.
I used the Ruger single-action hammer a trigger pin holes in the top of
my Power Custom Series I stoning fixture to test for fit of the modified trigger
into the half-cock notch on the hammer.
I polished and cold-blued the trigger surfaces I worked on.
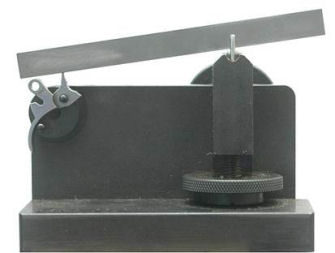
Finally, I installed the trigger in my Power Custom Series I stoning fixture
with the RSA adapter and used my fine and extra-fine ceramic sticks to polish
the sear. The original trigger pull
was inconsistent at about 4 lbs. 2 oz. and was long with significant creep.
But with the reduced power trigger return spring and half-cock hammer,
the new trigger pull is now 1 lb. 13 oz. and crisp with no creep.
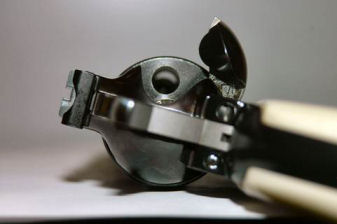
With
the hammer in the half-cock position, when I rotate the cylinder backwards
against the pawl a chamber is lined up perfectly with the loading gate.
I tested to ensure the hammer would fully cock on all six chambers.
If not, the lower tooth on the pawl would have to be modified, but my gun
locked up on all six chambers.
Every
Gun is Different
Every gun is different due to manufacturing tolerances, and this gun was no
different. The Power Custom
half-cock hammer was just a bit wider and thicker than the factory hammer which
caused it to bind in the aluminum grip frame.
I used a file to remove the factory finish (which was thick like a paint)
from the inside of the hammer gap in the grip frame, which no one will see, and
lengthened the gap just a bit so the hammer wouldn’t bind.
I also had to file some burrs from the rear of the trigger cutout in the
grip frame where the trigger was dragging.
Now the action is smooth with no drag.
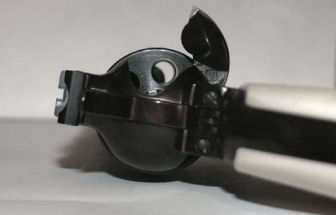
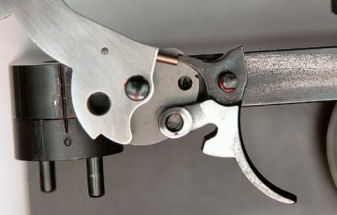
I
broke My Gun!
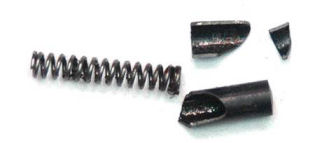
In the
process of disassembling and reassembling the gun I broke the cylinder stop
plunger. This plunger presses
against the cylinder stop – sometimes called the bolt – to return it to the
raised position when cocking the hammer.
This locks the cylinder in place when the hammer is cocked and prevents
the cylinder from rotating. I think
I didn’t get the grip frame aligned properly with the cylinder frame and applied
too much sideways force which broke the plunger.
I
couldn’t find the part at Brownells or MidwayUSA and eBay sellers wanted $25 or
more. I found a used one at Numrich
www.gunpartscorp.com for $8.95 plus
shipping. The shipping was almost as
much as the part, so I also purchased a new trigger in case I had to return a
modified gun to Ruger. Ruger will
replace any after-market parts with factory parts, so I always keep my factory
parts. However, since I modified the
triggers on my two Vaqueros and this Blackhawk, I would have to replace those
parts with the factory parts before sending any of them to Ruger for repair.
When
the new plunger arrived, the inside was filled with some crystalline substance.
This may have been old oil or grease that had dried out.
I thoroughly cleaned and oiled the inside of the plunger, inserted the
original spring, and reassembled the gun.
Everything now works the way it should.
Summary
This was a fun project and I now have a beautiful Blackhawk in my
collection.
|

