Etching With Electrolysis
by Roy
Seifert
Click here to purchase a zip file with this and
all Kitchen Table Gunsmith Articles.
Disclaimer: This
article is for entertainment only and is not to be used in lieu of a
qualified gunsmith. Please
defer all firearms work to a qualified gunsmith.
Any loads mentioned in this article are my loads for my
guns and have been carefully worked up using established guidelines and
special tools. The
author assumes no responsibility or liability for use of these loads,
or use or misuse of this article.
Please note that I am not a
professional gunsmith, just a shooting enthusiast and hobbyist, as well
as a tinkerer. This
article explains work that I performed to my guns without the
assistance of a qualified gunsmith.
Some procedures described in this
article require special tools and cannot/should not be performed
without them.
Warning: Disassembling
and tinkering with your firearm may void the warranty.
I claim no responsibility for use
or misuse of this article. Again,
this article is for entertainment purposes only!
Tools
and firearms are the trademark/service mark or registered trademark of
their respective manufacturers. Click on any
blue text to go to a
product/seller web site.
Introduction
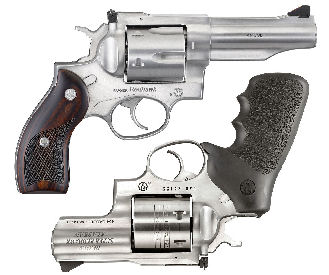
I
have two .45 Ruger Redhawks in my collection which I converted to also shoot .45
ACP with moon clips by thinning the ejector star.
Refer to my articles
Converting a KRH .45 LC Redhawk to shoot .45LC and .45ACP and
Building the Super Redhawk
“Triple Defender”. Because
I altered the caliber I needed to mark the new caliber somewhere on the barrel.
I thought the best way to add .45 Auto to each revolver was to etch the
new caliber with electrolysis.
The
electrolysis process involves applying 12-volts to a salt water mixture to the
metal through a mask. The
combination of the electricity and salt water etches the metal through the mask.
The mask prevents etching where it is not wanted so only the text is
etched.
Creality Falcon A1 Pro
After doing a lot of research on the Internet the method I found was to paint
the object I want to etch, then burn off the paint with a laser etchr leaving
behind the mask to be etched into the metal.
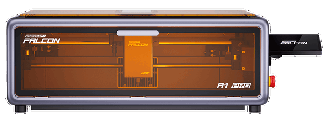
I
purchased a
Creality Falcon A1 Pro direct from the manufacturer at an excellent Labor
Day discount price. Based on what I
read, this Chinese-built laser was the easiest to use and learn.
I also purchased the 2-watt IR laser module for marking metal, and the
honeycomb mat for cutting material.
I got a discount for purchasing all the items as a set.
This is the tool I’ll use to create the mask.
Please note that a diode or IR laser will not actually etch the metal; it only
marks the metal. However, I can
create the mask using the laser engraver, then etch the metal with electrolysis.
Falcon Design Space
Creality has a software program called
Falcon Design Space which can be downloaded from their web site for free.
One of the major benefits of the Falcon A1 Pro is that it comes with an
overhead camera. Using that camera,
I can take a photo of my work piece, then place my artwork on the exact location
I want to etch or cut.
Creality also has a
Falcon A1 Pro Parameter Guide that gives speed and laser percent power for
various types of materials using the 20-Watt and 2-Watt lasers for engraving and
cutting. With some practice and
experimentation, I modified some of the suggested settings to fit my needs.
Practicing

My
wife purchased a stainless-steel knife at the dollar store.
This is my sacrificial test knife.
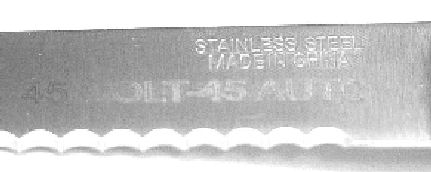
I
tried engraving directly onto the knife with the 2-watt IR laser, and although
it etchd the steel, it wasn’t deep enough as you can see from the above photo.
If all I wanted to do was mark the steel I could purchase a laser marking
spray which, when lased, leaves a nice permanent mark.
I
still like the adhesive mask method, but I can’t cut vinyl with the laser
because when burned, the poly-vinyl chloride (PVC) produces harmful fumes.
Even though the fumes are exhausted and filtered, I don’t want to take
any chances.
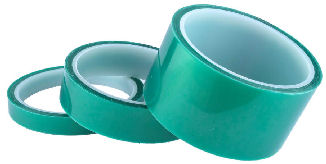
One
suggestion from the Internet was to use
polyester high temperature masking tape.
I purchased a 3-roll set from Amazon.
I can burn this tape without creating any harmful fumes.
I
laid the narrowest tape onto the knife blade and engraved it with the IR laser.
The laser burned through the tape exposing bare metal.
Etching Tools
To
do the etching I needed some tools.
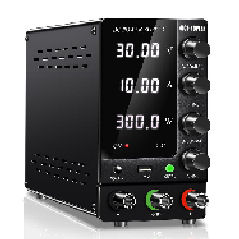
I purchased an
adjustable power supply and
test leads from Amazon. The
power supply has banana jacks into which I can plug the test leads.
The red lead (positive) is plugged into the positive side of the power
supply, the other end plugs into one of the alligator clips which gets attached
to the gun.
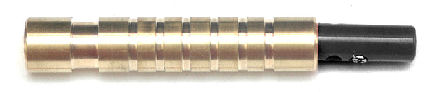
I
used my lathe to fabricate an etching wand out of a scrap piece of 1/2” brass
rod. The black lead plugs into the
negative side of the power supply, and into a hole I drilled in the wand.
The large notch up front is to hold a rubber band wrapped around a pad
which I will wet with the etching solution.
The smaller notches provide a gripping surface.
Etching the Knife
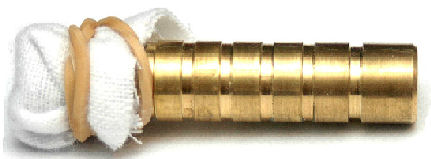
I
poured about 2 tablespoons of salt into a plastic cup and mixed it with warm
water. This is the etching
solution. I wrapped two .45 gun
cleaning patches around the top of the wand and secured it with a rubber band.
I connected the positive lead to the knife with an alligator clip and the
negative lead to the wand and set the power supply to 12-volts, 1-amp.
I dipped the pad into the etching solution, removed most of the solution
by pressing the pad against a paper towel, then touched the pad to the mask on
the knife.
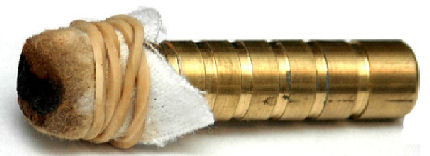
When I touched the wet patch to the knife it started to turn black.
This is from the metal being removed from the knife.
I
was impressed with the results. The
engraving was clean and deep; the above photo doesn’t do it justice.
I think for the gun I’ll increase the amperage to 2-amps.
The pad got very dirty so I’ll change the patches frequently for the gun.
I really like the fact that I can create the mask directly on the gun
without having to transfer it from one medium to another.
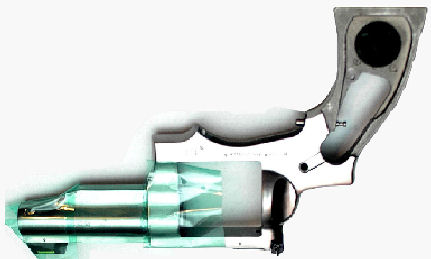
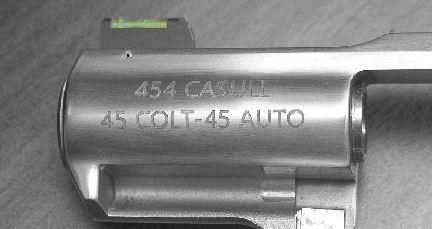
Engraving Locations
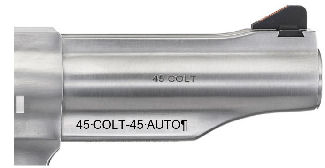
The
Redhawk has the original 45 COLT caliber marking on the barrel.
I decided to etch the new marking on the back of the ejector shroud as
shown in the above figure.
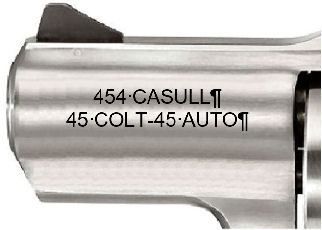
On
the Super Redhawk Alaskan there was not enough space on the ejector shroud to
also etch the additional caliber so I decided to etch the opposite side of the
barrel. This side was blank which
gave me plenty of room to etch all the calibers.
Disassembling the Revolvers
I disassembled the revolvers by removing the grips, trigger group and cylinder
so it would lay flat in the engraver.
I cleaned the surface of the gun with alcohol to remove any oil.
I
placed a strip of the wide polyester tape onto the gun so it covered the barrel
and shroud. I made sure the tape
was perfectly flat against the metal.
I covered as much of the exposed metal as I could so it wouldn’t get
stained by the etching fluid. I
laid the gun in the laser cabinet upside down and took a photo with the built-in
camera. I had to lay the gun upside
down because the laser head kept running into the recoil shield of the gun and
moving it. I positioned the
upside-down text onto the ejector shroud.
I used the 2-watt IR laser to burn the letters into the tape mask.
I
etched the metal on the gun like I did the knife.
I replaced the patches frequently.
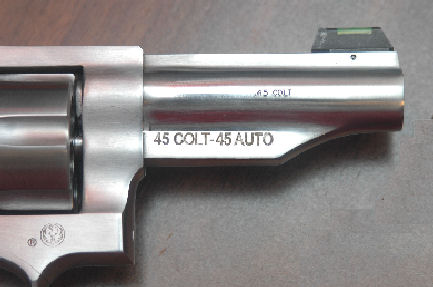
I
was pleased with the results. The
engraving came out nice and it was deep.
I
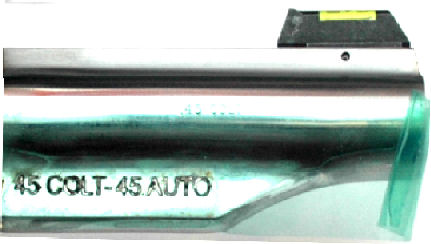
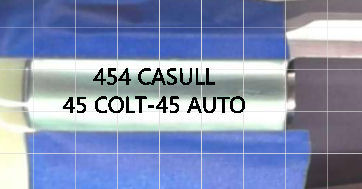
setup the green polyester hi temp tape on the blank side of the barrel as before
and put two strips of blue masking tape on the top and bottom so it would show
up better in the laser engraver camera.
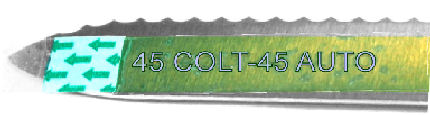
I positioned the text on the barrel as shown in the above photo.
As
you can see in the above photo the engraving came out sharp and clear.
I am very pleased with this process and if I change the caliber of
another gun I can etch the barrel.
|
