Slicking Up a Pietta 1873 Single Action Revolver
by Roy Seifert
Click here to purchase a
CD with this and all Kitchen Table Gunsmith Articles.
Disclaimer:
This article is for entertainment only and is not to
be used in lieu of a qualified gunsmith.
Please defer all firearms work to a qualified
gunsmith. Any loads
mentioned in this article are my loads for my guns and have
been carefully worked up using established guidelines and
special tools. The
author assumes no responsibility or liability for use of
these loads, or use or misuse of this article.
Please note that I am not a professional gunsmith,
just a shooting enthusiast and hobbyist, as well as a
tinkerer. This
article explains work that I performed to my guns without
the assistance of a qualified gunsmith.
Some procedures described in this article require
special tools and cannot/should not be performed without
them.
Warning:
Disassembling and tinkering with your firearm may
void the warranty. I
claim no responsibility for use or misuse of this article.
Again, this article is for entertainment purposes
only!
Tools
and firearms are the trademark/service mark or registered trademark
of their respective manufacturers.
Introduction
When I first got started in Cowboy Action Shooting 15 years
ago I researched the guns I would need. The two most
popular styles of single-action six-gun revolvers were, and
still are, the Ruger Vaquero , and the Colt Single Action
Army (SAA) and its European clones. The Schofield revolver
wasn’t popular or readily available at that time, and since
the Vaquero was stronger and more robust than the SAA –
which was prone to breakage when used regularly for
competition – I decided to go with the Vaqueros. If you
read my articles you know that I am a Ruger single-action
man with Vaqueros, Blackhawks, and Single Sixes in my
collection, and I have many articles on how to modify and
improve the Ruger platform.
Recently
I’ve had a number of questions from readers of the Kitchen
Table Gunsmith regarding SAA’s and their clones. Having
never owned or worked on this style of revolver I decided I
needed to learn more about them. At the time I was
researching guns
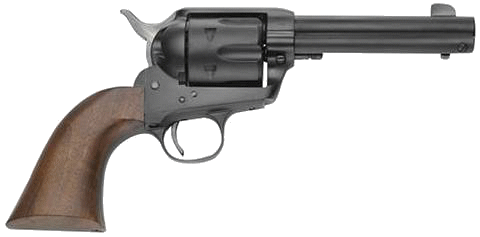
Cabela’s was selling the Millennium revolver for $200.
This was a Colt SAA clone manufactured by
F.A.P. di Pietta Giuseppe & C. S.n.c. of Italy imported
by
Century Arms International. Although somewhat improved,
this same gun is still available today, now called the 1873
model. The price was very reasonable then, and 15-years
later the price was still reasonable, so I purchased two of
them in .45LC (my preferred caliber) from
WholesaleHunter.com, an online sporting goods outlet.
The price was so reasonable I could purchase two of these
Italian Colt clones for about the same price as one Ruger
Vaquero!
Personally I had no problem purchasing an Italian clone. I
have heard and read stories of the earlier clones being of
poor quality, but the Italians learned quickly that if they
wanted to compete in the American firearms market, and
especially with the
SASS® crowd, they needed to up their game. So much so
that these revolvers were named “Best Gun” by SASS® in 2002
and 2008.
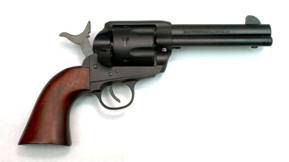
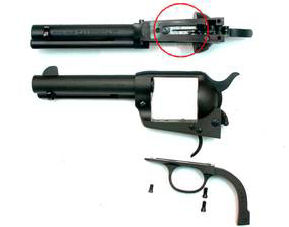
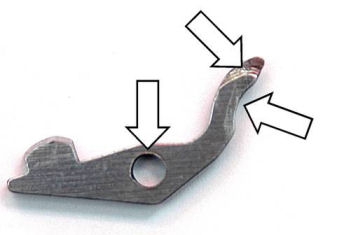
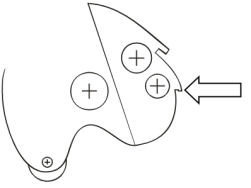
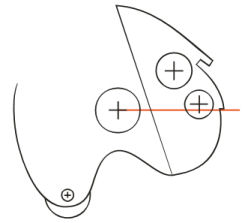
Overall
Assessment
(Diagrams courtesy F.LLI PIETTA Srl)
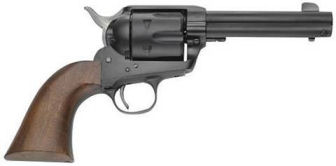
After the
guns arrived I carefully examined them and gave them a
thorough cleaning. These guns are within six serial numbers
of each other so from now on I will refer to them as gun #85
and gun #91. I was a little disappointed that these were
not faithful reproductions of the Colt 1873 SAA. They did
not have the first safety notch click when cocking the
hammer because they came with a transfer-bar safety similar
to a Ruger. This meant I could safely load all six chambers
and not worry about having a hammer-mounted firing pin rest
on a live primer. The firing pin was mounted in the frame
and not on the hammer. Also, instead of having a flat hand
spring like an original Colt they had a coil spring and
plunger again similar to a Ruger. I feel as though I
purchased two “Col-gers” (a Colt/Ruger hybrid). Pietta made
safety and reliability improvements to the old 1873 pattern
by using a transfer bar and coil spring and plunger for the
hand.
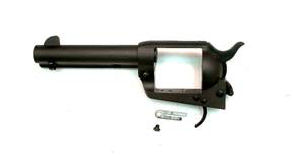
The
finish was matte blue; they feel almost like they were
Parkerized. The action of each revolver, being brand new,
was stiff and the triggers broke at 2.8 pounds for each
gun. However, the trigger pull was long with a lot of creep
indicating that the sear ledge on the hammer was too deep.
I also
discovered that the hammer spring was so stiff that while
speed-cocking the revolvers like I would during a cowboy
match I sometimes didn’t get the hammer fully cocked so when
my thumb slipped off of the hammer spur the hammer dropped
into the half-cock notch. The half-cock notch helps to
prevent the dreaded “skipped round” but does cost time on
the clock. A reduced power hammer spring should fix this
problem.
I found a
couple of articles on the Internet (links below) on how to
improve the action of a SAA clone, plus I have two books in
my library on how to work on these revolvers, so these
references were the starting point for my work.
http://www.hobbygunsmith.com/Archives/Oct04/Interview.htm
http://www.gunblast.com/JimTaylor_Uberti.htm
Tools and
Parts

Most of
the tools, parts and supplies I purchased from
Brownells unless otherwise noted. After purchasing the
guns I purchased a set of screwdriver bits made specifically
for the Colt SAA and clones
#080-000-086, a Wolff reduced power bolt and trigger
spring
#969-322-900, and a Wolff reduced power hammer spring
#969-322-800. The screwdriver bits will help prevent me
from buggering up the screw heads when disassembling and
reassembling the guns, and the reduced power springs will
lighten the action and trigger pull.
Many
years ago I purchased the
Gunsmith Action Set of polishing stones from
Boride Engineered Abrasives. I have used these
excellent stones for many years on many guns; these are some
of the best tools I own for stoning gun parts.
By the
way, I never replace springs until AFTER I perform polishing
and function checks. I had a Ruger Vaquero that would no
longer function with a reduced power trigger return spring
because the trigger was rubbing against the frame. I had to
open up the cutout in the frame so the trigger would
function properly with the reduced power spring.
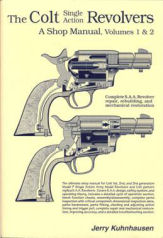
I also
purchased The Colt Single-Action Revolvers, A Shop Manual
Volumes 1 & 2 by Jerry Kuhnhausen from MidwayUSA
#133799. I have a number of Jerry’s excellent books in
my library and have found them to be a very important source
of information when working on guns.
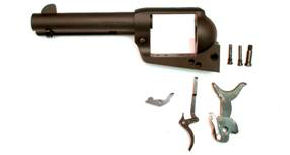
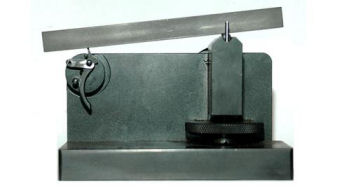
Barrel
and Chamber Throat Measurements
I slugged the barrel and measured the chamber throats in
each gun. The bores measured 0.452 which is what I
expected, and the chamber throats measured between 0.452 -
0.4535. Since some of the throats were right at 0.452 I
decided to open them up just a bit.

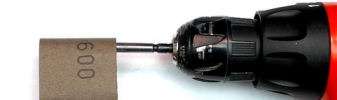
I
purchased a chamber throat reamer
#513-000-001 that opens the chamber throats to 0.4525.
It came with a pilot bushing so the reamer stayed centered
in the chamber. I have used this reamer to open the chamber
throats in all my .45 LC revolvers.
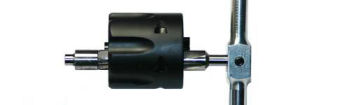
I
attached a T-handle to the reamer, lubricated it with
cutting oil, and ran the reamer through all the chambers in
both cylinders. I inserted the pilot bushing into the
cartridge end of the chamber until it met with the throat,
then I turned the reamer by hand until the teeth came
through the end of the cylinder. I flushed the chamber with
brake parts cleaner to remove any oil and leftover chips,
then lubricated each chamber with gun oil. For most of the
chambers the reamer fell through and performed no cutting.
The reamer shaved metal from only two chamber throats, the
ones that measured 0.452.
I am a
big fan of Ruger revolvers, but every big-bore Ruger I have
ever worked on had the same two problems; the chamber
throats were undersized, and there was a constriction inside
the barrel under the barrel threads. These two conditions
are detrimental to accuracy and require some work to correct
(refer to my article
Accurizing the Ruger Single-Action Revolver.) It
seems more care was given by the Italians during their
manufacturing process than one of the largest American
firearms companies! My two Pietta 1873’s had no barrel
constriction, and chamber throats were the proper size.
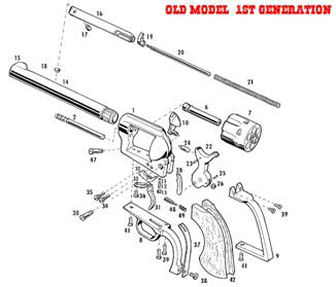
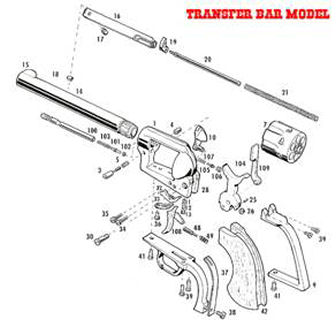
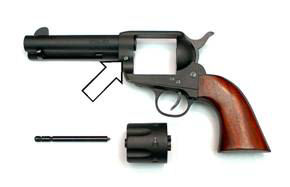
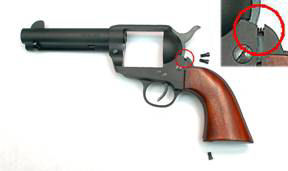
Disassembly
Disassembling the Colt single-action revolver is pretty
easy. Always use hollow-ground screwdriver tips of the
proper size to prevent from buggering the screw heads.
These photos and write up are for gun #91, but I performed
the same work to both revolvers.
|
|
Make sure the revolver is unloaded! |
|
 |
Place the hammer in the half-cock position and open
the loading gate. |
 |
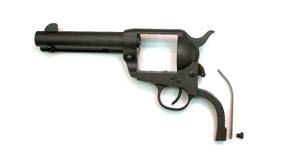
Press in the base pin latch and pull out the
cylinder base pin. Remove the cylinder from the
right of the frame.
Close the loading gate.
Hold the hammer back so the trigger is out of the
loading notch, press the trigger, and allow the
hammer to move to the fully forward position and
rest against the frame. |
|
N/A for one-piece grips |
Remove the grip panel screw and remove the two grip
panels. My guns had one-piece grips so I did not
have to perform this step. |
 |
Remove the three screws from the back strap; two
from the top and one from the bottom. The bottom
screw is a different size from the two top screws;
do not get them confused. Set them aside in a small
container so you don’t lose them.
Notice the hand spring that is exposed when the back
strap separates from the frame. |
 |
With one-piece grips; rotate the back strap and grip
back and down to remove it from the trigger guard.
With two-piece grips; remove the back strap. |
 |
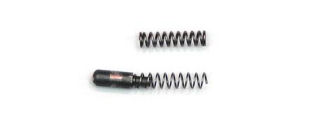
Remove the hand spring and plunger from the rear of
the frame. Your revolver may not have this feature. |
 |
Remove the hammer spring retaining screw and remove
the hammer spring. This screw was installed with
Loctite by the factory so it was very tight on my
two revolvers. I was sure to use the proper size
screwdriver blade/bit. |
 |
Remove the three screws from the trigger guard and
remove the trigger guard. The front screw is
smaller than the two rear screws so don’t get them
confused.
This exposes the bolt and trigger return spring and
retaining screw inside the bottom of the frame. |
 |
Remove the bolt/trigger return spring retaining
screw and remove the spring. This screw was
installed with Loctite at the factory so it was very
tight on my two revolvers. I was sure to use the
proper size screwdriver blade/bit. |
 |
Remove the three screws from the side of the
frame. The trigger and transfer bar, hammer and
hand, and bolt can now be removed from the bottom of
the frame.
If you have the old-style hand with a flat spring
attached you will have to lower the hammer through
the bottom of the frame to remove the hand and
spring. |
 |
Remove the loading gate detent plug screw from the
bottom of the frame, then remove the detent spring
and plunger.
Remove the loading gate from the frame by pulling
forward. |
Polishing
the Bolt

To my
surprise I found the right leg of the bolt had been cut off
to accommodate the transfer bar. There were some burrs left
when the leg was cut which I polished off using a 400-grit
stone.
The sides
of the bolt had tooling marks and burrs around the pivot
hole. I polished the sides of the bolt with 600-grit
wet/dry paper. The goal here was not to alter the
dimensions of the bolt, just polish off the burrs. I used a
Cratex bit and my high-speed rotary tool to polish the curve
and tapered end that ride on the bolt cam.
After I
reassembled the gun I discovered the bolt would not stay
down when the hammer was in the half-cock, loading
position. The curved leg of the bolt was slipping off of
the cam on the hammer causing the bolt to fall too early.
Upon inspection I found the long leg was a few thousands of
an inch away from the cam. I carefully pressed a large,
flat-blade screwdriver between the two legs to spread them
apart just enough so the long leg was laying flat against
the edge of the hammer so the cam was making positive
engagement. Now the bolt worked the way it should.
Just so I
only have to write this once, after I polished areas that
were blued, I re-blued with cold-blue to protect the exposed
metal. I first cleaned the part with brake parts cleaner,
degreased with acetone, then dipped the part in
Van’s Instant Gun Blue or
Birchwood Casey Perma Blue. I then coated the part with
gun oil to preserve and lubricate it.
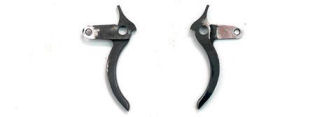
Polishing
the Hammer
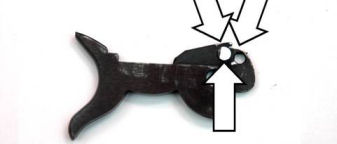
As you
can see from the above photo the hammer has no safety notch
because the gun has a transfer bar. I used a Cratex bit to
polish the cam that the bolt rides over and the front edges
of the hammer where the trigger rides.
The pin
that holds the hammer spring roller protruded from each side
of the hammer. I used a 400-grit stone to polish the ends
of the pin so they were flush with the sides of the hammer.
The hammer on gun #91 did not have any other burrs or
imperfections so other than dressing the sides of the hammer
where it rode in the frame, I performed no other polishing.
Caution: The following procedure requires special tools and
jigs to maintain the proper angles of the trigger and sear
and should not be performed without them.
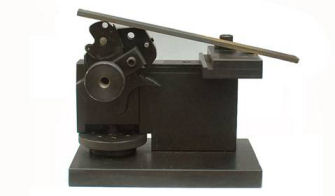
The sear
ledge on the hammer for #91 measured 0.034-inch which
created a long trigger pull with a lot of creep. I placed
the hammer in my Power Custom Series 2 stoning fixture that
I purchased from MidwayUSA.com
#411263 using the universal adapter and used a 400-grit
stone to reduce the depth of the sear notch. I reduced it
to 0.020-inch and tested it for creep and let off. There
was still just a bit of creep left in the trigger but I
decided to leave it alone.
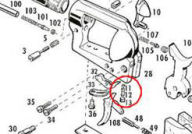
Once the
depth of the sear was set I polished the face of the sear.
I discovered that the Pietta hammer had a shelf that the
trigger rode on. When I reduced the depth of the sear I
removed that shelf.
I rotated
the universal adapter and adjusted the fixture so I was
polishing the sear flat and at the proper angle. The angle
of the sear should be in line with the center of the hammer
pivot hole as shown in the above diagram.

I first
polished with the Power Series II India stone
#080-815-000 until the sear was smooth and shiny. I
then finished polishing with the Power Series II Hard
Arkansas stone
#080-815-001.
Polishing
the Trigger
The hole
in the trigger where the transfer bar rotated had some burrs
so I used a 400-grit stone to remove those burrs. I also
polished the back side that rubs against the hammer. There
was a burr around the trigger pivot hole so I stoned that
down as well.
The
surface of the trigger that mated with the sear on the
hammer was very rough and had visible tooling marks as you
can see from the above photo. I mounted the trigger in the
MKII adapter for my Power Custom Series 1 stoning fixture I
purchased from MidwayUSA
#743549. I didn’t have the Colt Single Action adapter,
but the trigger fit in the MKII adapter perfectly.
I coated
the trigger engagement surface with a blue marker and
adjusted the jig until my fine ceramic stone
#080-721-604 was polishing the surface flat. I polished
until all the tooling marks were removed. I finished with
the extra-fine ceramic stone
#080-721-601 to get a very smooth surface.
After
reducing the depth of the sear, and polishing the trigger
and sear the trigger broke cleanly at 2.1 pounds with just a
hint of creep.
Polishing
Pivot Pins

The bolt
and trigger pivot screws were very rough so I chucked the
screw heads in my cordless drill and used 600-grit wet/dry
paper to polish them. I didn’t remove all of the tooling
marks because this would alter the diameter of the pins, but
I polished just until they were smooth and there were no
rough edges. You can see the bottom screw is much rougher
and more pitted than the top screw.
I chucked
the cylinder base pin in my cordless drill and polished it
with 600-grit wet/dry paper. The pin had tooling marks left
over from the manufacturing process and I wanted to smooth
them down just a bit.
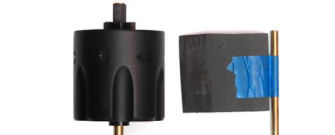
I taped a
piece of 600-grit wet/dry paper around a 3/16 piece of brass
rod and ran this in and out of the cylinder base pin hole.
This polished out any burrs which allowed the cylinder to
rotate much more smoothly.
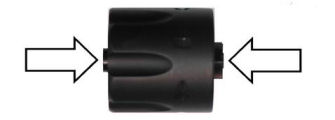
I
carefully polished off any burrs from the cylinder ratchet
on the rear of the cylinder, and the gas ring on the front
of the cylinder with a 400-grit stone. I only polished
these areas; I didn’t want to remove any metal otherwise I
would increase end shake which would also affect headspace.
Replacing
the Hand Plunger Spring
I felt
the hand plunger spring was way too strong so I replaced it
with a piece of 0.012 spring from Brownells spring Kit #69
#025-069-000. I cut the spring to the same length as
the original and pinched one end so it would fit over the
end of the plunger. The spring still provides tension to
keep the hand in contact with the ratchet on the cylinder,
but the cylinder now rotates much easier.
Reassembly
Throughout the polishing process I reassembled and
disassembled the gun many times to test for fit and
function. Now that everything was polished and fitted,
exposed metal was cold-blued, and the gun functioned
correctly it was time to reassemble the gun for the last
time.
As I
reassembled the gun I lubricated all parts that rubbed
together with Brownells Action Lube Plus
#083-050-002. This is a synthetic grease that I use for
the internal moving parts on all my firearms. I applied
small amounts of the grease using a toothpick to pivot
points and the trigger and sear. I also applied a touch to
the end of the hammer spring where the roller rides, and the
ends of the trigger and bolt return spring where they ride
against the trigger and bolt.
The leaf
of the bolt/trigger spring that rests on the trigger and
acts as the trigger return spring I bent up until it was
just touching the trigger. I tested it to make sure
the trigger would still function correctly.
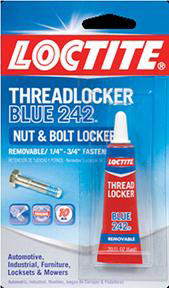
I
discovered while dry-firing both revolvers that the frame
screws became loose. This would not be good, especially
during a cowboy match. As I reassembled the gun I cleaned
each threaded hole and corresponding screw with acetone,
then applied a drop of
Loctite Blue 242 to the screw threads. A little goes a
long way so if it looked like I applied too much; I touched
the end of a cotton swab to the drop to soak up the excess.
Primer
Test
My final test was to prime six .45 LC cases with CCI #300
large pistol primers, but no powder or bullet. CCI primers
are harder than other brands of primers, so if the gun will
pop CCI primers I should have no misfires. I loaded the
primed cases into the cylinder and they all fired with no
problems.
Summary
I
performed all the same procedures to gun #85 so now both
guns are competition ready. I now know more about the Colt
action than I did before, and I have two more cowboy guns
that I can use, or loan out to friends who come along to a
match with me. These guns were almost ready to go right out
of the box, even though all the screws needed some Loctite, but a little polishing and tweaking never hurts
to improve performance.
|