Accurizing
the Ruger® Single-Action Revolver
by Roy Seifert
Click here to purchase a
CD with this and all Kitchen Table Gunsmith Articles.
Disclaimer:
This article is for entertainment only and is not to
be used in lieu of a qualified gunsmith.
Please defer all firearms work to a qualified
gunsmith. Any loads
mentioned in this article are my loads for my guns and have
been carefully worked up using established guidelines and
special tools. The
author assumes no responsibility or liability for use of
these loads, or use or misuse of this article.
Please note that I am not a professional gunsmith,
just a shooting enthusiast and hobbyist, as well as a
tinkerer. This
article explains work that I performed to my guns without
the assistance of a qualified gunsmith.
Some procedures described in this article require
special tools and cannot/should not be performed without
them.
Warning:
Disassembling and tinkering with your firearm may
void the warranty. I
claim no responsibility for use or misuse of this article.
Again, this article is for entertainment purposes
only!
Tools
and firearms are the trademark/service mark or registered trademark
of their respective manufacturers.
Ruger® makes a fine single-action revolver.
But like most production firearm manufacturers they
can’t afford to take the time to make the custom
improvements to really make this revolver into an excellent
shooter. Additionally
the larger-bore Ruger® single action revolvers can have other
problems detrimental to accuracy.
In this article I will identify those problem areas
and improve or eliminate them.
I used a stainless steel Ruger® Bisley Blackhawk® with
a 5 1/2” barrel in .45LC to perform my accurizing tasks.
Revolver
Accuracy
In order to gain maximum accuracy from any revolver, the
diameter of the bullets, the cylinder throats, forcing cone,
barrel and muzzle all must be in harmony.
Specifically, the bullet must be .001” to .002”
larger than the bore, the bore must be uniform from forcing
cone to muzzle, the muzzle must be properly crowned, and the
cylinder throats must be at the same diameter, or .0005”
larger than the bullet.
You also need a good trigger pull.
I measured these areas on my Bisley Blackhawk® and
here’s what I found:
- Cylinder
Throats - 0.450”
- Bore
- 0.451”
- Barrel
constriction - 0.001”:
This seems to be a common problem with the larger
bore Ruger revolvers.
The constriction was where the barrel screwed into
the frame, and it can be as much as 0.004”!
- Trigger
pull – 3.5 pounds with a lot of creep
With
these measurements this particular revolver would act as
follows:
- Burning
gunpowder forces 0.452”bullet out of case into cylinder
throat.
- Cylinder
throat swags bullet to 0.450”
- Bullet
moves across the cylinder gap into the barrel forcing
cone. Actually
the bullet is still in the cylinder when it enters the
forcing cone.
- Barrel
constriction ensures bullet stays at 0.450”
- 0.450”
bullet is 0.001” undersize for the 0.451” bore, bullet
does not make a tight seal as it travels down the bore,
gas leaks around the bullet causing leading, who knows how
it will exit the muzzle, resulting in a very disappointing
group.
So,
to accurize this revolver I want to perform the following
tasks:
- Open
up the cylinder throats to 0.452 - 0.4525.
This must be done before fire lapping,
otherwise most of the lapping opens up the cylinder
throats and doesn’t do much work on the barrel.
- Perform
an action job.
- Fire-lap
the barrel to remove the constriction and polish and taper
the bore
Reaming
Cylinder Throats
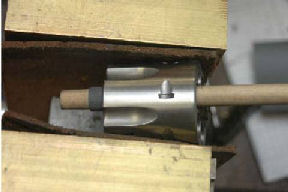
I
cut a slit in a piece of 3/8” dowel and wrapped a strip of
320 grit wet/dry paper around it so it would fit snuggly in
the chamber throat and attached the other end of the dowel to
my drill. I
applied a few drops of oil to the paper, inserted the reamer
through the chamber and ran the drill at a medium speed while
moving the reamer in and out.
I reamed each throat until it measured 0.4525”.
This not only opened up the throats, but polished them
mirror smooth which made them much easier to clean.
Note in the above figure I reamed from the chamber end.
This helped me to visually keep the reamer centered in
the chamber ensuring I reamed the throats square.
Action
Job
First I installed a spring kit.
I purchased kit RSA-106 from Brownells product SKU# 080-665-106
which contained a reduced power trigger return spring, 17, 18,
and 19 lb. hammer springs (factory is 23 lb.), and a stronger
base pin plunger spring. First
I completely disassembled the gun and polished all trigger
parts and pins. I
made sure the trigger was not rubbing against the grip frame.
(I had this happen on one revolver I worked on!) I
also polished inside the frames where moving parts made
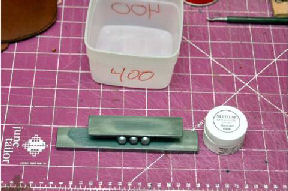
contact using 400-grit polishing stones and oil.
After polishing, cleaning and oiling all internal parts
I reassembled the gun using the spring kit with the 19lb.
mainspring to test for reliable function.
I resized and primed 6 cases with CCI primers.
CCI primers are noted for being harder than other
primers. I loaded
the primed, empty cases into the cylinder and tested to make
sure each primer fired reliably.
With
most Ruger SA triggers the trigger sear sits too deeply on the
hammer notch. This
makes a very safe, but long and creepy trigger pull.
Also these surfaces are often just rough ground as they
come from the factory so they need some smoothing and
polishing.
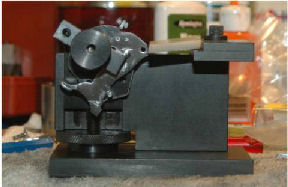
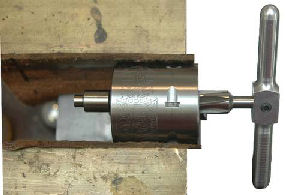
I
installed the hammer in my Power Custom Series 2 stoning
fixture I purchased from Brownells product SKU# 713-270-014
using the universal adapter Brownells product SKU# 713-271-000.
I used the original hammer pivot pin inserted groove
first into one of the holes in the adapter.
The pin was held in place by a set screw.
I made sure the set screw contacted the groove so as
not to raise a burr on the pivot surface of the pin.
I marked the front edge of the hammer notch with a blue
marker and adjusted the fixture until my stone was flat across
the front of the notch. The
notch in my hammer measured 0.022” so I took a 220 grit
stone and carefully reduced the depth of the notch to
0.014”.
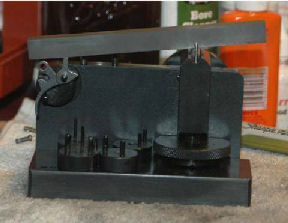
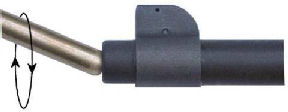
I
then rotated the hammer so I could polish the engagement
surface of the hammer notch as shown in Figure 2 above.
I marked the surface with a blue marker and made sure
to adjust the fixture so I was polishing this surface
perfectly flat. I
used my hard Arkansas stone with a beveled edge to
final-polish the surface.
Next
I installed the trigger in my Power Custom Series 1 stoning
fixture using the BH (Blackhawk) adapter Brownells product SKU
# 713-070-008.
I used a blue marker to mark the surface and adjusted
the fixture until I was polishing the surface perfectly flat
and square. I used
ceramic stones Brownells product SKU# 080-721-621
to polish the sear. I
used the coarse ceramic stone to polish off all of the
grinding/ machine tool marks, then final polished with the
fine ceramic stone. Ceramic
stones use water as the cutting agent, not oil.
I
applied a bit of Action Lube Plus available from Brownells
product SKU# 083-050-002
to the hammer and sear mating surfaces to ensure smooth
function and to prevent corrosion.
I re-assembled the gun and tested the trigger.
With the 19 lb. hammer and lighter trigger return
springs installed, it broke at exactly 2.5 pounds every time
with no creep.
Fire-Lapping
the Barrel
Fire-lapping involves imbedding different grits of lapping
compound into lead bullets and firing them down the barrel at
a very moderate velocity.
This process accomplishes a number of positive things:
- Smoothes
the barrel which makes it easier to clean
- Removes
tight spots
- Slightly
tapers the barrel from forcing cone to muzzle
I
really wanted to eliminate the tight spot under the threads;
tapering and polishing the barrel were added benefits.
I purchased a NECO
fire-lapping kit which included 4 grits of lapping compound,
220, 400, 800, and 1200. Their
instruction manual said to use lead bullets to fire-lap a
revolver barrel, and shoot multiple exact full cylinders of
bullets. (This is
so each chamber throat in the cylinder gets the same amount of
polishing.) They
recommended 12 rounds with 220-grit, 18 rounds with 400-grit,
and 24 rounds with 800-grit.
They did not recommend using the 1200-grit but they
stated it couldn’t hurt.
So at a minimum this meant I had to prepare 54 loaded
rounds. Just to
make sure I removed the constriction I actually loaded 48
rounds of 220-grit.
First
I took ninety 250-grain cast lead bullets that I bulk
purchased already cast and lubed and laid them in an aluminum
pan. I baked them
in my toaster oven at 250° for 30 minutes to remove the wax
lubricant from the lube groove.
Then I took the appropriate number of bullets and
impregnated them with the proper grit compound.
I spread a thin layer of compound on the steel plate
provided in the NECO kit and rolled 3 bullets at a time
between it and another steel plate thereby imbedding the
compound into the bullets.
I wiped off the excess compound from each bullet and
separated them by grit in preparation for loading.
I loaded each round with 2-grains of Red Dot which
produced a low velocity load.
Now
it’s off to the range I go.
I started with the 220-grit rounds and fired a cylinder
full, then I had to thoroughly clean the barrel and cylinder
using a .38 caliber patch with Remington Bore Cleaner wrapped
around a .44 brass bristle brush.
Everything got oiled with Hoppes, then I slugged the
barrel to gauge the fire-lapping progress.
I fired 36 rounds of 220-grit to remove the
constriction, cleaning and slugging between every six shots.
Then I fired 18 rounds of 400-grit, again cleaning
between every six shots, and then 24 rounds of 800-grit for
final polish. It
is important to clean after every six rounds otherwise you
begin to lap the fouling and not the barrel metal.
Also, after using the cases for fire-lapping they
should be destroyed. If
you reload these cases residual lapping compound can
contaminate the bullet which will damage your barrel.
However, if you plan to accurize more then one gun of
the same caliber, you can re-use the cases, but you must keep
them separated by grit.
Cleaning
Up the Muzzle
Nicks
and imperfections on the muzzle can be detrimental to
accuracy. To
ensure the muzzle is completely free of any nicks or
imperfections I lapped it using a brass muzzle lap available
from Brownells product SKU# 080-764-000.
I chucked the lap in my hand drill and put some
400-grit lapping compound on the end of the lap.
With the drill running at 500-700 RPM I pressed the
round end of the lap against the muzzle at the angle shown in
the above photo and rotated the drill through 360-degrees
keeping the lap at the same angle.
I did this for about 30-seconds making sure I kept
rotating my drill in a circular motion.
I washed off the lapping compound with brake parts
cleaner.

The
figure above shows the results.
This 25 yard group was done with bullets sized
0.452”. It
measured 0.774”! This
made all my work worthwhile, and it certainly paid off in
improved accuracy. This
is what is happening now with my accurized revolver:
- Burning
gunpowder forces 0.452”bullet out of case into cylinder
throat.
- 0.4525”
cylinder throat guides bullet into the forcing cone, no
swaging occurs.
- Bullet
moves across the cylinder gap into the barrel forcing
cone.
- No
barrel constriction exists so 0.452” bullet enters
0.451” barrel. Because
the bullet is 0.001” oversize all lands and grooves are
sealed.
- 0.451”
bullet is in constant contact with the bore because
fire-lapping slightly tapered the bore.
Bore is sealed, no gas cutting/leading occurs.
- Bullet
exit from muzzle is consistent resulting in excellent
groups.
These
are procedures that any hobby gunsmith can perform and work
well for any revolver, whether single or double action.
Addendum

Although I
was able to open up the cylinder throats by reaming them with
wet/dry sand paper, the proper tool is a cylinder throat
reamer available from Brownells product SKU# 513-000-002.
This reamer opens up the throats to 0.4525”.
First I
installed the T-handle from my .38-.45 Basic Chamfering Kit,
Brownells product SKU# 080-479-451,
to the end of the reamer.
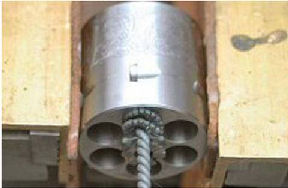
I chucked the cylinder in a padded vice, lubricated the
reamer with cutting oil, and inserted it from the chamber-end
of the cylinder. I
turned the reamer clockwise as viewed from the handle end
until the reamer protruded from the end of the chamber.
I never want to turn the reamer counter-clockwise as
this can break the teeth.
I cleaned off all of the metal chips before removing
the reamer according to the included instructions.
Now all the throats consistently measured 0.452”.

Finally I
wanted to polish the throats to remove any burrs or reaming
marks. Brownells
sells a cylinder hone specifically designed to polish chambers
in revolver cylinders called a Flex-Hone, refer to my article Polishing
RevolverChambers.
This is the correct tool for polishing chambers and
consists of small balls of polishing grit on the ends of a
spiral wire brush. The
Flex-Hone comes in two different grits, medium product SKU# 080-608-145
and fine product SKU# 080-608-246.
The medium-grit
hone is used to polish-out the tooling marks, and the
fine-grit hone is used to final-polish the chamber.
Brownells states that you should only use the Flex-Hone
Oil product SKU# 080-609-008
as the cutting/lubricating agent, and that you should not spin
the hone any faster than 750 RPM. This
is well within the slow speed of my cordless drill.
I used the
fine Flex-Hone to polish out the tooling marks. I
put a few drops of Flex-Hone oil in the chamber, chucked the
hone into my cordless drill and ran the Flex-Hone in and out
of the chamber at slow speed for about 30-seconds. Now
each chamber throat is consistent and polished.
|