Making Custom Shooting Sticks
by Roy Seifert
Click here to purchase a
CD with this and all Kitchen Table Gunsmith Articles.
Disclaimer:
This article is for entertainment only and is not to
be used in lieu of a qualified gunsmith.
Please defer all firearms work to a qualified
gunsmith. Any loads
mentioned in this article are my loads for my guns and have
been carefully worked up using established guidelines and
special tools. The
author assumes no responsibility or liability for use of
these loads, or use or misuse of this article.
Please note that I am not a professional gunsmith,
just a shooting enthusiast and hobbyist, as well as a
tinkerer. This
article explains work that I performed to my guns without
the assistance of a qualified gunsmith.
Some procedures described in this article require
special tools and cannot/should not be performed without
them.
Warning:
Disassembling and tinkering with your firearm may
void the warranty. I
claim no responsibility for use or misuse of this article.
Again, this article is for entertainment purposes
only!
Tools
and firearms are the trademark/service mark or registered trademark
of their respective manufacturers.
All
shooters know that the steadier you can hold a gun the more
accurate the shot will be.
One method of providing a steady rest for a gun is to
use shooting sticks. Shooting
sticks have been around as long as firearms themselves.
Some of the very early European smoothbore long guns
were so heavy they were issued with a shooting stick.
The American plains buffalo hunters of the 1800’s
often used crossed sticks to steady their buffalo rifles.
As I prepared my kit for hog hunting I decided I needed
a set of shooting sticks.
There is a
dizzying array of shooting sticks available to the shooting
sportsman; monopod, bipod, tripod, folding, collapsing - so
many that it becomes confusing to decide what’s best.
And the prices go from about $20.00 up to $100.00!
In their simplest form shooting sticks are two crossed
sticks. I could
have gone to the hardware store and purchased some wooden
dowel for that, but after much research and trial and error I
decided I needed shooting sticks that met the following
criteria:
-
Light weight but sturdy –
this could be wood, fiberglass, or aluminum
-
Must
fold up for carry – collapsible would also work
This pretty much eliminated wood.
-
Must be height adjustable
– collapsible would definitely work
-
Must allow the bore of the
gun to sit above a 42-inch high portable blind.
-
Must be inexpensive
Fixed
length folding shooting sticks I found were either too short
or too tall. Collapsible
aluminum shooting sticks cost $60 or more.
I thought I could probably beat that price by making my
own. I decided to
make a hybrid crossed bipod with each leg made of three
folding sections of aluminum tubing.
The first two sections would have a bungee chord
running through them attached to the third section.
These could easily be pulled apart and folded for
storage and carry. The
bungee chord would keep all the pieces together, and help it
to practically assemble itself.
The third section would have an insert which could be
extended and locked in place at various points thereby
adjusting the height.
I purchased
6061-T6 aluminum tubing from Online
Metals in the following sizes, total price was $45.00 with
shipping:
-
Three
36-inch pieces of 0.5" OD x 0.058" wall x
0.384" ID 6061 T6 tube.
These will be the leg sections.
-
One
36-inch piece of 0.375" OD x 0.035" wall x
0.305" ID 6061 T6 tube.
This will be the extendable inserts.
-
One
24-inch piece of 0.375" OD x 0.035" wall x
0.305" ID 6061 T6 tube.
This will be the inserts that join the leg sections
together.
-
One 12-inch piece of 0.25"
OD x 0.058" wall x 0.134" ID 6061 T6 tube. This
will be the bottom of the extendable leg that sits in the
ground, and the bungee chord ferrules.
I
also purchased 10 feet of 1/8 bungee cord material from A1
Foam and Fabrics for $12.00 including shipping.
This will be used to hold the sections together.
Other
materials I used that I already had on hand:
Two
4-inch pieces of black heat-shrink tubing that will fit over
1/2-inch tubing. This
is available from Radio Shack.
Two
hairpin cotters for locking the extendable legs in place –
purchased for $.98 from the hardware store
-
One
10-24 x 2 inch screw
-
One
10-24 nut
-
One
3/8-inch nylon spacer
-
Two
#10 10-12 ga. ring terminals
-
Black
RTV
-
3/8”
plastic end cap purchased for $1.04 from the hardware
store
First I cut
all three of the 1/2” x 36” tubing in half making six
18-inch pieces. I
used the metal cutting blade in my miter saw to make straight
cuts. I then used
a file to bevel the sharp outside edges, and a cone-shaped
stone to bevel the inside edges on each end.
I then cut
a piece of 3/8-inch tubing in half making two 18-inch pieces.
These pieces will become the extendable legs.
Using a #29 drill I drilled a hole 2” down from the
top of each of the 18” extendable leg pieces, then beveled
the inside and outside edges as before.
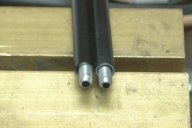 I
cut the 1/4” x 12” into two 3” sections.
These are the bottoms of the extendable legs.
I beveled the end so that it created a taper, then
filled the end with black RTV.
While the RTV was setting up I bead blasted the two
extendable legs and painted them with a gray primer.
After the primer dried I then painted them with a flat
black. After the
paint dried I epoxied the 1/4“ x 3” ends into the bottom
of the extendable legs with the tapered ends out as shown in
the photo. I
cut the 1/4” x 12” into two 3” sections.
These are the bottoms of the extendable legs.
I beveled the end so that it created a taper, then
filled the end with black RTV.
While the RTV was setting up I bead blasted the two
extendable legs and painted them with a gray primer.
After the primer dried I then painted them with a flat
black. After the
paint dried I epoxied the 1/4“ x 3” ends into the bottom
of the extendable legs with the tapered ends out as shown in
the photo.
 I
took the other piece of 3/8-inch tubing and cut four 4-inch
pieces to make the joining inserts.
I beveled the inside and outside edges as before.
Using a 3/32” drill I drilled a hole in two of the
4” joining pieces 1” down from the top.
Then I cut 4 pieces of 1/4“ tubing 1/2“ long to act
as ferrules to hold the bungee chord in place.
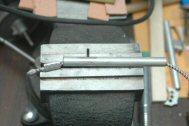
I cut two 30” pieces of 1/8” bungee chord and
threaded one end of each piece into a ferrule and squeezed it
in my vice. The
photo shows the ferrules before and after. I
took the other piece of 3/8-inch tubing and cut four 4-inch
pieces to make the joining inserts.
I beveled the inside and outside edges as before.
Using a 3/32” drill I drilled a hole in two of the
4” joining pieces 1” down from the top.
Then I cut 4 pieces of 1/4“ tubing 1/2“ long to act
as ferrules to hold the bungee chord in place.
I cut two 30” pieces of 1/8” bungee chord and
threaded one end of each piece into a ferrule and squeezed it
in my vice. The
photo shows the ferrules before and after.
 I
had to trim the edges of the ferrules using my Dremel tool and
a grinding bit to get them to fit into the 3/8” tubing.
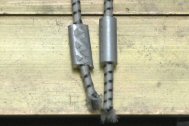
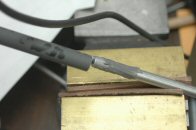
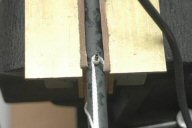
I inserted the free end of the bungee through one of
the joining pieces that had the roll pin hole.
I inserted from the hole end so the ferrule would enter
the tube last. When
the ferrule got close to the opening I installed a 3/32”
roll pin, then pulled the bungee chord tight.
The photo shows the bungee, ferrule, and roll pin in
place. After I
tapped the roll pin through the tube I ground off the end of
the roll pin flush with the sides of the tube.
I put a glop of epoxy on each side of the ferrule then
pulled it into the tube. With
the roll pin and epoxy the bungee chord should never come out. I
had to trim the edges of the ferrules using my Dremel tool and
a grinding bit to get them to fit into the 3/8” tubing.
I inserted the free end of the bungee through one of
the joining pieces that had the roll pin hole.
I inserted from the hole end so the ferrule would enter
the tube last. When
the ferrule got close to the opening I installed a 3/32”
roll pin, then pulled the bungee chord tight.
The photo shows the bungee, ferrule, and roll pin in
place. After I
tapped the roll pin through the tube I ground off the end of
the roll pin flush with the sides of the tube.
I put a glop of epoxy on each side of the ferrule then
pulled it into the tube. With
the roll pin and epoxy the bungee chord should never come out.
I
finished drilling all the rest of the holes.
In the bottom leg sections I drilled the adjustment
holes using a #29 drill bit.
I also drilled the roll-pin hole using a 3/32” drill
bit. In the top
sections I drilled the assembly holes with a #9 drill bit.
After drilling all holes I polished the tubes with
320-grit sandpaper to remove any burrs and prepare for
painting.
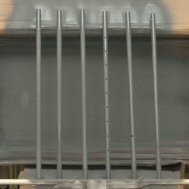

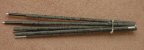
I spray painted
the rods with Brownells
Aluma-Hyde II parkerizing gray.
I used two coats to make sure I got good coverage.
After the paint dried I
took a small sea sponge and dipped it into Aluma-Hyde II flat
black sprayed against the back of my spray booth and made a
camouflage patters on the rods.
I wanted them to look like sticks.
 Now
for the assembly. I
took the 3/8” tubes that had the bungee chord attached,
spread some epoxy around the top 2 inches, then inserted them
into the bottom of the top two sections so that 2 inches of
the tube was exposed with the bungee hanging out of it.
I then took the 3/8” tubes with no bungee chord and
glued them to the middle sections, leaving 2 inches exposed. Now
for the assembly. I
took the 3/8” tubes that had the bungee chord attached,
spread some epoxy around the top 2 inches, then inserted them
into the bottom of the top two sections so that 2 inches of
the tube was exposed with the bungee hanging out of it.
I then took the 3/8” tubes with no bungee chord and
glued them to the middle sections, leaving 2 inches exposed.
 After
the epoxy dried I threaded the bungee from the bottom of the
top section through the middle section.
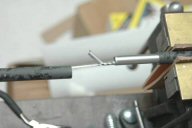
I assembled the top and middle sections, then pulled
out 5 inches of bungee and clamped it with a pair of vice
grips. I then
attached a ferrule close to the vice grips and crimped it in
place with my vice, then cut off the excess bungee.
I didn’t remove the vice grips yet because I didn’t
want to have to go fishing for that ferrule if it snapped back
inside the middle section. After
the epoxy dried I threaded the bungee from the bottom of the
top section through the middle section.
I assembled the top and middle sections, then pulled
out 5 inches of bungee and clamped it with a pair of vice
grips. I then
attached a ferrule close to the vice grips and crimped it in
place with my vice, then cut off the excess bungee.
I didn’t remove the vice grips yet because I didn’t
want to have to go fishing for that ferrule if it snapped back
inside the middle section.
I took the
bottom leg and started a 3/32” roll-pin in the roll-pin
hole. Then I cut
about 50” of string, doubled it, then fed the loose ends
through the top of the tube until they protruded through the
bottom. The loop
of string left at the top of the third section I wrapped one
time around the bungee above the ferrule.
This helped me to feed the ferrule into the third
section.
Holding the
string taught I pulled the ferrule through the third section
until it was below the roll-pin hole.
I wrapped the string around the roll pin so I could
reposition the assembly in my vice.
With the bottom section in the vice I seated the
roll-pin. When I
released one side of the string it came unwrapped from the
bungee and the ferrule sat against the roll pin.
I inserted
the adjustable leg into the third section, aligned the holes
and inserted the hairpin cotter to hold it in place.
I also inserted a plastic cap plug into the top
section, but I could have just filled it with black RTV.
To keep the
sticks in place while folded for carry I built a bungee keeper
using a 6-inch scrap piece of bungee chord and two ring
terminals. I
crimped the ring terminals onto either end of the bungee.
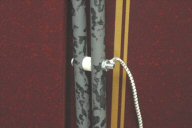 I
assembled the two sides by inserting a 10-24 x 2” metal
screw through one side, through the nylon washer, and through
the other side. I
installed one of the ring terminals onto the screw then
attached the 10-24 nut. I
put some Loctite red on the threads then tightened the nut
just tight enough so I could rotate the sticks freely. I
assembled the two sides by inserting a 10-24 x 2” metal
screw through one side, through the nylon washer, and through
the other side. I
installed one of the ring terminals onto the screw then
attached the 10-24 nut. I
put some Loctite red on the threads then tightened the nut
just tight enough so I could rotate the sticks freely.
Finally I
cut two 4-inch lengths of black heat-shrink tubing and using
my wife’s hair dryer attached them to the tops.
This will protect the finish on the guns.
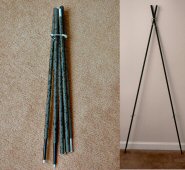
I am very
pleased with the result. These sticks are light, easy to
fold up and carry, but when I release the keeper strap, the
sticks almost assemble themselves. And, because they are
adjustable, I can use them in many different shooting
situations.
|