Building the Super
Redhawk “Triple Defender”
by Roy
Seifert
Click here to purchase a zip file with this and
all Kitchen Table Gunsmith Articles.
Disclaimer: This
article is for entertainment only and is not to be used in lieu of a
qualified gunsmith. Please
defer all firearms work to a qualified gunsmith.
Any loads mentioned in this article are my loads for my
guns and have been carefully worked up using established guidelines and
special tools. The
author assumes no responsibility or liability for use of these loads,
or use or misuse of this article.
Please note that I am not a
professional gunsmith, just a shooting enthusiast and hobbyist, as well
as a tinkerer. This
article explains work that I performed to my guns without the
assistance of a qualified gunsmith.
Some procedures described in this
article require special tools and cannot/should not be performed
without them.
Warning: Disassembling
and tinkering with your firearm may void the warranty.
I claim no responsibility for use
or misuse of this article. Again,
this article is for entertainment purposes only!
Tools
and firearms are the trademark/service mark or registered trademark of
their respective manufacturers. Click on any
blue text to go to a
product/seller web site.
Introduction
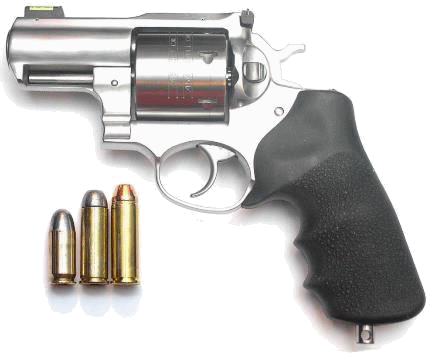
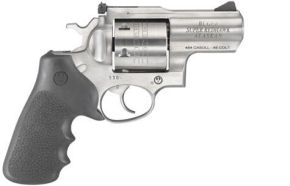
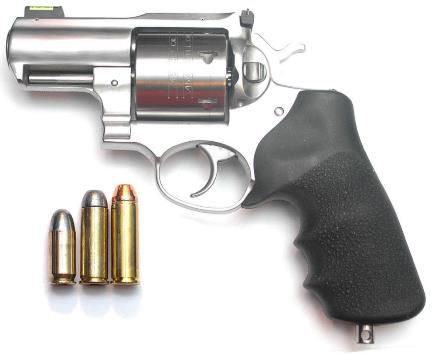
I recently purchased a Ruger KSRH-2454 Super Redhawk Alaskan in .454 Casull.
This revolver will chamber both .45 Colt and .454 Casull cartridges.
When I picked the gun up from my dealer, he wanted to know what my plans
were for this revolver since it was on his personal bucket list.
I wanted it to be able to chamber .45 ACP to make it a true “Triple
Defender” revolver. In 2016 I had
converted my KRH-45-4 .45 Colt Ruger Redhawk by milling the ejector star to
accept .45 ACP cartridges in moon clips (refer to my article
Converting a KRH .45 LC Redhawk to Shoot .45LC and .45ACP).
I wanted to perform the same work to my new Alaskan making it into a
Super Redhawk Alaskan “Triple Defender”.
Initial Inspection
When I brought the gun home, I did a thorough
inspection. The double-action
trigger pull was smooth, but the single-action trigger pull was gritty with a
lot of creep. This will require an
action job to correct.
I also discovered that the ejector star would bind
when pressing the ejector rod. When
I released the ejector rod the ejector star would not retract back flush with
the rear of the cylinder. I applied
some oil to the ejector star shaft and the binding went away.
I like the rubber grips that came with this revolver
better than the grips that came with the KRH .45 Colt Redhawk.
The KRH grips were too large for my hand, so I replaced them with factory
wood grips. However, the Alaskan
grips fit my hand perfectly.
Disassembly
Following the instructions in the included
manual, I disassembled the revolver down to its major component parts, hammer,
hammer spring and strut, trigger group, and cylinder assembly.
I was surprised at how many burrs and sharp edges there were on this gun,
including tooling marks and a major burr on the single-action sear.
I’m sure this burr was causing the gritty single-action trigger pull.
Action
Job
I completely disassembled the trigger group being
careful not to lose the many springs and plungers.
These are all different and must be correctly installed in their original
position. I performed an action job
like I did for my KRH Redhawk.
(Refer to my article
Performing an Action Job on a Ruger Redhawk.)
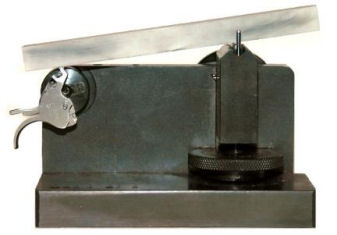
I used my Power Custom Series I Stoning
Fixture with the RH adapter to polish the single-action sear and remove the
burr. I used a 900-grit polishing
stick from my
Boride Engineered Abrasives gunsmithing kit,
then finished with the extra-fine ceramic stick from Brownells
#080-721-601.
I used a 220-grit polishing stick to
reduce the sear ledge on the hammer by about 0.010” to eliminate the creep.
I polished the rounded top of the hammer strut where
it rides in a groove in the hammer with a Cratex bit.
I also polished the edges and corners of the shaft to remove any burrs
that might interfere with the spring.
When I assembled the revolver I added a bit of Brownell’s Action Lube
Plus
#083-050-002WB
to the knob so it would ride smoothly in the hammer.
Replacing Springs
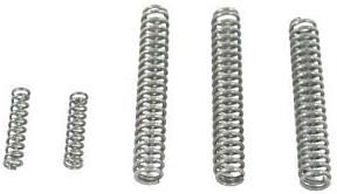
I purchased a
Wolff Super Redhawk Shooters Pak
#17109. This set contains 1 each 9-,
10- and 12-pound reduced power hammer springs, and 1 each 10- and 12-pound
trigger return springs allowing adjustment for lighter and smoother trigger and
hammer action. The factory hammer spring
is 14 pounds, and the factory trigger return spring is 15 pounds.
I removed the hammer spring by putting the hammer
strut in my vise. I used a pair of
channel-lock pliers to push down on the hammer strut seat, removed the
disassembly pin, then gently relieved tension from the hammer spring.
I removed the factory hammer spring and installed the 12-pound hammer
spring. When replacing a mainspring
I usually use the heaviest reduced power spring.
The reloading manuals recommend using small rifle magnum primers.
I have CCI #450 small rifle magnum primers which are considered the
hardest in the industry, so I want to ensure I get reliable ignition.
I placed the hammer strut seat in the pliers, set it
on top of the new spring, compressed the spring and replaced the disassembly
pin. The hammer strut seat must be
oriented correctly, or the gun cannot be reassembled.
I also installed the 10-pound trigger return spring when I reassembled
the revolver. The trigger pull is
now much lighter.
Sticky
Chamber

When loading dummy rounds, I discovered one chamber
was a bit sticky. I honed each
chamber with a .45 Colt Flex Hone I purchased from Brownells
#080-608-246WB
using Flex Hone oil I also purchased from Brownells
#080-609-008WB.
I used the slow speed on my cordless drill and moved the hone in and out
of each cylinder. This not only
fixed the sticky chamber but should make empty cases easy to eject.
Reaming the Trigger Return/Trigger Guard Latch Spring Tunnel
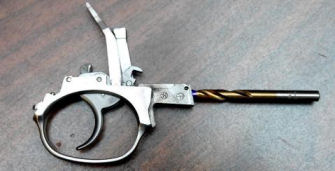
The trigger return/trigger guard latch spring tunnel
was very rough. The trigger guard
latch could barely move in the tunnel.
While I had the trigger group completely disassembled, I used a #5 drill
bit to ream the trigger return/trigger guard latch spring tunnel.
The bit fit tightly in the tunnel; it removed very little metal, but it
did remove any burrs and polished the inside. I
marked the drill bit with a blue marker so I didn’t go too far in the tunnel
otherwise I would have removed the lip from the trigger-side of the tunnel.
Now the plungers move smoothly in the tunnel and made it easier to remove
the trigger group from the frame.
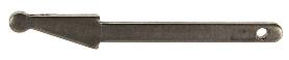
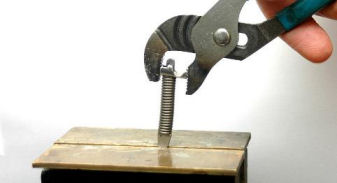
Note: In the above photo the trigger
group is assembled with the #5 drill bit installed in the spring tunnel.
Note the blue mark on the bit.
When I performed the work the trigger group was completely disassembled.
Jammed
Ejector Star
The correct way to eject empty brass from a revolver
is to press the cylinder release with the right hand, swing open the cylinder
with the first 2 or three fingers of the left hand, tip the gun up and rest the
frame on the fingers that opened the cylinder, then use the thumb of the left
hand to press the ejector rod. Any
unburnt powder will fall out with the empty cases instead of falling under the
ejector star and jamming the revolver.
However, if I put just a bit of sideways pressure on the ejector rod, it
felt like it was blocked and would not function.
I disassembled the cylinder as far as I could go to see where the ejector
rod was being blocked, but I couldn’t find anything.
If the ejector rod was perfectly in line with the cylinder it would work.
If I rotated the cylinder, it would sometimes work, sometimes jam.
I decided to return the gun to Ruger for service.
I registered the revolver on the Ruger website and submitted a service
ticket. I received an email in
response requesting that I speak with a service representative.
I explained the problem and he issued a return material authorization
(RMA) number and shipping label. I
will have to reinstall the factory springs, otherwise Ruger will replace them.
They may also replace the hammer since I’ve done some work to it as well.
I received the revolver back from Ruger in 10 days.
The packing slip stated that they replaced the ejector and adjusted the
trigger. I’m not sure what adjusting
the trigger means, but it feels the same to me after the work I did, i.e. crisp
let off with no creep. And now the
ejector rod works as it should.
Hammer
Rubbing
Another problem this gun had if I lower the hammer
slowly with the trigger pulled, the sear ledge on the hammer rubbed against
something about 2/3 along its travel.
It appears that the single-action ledge was rubbing against the rear of
the pawl. This area was dished out
at the factory, but apparently not enough to clear the hammer.
I remove the pawl from the trigger group again being
careful not to lose the spring and plunger behind it.
I used a 320-grit polishing stick to reduce the area on the rear of the
pawl where the hammer was rubbing.
The hammer now falls without any rubbing.
In the process of reassembly, I lost the spring and
plunger! I heard it go boing,
tinkle, tinkle as it shot off somewhere in my shop never to be seen again.
I ordered a replacement spring and plunger from Gun Parts Corp. and in a
couple of days my revolver was functioning again.
That was a $22 mistake, and I know better than that.
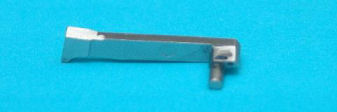
Milling the Ejector Star
I measured the distance from the rear of a .454
Casull cartridge head to the front of the cylinder, which was 1.805”.
I measured the same distance with a .45 ACP case and moon clip, which was
1.831”.
1.831 – length of cylinder with .45 ACP and moon clip
- 1.805 – length of cylinder with .454 cartridge
0.026 – amount to mill off ejector star
As it turned out, the ejector star of the Alaskan was
the same diameter as the KRH Redhawk, so I didn’t have to change my CNC program.
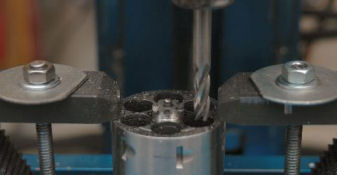
I disassembled the revolver and set the cylinder in my CNC mill.
I centered a 1/4” square end milling bit on the cylinder and milled
0.026” off the ejector star.
I thoroughly cleaned any metal chips off the cylinder
and reinstalled it onto the revolver.
This revolver will now chamber .45 ACP in moon clips, .45 Colt, and .454
Casull cartridges. The .45 Colt and
454 Casull cartridges still headspace on the rear of the cylinder face, but the
.45 ACP now headspaces on the moon clip.
Trigger Pull
As mentioned before, the single-action trigger
pull was gritty with a lot of creep.
From the factory, it was 4-pounds, 4-ounces as measured with my Lyman digital
trigger pull gauge. After performing
an action job and replacing the springs, the single-action trigger pull measured
a smooth 2.0-pounds with no creep.
Adding
a Lanyard Ring Stud

I fabricated a lanyard ring stud out of 3/8”
stainless-steel rod. I used my lathe
to turn and thread the shank, then used my CNC mill with the rotary “A” axis to
mill the 3/16-inch hole. The lanyard ring
stud replaced the 10-24 screw at the bottom of the grip.
Now I can install a split ring and connect a lanyard so I won’t lose the
gun if it slips out of a holster in the field.
Replacing the Front Sight
I have replaced the front sight on most of my
rifles and revolvers with a green fiber optic sight.
The green shows up better for my eyes.
I removed the front sight roll pin with a 1/16 roll pin punch I purchased
from Brownells
#230-100-000WB.
With the roll pin removed I could remove the front sight.
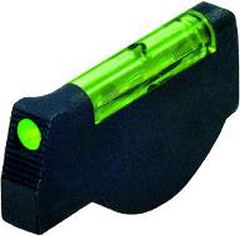
I purchased a HIVIZ green fiber optic front sight
from
Amazon.com. I installed the sight on the
revolver and held it in place with a clamp.
I used the original roll pin holes in the revolver to drill a 1/16 hole
in the sight. I replaced the roll
pin so it was flush with the sides of the revolver.
Summary
My “Triple Defender” is now complete.
I performed an action job and replaced springs, so the trigger pull is a
crisp 2-pounds. I milled the ejector
star so I can now chamber .45 ACP cartridges in moon clips, as well as .45 Colt
and .454 Casull. I added a lanyard
ring stud and replaced the front sight with a green fiber-optic front sight.
This gun is now more versatile because it can be used for personal
defense shooting .45 ACP and .45 Colt “cowboy” loads, or it can be used for
hunting/predator defense using uploaded .45 Colt or .454 Casull loads.
Kudos to Ruger Customer Service for correcting the
ejection problem and returning the revolver to me in a timely manner.
Ruger has probably the best customer service department in the industry.
This is the first time I have ever returned a firearm to the factory in
the 48-years I have owned guns, but I was very pleased with the outcome.
Thanks, Ruger, for producing quality firearms and providing quality
customer service.
|