Converting a KRH .45 LC Redhawk to shoot .45LC and .45ACP
by Roy Seifert
Click here to purchase a
CD with this and all Kitchen Table Gunsmith Articles.
Disclaimer:
This article is for entertainment only and is not to
be used in lieu of a qualified gunsmith.
Please defer all firearms work to a qualified
gunsmith. Any loads
mentioned in this article are my loads for my guns and have
been carefully worked up using established guidelines and
special tools. The
author assumes no responsibility or liability for use of
these loads, or use or misuse of this article.
Please note that I am not a professional gunsmith,
just a shooting enthusiast and hobbyist, as well as a
tinkerer. This
article explains work that I performed to my guns without
the assistance of a qualified gunsmith.
Some procedures described in this article require
special tools and cannot/should not be performed without
them.
Warning:
Disassembling and tinkering with your firearm may
void the warranty. I
claim no responsibility for use or misuse of this article.
Again, this article is for entertainment purposes
only!
Tools
and firearms are the trademark/service mark or registered trademark
of their respective manufacturers. All tools were
purchased from Brownells
unless otherwise indicated.
Introduction
I read an article in the June, 2016 issue of American
Rifleman on Ruger’s .45 Colt/.45 ACP Redhawk.
I am a big fan of interchangeable caliber guns because this
adds flexibility to the firearm, and they’re just plain fun
to shoot. I fitted .45 ACP cylinders to my two old-model
.45 Colt Ruger Vaqueros (refer to my article
Fitting a .45 ACP Conversion Cylinder), and I have
two Ruger Super Single Six Convertible revolvers that shoot
.22 short/long/long rifle out of one cylinder, and .22 WMR
out of a second cylinder. I wanted the flexibility of being
able to shoot two different calibers with the Redhawk, but I
didn’t want to pay the $800 - $1,000 for a new one. And
besides, being an amateur gunsmith I knew I could convert a
standard .45 Colt Redhawk to also shoot .45 ACP.
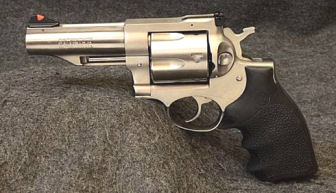
I found a
used older-model KRH-45-4 Redhawk on
Gunbroker for a very reasonable price. The total plus
shipping and transfer cost through my FFL dealer came to
$660, and the seller took a credit card without any
additional fees; a savings of $19.00! The best price I
could find for a new model 5032 convertible Redhawk was in
the neighborhood of $990 including shipping and transfer
fees.
Full Moon
Clips
.45 Colt (or .45 Long Colt or .45 LC) cartridges headspace
on the rim. On the Redhawk the rim sets on the rear face of
the cylinder and ejector star. .45 ACP cartridges headspace
on the case mouth. Since there is no lip in the .45 LC
chamber for the mouth of a .45 ACP cartridge, that cartridge
would fall through. The way to get around this is to use a
full moon clip to hold the .45 ACP cartridges.
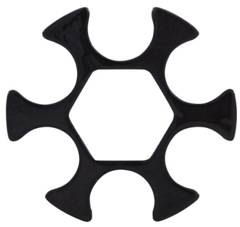
.45 ACP
cartridges snap into the full moon clip at the ejector
groove. With the moon clip in place .45 ACP cartridges
headspace on the rim just like a .45 LC cartridge. I
purchased a package of 8 full moon clips from MidwayUSA
product
#323361.
To get
the moon clip to work with the .45 LC Redhawk I needed to
remove metal from the ejector star. This is standard
practice for competition shooters who want to modify their
revolver to take full moon clips because this makes loading
and unloading much faster. There is an excellent video on
You Tube by
TK Custom on how they mill a Smith & Wesson 686 cylinder
and ejector star to accommodate full moon clips. The
ejector star on the Redhawk was wide enough to accommodate
the full moon clips so I didn’t have to remove any metal
from the cylinder itself.
Tools and
Parts
To work on my new Redhawk I needed some additional parts. I
purchased everything from
MidwayUSA.com unless otherwise noted.
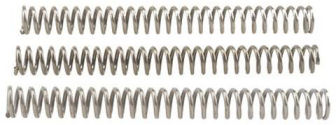
Wolff
Hammer Spring Pack Ruger Redhawk Reduced Power
#139298 – This spring pack contains three reduced power
hammer/trigger return springs; 12#, 13#, and 14#. The
factory spring is 17#. Installing a reduced power spring
will reduce the double-action and single-action trigger
pull. On the Redhawk, the mainspring serves as both the
hammer spring and trigger return spring. This is the reason
why the single-action trigger pull is so heavy.
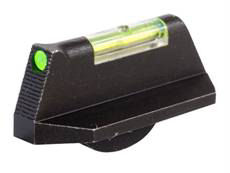
HIVIZ
Front Sight Ruger Redhawk 4" Barrel with Pinned Front Sight
Steel Fiber Optic
#211617 – The front sight on this older model is pinned
in place and I prefer green instead of red. HIVIZ makes
replacement front sights for both the older and new Redhawk
models, all are available from MidwayUSA.
Disassembly
There are many books and You Tube videos on how to
disassemble the Redhawk. This gun did not come with the
manual, but a quick call to
Ruger customer service and the
nice lady there sent me one. Disassembly instructions are
included in the manual. I placed all small parts in plastic
trays so they wouldn’t get lost. There are five different
plungers and springs used in the revolver and they are all
different, so I was careful not to get them confused. When
I reassembled the gun I made sure all moving parts were
properly lubricated.
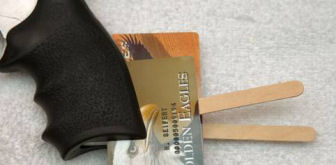
Ok so
this used gun didn’t come with the special tool for
removing the monogrip. During my call to
Ruger customer service
I asked for the tool and
they sent me the tool and instructions free of charge, but
I found a video on
You Tube showing how to remove the monogrip without the
special tools.
-
Insert two plastic cards between the bottom rear of the
grip and the frame. Do this on both sides of the
frame. I used some old NRA membership cards.
-
Slip
a screwdriver blade between the two cards to spread the
monogrip away from the grip panel locator. I used
Popsicle sticks. The plastic cards help to prevent
marring the frame.
-
Slip
the bottom of the grip forward, remove the plastic cards
and separator (screwdriver blades or Popsicle sticks),
then slide the grip down off of the frame.
Inspection
After disassembling the Redhawk I performed a full
inspection. This gun was used and not cleaned very well.
If I was a professional gunsmith I would charge $40 every
time someone brought me a dirty gun! I gave it a thorough
cleaning but did not lubricate anything until after I
inspected and modified parts.
Every
big-bore Ruger single-action revolver I have ever
owned had the same two well-known problems; the chamber
throats in the cylinder were undersize, and there was a
constriction in the barrel where it screwed into the frame.
This is extremely detrimental to accuracy since the bullet
is being swaged to a diameter less than the bore diameter.
I have written a complete article on how to accurize these
Ruger big-bore single-action revolvers (refer to my article
Accurizing the Ruger Single-Action Revolver) by
opening up the chamber throats and removing the barrel
constriction.
I needed
to see if this Redhawk had the same issues as its
single-action brethren. I measured the chamber throats in
the Redhawk and they all measured 0.451”. I oiled the bore
and drove a soft lead slug from muzzle to forcing cone and
found there was no constriction inside the barrel.
Light
Primer Strikes
The Ruger web site showed that my Redhawk was built in
2008. As late as 2011 it was reported that many Redhawks
suffered from light primer strikes. Internet research
indicated this was caused by a short firing pin, thick
hammer surface, a short and/or radiused transfer bar, or a
combination of any or all three. However, not every model
or individual revolver displayed this problem. The most
common fix was to remove a small amount of metal, 0.0005 –
0.001 from the top face of the hammer so it would move the
transfer bar farther against the firing pin.

I pressed
the trigger and lowered the hammer so it would press against
the transfer bar and firing pin. I measured the firing pin
protrusion with my homemade firing pin protrusion gauge and
it measured 0.050”. With the hammer removed I pressed the
trigger and pressed the transfer bar against the firing
pin. I again measured firing pin protrusion and it also
measured 0.050”; industry standard is 0.050” – 0.055”.
Because protrusion was the same with and without the hammer
I didn’t have to remove metal from the top of the hammer
face.
Polishing
Internal Surfaces
Dry-firing the gun showed me some areas that required some
light stoning. There was a burr on each side of the trigger
guard cutout where the trigger sets. These burrs were
rubbing against the trigger creating a visible mark on the
trigger. This rubbing causes friction which increases
trigger pull.
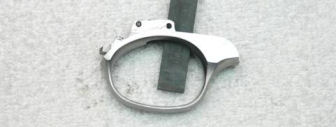
I removed
all parts from the trigger guard and used a 320-grit flat
polishing stick to gently polish off the burrs and smooth
the surfaces. This prevents the trigger from rubbing.
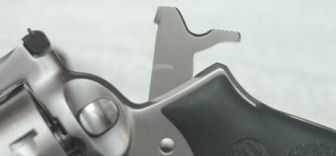
I
performed the same polishing to the inside of the frame
where the hammer rides to again eliminate some burrs. You
can clearly see the scratch on the left side of the hammer
caused by a burr on the frame.
Replacing
the Mainspring

As
mentioned before, the Wolff Redhawk spring pack came with 3
lighter mainsprings; 12#, 13#, and 14#. The factory
mainspring is 17#. I was astonished at just how heavy the
single-action trigger pull was with this gun. I placed the
rear of the hammer strut in a padded vise, pushed down on
the mainspring lever, removed the takedown pin, and gently
relaxed pressure on the factory spring. I wore safety
glasses and covered the assembly with a cloth so I wouldn’t
lose the spring. I polished the hammer strut with 800-grit
wet/dry sand paper, then replaced the mainspring with the
12# replacement mainspring, the lightest of the three.
I
reassembled the gun and tested the new spring with 6 empty
.45 LC cases primed with CCI 300 large pistol primers. CCI
primers are the hardest in the industry so if the gun can
reliably ignite CCI primers, it will pretty much fire
anything else. I loaded the cases into the cylinder and
tested by cycling the gun double-action. The hammer does
not come as far back in the double-action cycle as it does
manually cocking it single-action. All 6 primers ignited,
and the trigger returned without binding.
The
double-action was already smooth, but heavy. Replacing the
factory mainspring with a lighter after-market spring
significantly reduced the trigger pull. This gun now feels
like a Smith & Wesson revolver.
Milling
the Ejector Star
The whole purpose of this exercise was to see if I could
modify the .45 LC Redhawk to take .45 ACP using full moon
clips. In order to accommodate the moon clips I had to mill
the ejector star. This was not a problem with my CNC mill,
but I needed to do a little math first.
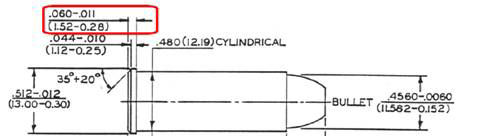
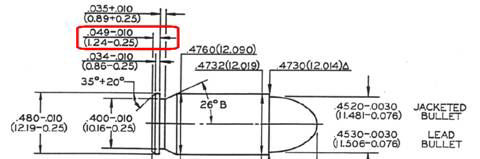
According
to
SAAMI cartridge specifications the rim of a .45 LC case
is 0.060” thick, but the rim of a .45 ACP case is only
0.049” thick. The thickness of my .45 ACP moon clips is
0.032” so it’s time to do a little math.
0.032
– moon clip
+ 0.049
– .45 ACP rim
0.081
- 0.060 – .45 LC rim
0.021 – amount to mill off of the ejector star
The
thickness of the ejector star was 0.070”. I was afraid I
would have to mill 0.032” off of the ejector star which was
almost half of the thickness. I was concerned that removing
that much metal would weaken the ejector star, but removing
only 0.021” should not affect the strength of the star.
However, I won’t be able to use moon clips for .45 LC
cartridges, but that’s really not a problem. If necessary,
I could use speed loaders.

I fixed
the cylinder to the milling table of my hobby CNC mill and
centered a 1/4” square end bit to the center of the
cylinder. I milled 0.021” off of the ejector star. I left
the ejector star installed on the cylinder; the cylinder
provided extra support during the milling process.
Now .45
LC cartridges can still be loaded one at a time as before,
or by using a speed loader. The rim of the case sets on the
outside edge of the cylinder and doesn’t touch the ejector
star. Headspace is still on the rear face of the cylinder
exactly the same as when the revolver came from the factory.
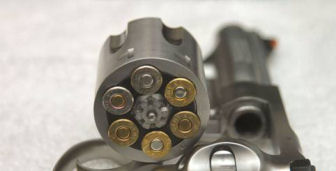
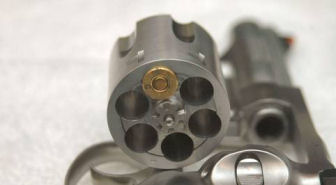
With the
recessed ejector star, I can now load six .45 ACP cartridges
with a full moon clip. I did notice, however, that a raised
primer had a tendency to bind the cylinder because the
primer would rub against the recoil shield. If I plan to
shoot .45 ACP with this revolver I need to make sure all
primers are flush or below the level of the case head.
Summary
This used revolver had been fired, but not cleaned very
well, and apparently never been disassembled. I completely
disassembled, cleaned, and lubricated it like I do to all my
guns. Milling the ejector star to accept .45 ACP cartridges
in moon clips makes this revolver much more flexible. I
can’t wait to try it out. For future owners of this gun I
will add a note to the manual indicating that this gun will
now take .45 ACP cartridges if used with a full moon clip
that is 0.032” thick. So it's not exactly a model 5032
because it doesn't have the removable front sight, but it
will shoot .45 ACP with full moon clips.
By the
way, the ejector star is a restricted part that must be
installed at the Ruger factory. If I had screwed it up I
would have had to send the entire gun to Ruger and pay for
shipping, the part, and labor.
Special
Thanks
A special thanks to the great folks at
Kittery Trading Post in Kittery, Maine. Their customer
service has to be second to none; they helped to make this
purchase and the transfer process quick, easy, and
affordable. Check out
their web site for great prices on used guns.
|