Adding a Flash Suppressor to a Ruger Mini-30
or "How I Became Intimate with a 10-Inch Mill Bastard File"
by Roy Seifert
Click here to purchase a
CD with this and all Kitchen Table Gunsmith Articles.
Disclaimer:
This article is for entertainment only and is not to
be used in lieu of a qualified gunsmith.
Please defer all firearms work to a qualified
gunsmith. Any loads
mentioned in this article are my loads for my guns and have
been carefully worked up using established guidelines and
special tools. The
author assumes no responsibility or liability for use of
these loads, or use or misuse of this article.
Please note that I am not a professional gunsmith,
just a shooting enthusiast and hobbyist, as well as a
tinkerer. This
article explains work that I performed to my guns without
the assistance of a qualified gunsmith.
Some procedures described in this article require
special tools and cannot/should not be performed without
them.
Warning:
Disassembling and tinkering with your firearm may
void the warranty. I
claim no responsibility for use or misuse of this article.
Again, this article is for entertainment purposes
only!
Tools
and firearms are the trademark/service mark or registered trademark
of their respective manufacturers.
A
long time ago, I purchased a Colt AR-15 Sporter in 7.62 x 39
caliber, the same caliber as the AK-47.
Since the lower was the same as a .223 AR-15, I
purchased a .223 Remington upper, which functioned
perfectly. I now
had an interchangeable caliber AR-15.
Although I purchased 1,000 rounds of Wolf 7.62 x 39,
I never really fired it.
I sold the Sporter to a friend, and with the money, I
purchased an AR-15 lower for my .223 Remington upper, and a
Ruger Mini-30.
The
Ruger Mini-30 is chambered for the 7.62 x 39 cartridge; it
was Ruger’s answer to all the AKs and SKSs being imported.
I wanted a rifle to shoot the 7.62 x 39, but the
AK-47 was too expensive, and I never really liked the SKS.
I’ve owned Ruger Mini-14s before and liked that
pattern of rifle, so I decided on the Mini-30.
 I’ve
never really liked the large front sight on the Ruger
Mini’s. I prefer
a military-type front sight with the protective wings.
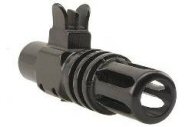
Choate Machine and Tool, Inc. makes a combination front
sight and flash suppressor for the Mini-14.
I was hoping this would also fit the Mini-30, but man
was I wrong! The inside diameter of the front sight was
0.54”, and although the barrel on the Mini-30 was tapered,
at the widest point where the new sight would go, the barrel
measured 0.62”. That
meant I would have to remove at least 80 thousands of an inch
around the barrel. The
preferred method would have been to remove the barrel and turn
it down on a lathe. Well,
I don’t have a lathe, so the next method was to draw-file
the barrel. Draw-filing
over 80 thousands is not for the faint of heart.
But even if I messed it up, I was going to install a
red-dot sight anyway so I really wouldn’t need the front
sight; but the flash hider would be nice. There are
professional gunsmiths who are probably cringing right now,
but hey, I'm a kitchen-table gunsmith. I’ve
never really liked the large front sight on the Ruger
Mini’s. I prefer
a military-type front sight with the protective wings.
Choate Machine and Tool, Inc. makes a combination front
sight and flash suppressor for the Mini-14.
I was hoping this would also fit the Mini-30, but man
was I wrong! The inside diameter of the front sight was
0.54”, and although the barrel on the Mini-30 was tapered,
at the widest point where the new sight would go, the barrel
measured 0.62”. That
meant I would have to remove at least 80 thousands of an inch
around the barrel. The
preferred method would have been to remove the barrel and turn
it down on a lathe. Well,
I don’t have a lathe, so the next method was to draw-file
the barrel. Draw-filing
over 80 thousands is not for the faint of heart.
But even if I messed it up, I was going to install a
red-dot sight anyway so I really wouldn’t need the front
sight; but the flash hider would be nice. There are
professional gunsmiths who are probably cringing right now,
but hey, I'm a kitchen-table gunsmith.
The
front sight had a lip on the inside that would rest up against
the muzzle. I
measured the depth of the lip then marked the barrel back from
the muzzle the same amount.
I installed a stop-collar at the mark to prevent
marring the barrel beyond that point.
The stop-collar was a bit large so I had to wrap some
tape around the barrel first before installing the collar.
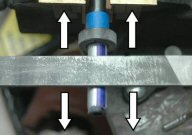 I
disassembled the rifle and put the barreled action in my bench
vise. I marked the
area to be filed with a blue marker, chalked a 10-inch mill
bastard file, and began draw-filing as shown in the photo.
Note the stop-collar.
After I removed the blue with the file, I rotated the
barrel, re-marked the area, and continued to draw-file.
I repeated the rotate/mark/file process and constantly
tried the new sight for fit. I
disassembled the rifle and put the barreled action in my bench
vise. I marked the
area to be filed with a blue marker, chalked a 10-inch mill
bastard file, and began draw-filing as shown in the photo.
Note the stop-collar.
After I removed the blue with the file, I rotated the
barrel, re-marked the area, and continued to draw-file.
I repeated the rotate/mark/file process and constantly
tried the new sight for fit.
 Because
the barrel was tapered, eventually the new sight would fit at
the muzzle end of the barrel, but not further up.
At this point I began to draw-file only the upper part
of the barrel close to the stop-collar until the sight would
fit farther up the barrel.
When the sight would fit onto the barrel with only the
width of the file left, I switched to a narrow safe-edge Swiss
pattern file so I could draw-file a narrower length.
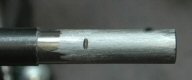
Eventually I couldn’t draw-file anymore, so I used
the Swiss file and filed perpendicular to the barrel and up
against the stop collar to reduce the diameter of the final
part of the barrel. In
the left photo, you can clearly see the lip where the
stop-collar was positioned, and the roll-pin notch from the
original sight. The
smooth area in front of the lip was where I filed
perpendicular to the barrel. Because
the barrel was tapered, eventually the new sight would fit at
the muzzle end of the barrel, but not further up.
At this point I began to draw-file only the upper part
of the barrel close to the stop-collar until the sight would
fit farther up the barrel.
When the sight would fit onto the barrel with only the
width of the file left, I switched to a narrow safe-edge Swiss
pattern file so I could draw-file a narrower length.
Eventually I couldn’t draw-file anymore, so I used
the Swiss file and filed perpendicular to the barrel and up
against the stop collar to reduce the diameter of the final
part of the barrel. In
the left photo, you can clearly see the lip where the
stop-collar was positioned, and the roll-pin notch from the
original sight. The
smooth area in front of the lip was where I filed
perpendicular to the barrel.
I
degreased the filed area with Acetone, cold-blued using
Van’s Instant Gun Blue, then coated with gun oil.
I used a soft-faced mallet to drive the sight in place,
then rotated it until it was in the proper position.
I took a 5/32” drill bit and drilled a detent in the
barrel for the sight’s setscrew, then installed the setscrew
using Loctite blue.
I
didn’t want to use the 1/8” roll pins that came with the
sight because I thought a 1/8” hole might make the barrel
too thin, so I decided to use 3/32” roll pins instead.
I used a #42 0.093” drill bit and carefully drilled
holes in the indicated positions through the sight and bottom
of the barrel. I
then installed two 3/32” roll pins that I cut to the proper
length.
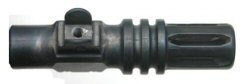
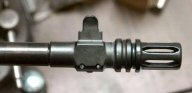 This
photo shows the results. The
end of the sight comes right up to the lip, and the setscrew
(you can just see on the bottom) and roll pins keep the sight
in place. This
project took hours to complete because of the draw-filing, but
I’m very pleased with the results, and no special tools
other than normal hand/power tools were required to complete
the project. This
photo shows the results. The
end of the sight comes right up to the lip, and the setscrew
(you can just see on the bottom) and roll pins keep the sight
in place. This
project took hours to complete because of the draw-filing, but
I’m very pleased with the results, and no special tools
other than normal hand/power tools were required to complete
the project.
Addendum
4/18/2009
After adding M1 carbine sights to this rifle (refer to my
article Installing
a M1 Carbine Rear Sight on a Ruger® Mini Thirty®) I
finally took it out to the range.
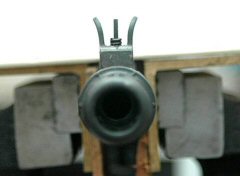
I had a feeling it would shoot high because the post on
the new front sight was lower than the original.
Sure enough, even with the rear sight at its lowest
position, the rifle shot about six inches high at 100 yards.
There
are two ways to make a firearm shoot lower; either lower the
rear sight, or raise the front sight.
Since the rear sight was already as low as it would go,
I decided to install an adjustable front sight post similar to
an AR15.
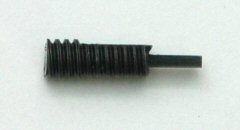
First
I used my hobby CNC mill to create a front sight post from
10-24 threaded rod. I
milled a flat onto the threaded base of the post so a set
screw would prevent it from turning under recoil.
I then cold-blued the sight post.
I
removed the flash suppressor from the barrel and milled off
the sight post. This
suppressor has been heat-treated so it’s very hard.
To avoid breaking taps I used oversized drill bits.
For the 10-24 sight post I should have used a #25 drill
bit, but instead I used a #19, slightly larger, bit.
I first used a 1/8" square end bit to plunge-mill a pilot
hole in the top of the
front sight between the protective wings,
then used the #19 bit to drill out the hole.
I then used a 10-24 tap to tap the threads.
For
the 8-32 set screw I should have used a #29 drill bit, but I
used a larger #24 bit to drill the set screw hole in the side
of the sight. I
then tapped it for 8-32.
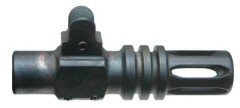
I
measured the original sight and found the post was 1.125”
above the center line of the bore.
I installed the threaded post into the top hole leaving
the top of the post 1.125” above the center line of the
bore. This made
the post slightly higher than the protective wings.
I installed the set screw with blue Loctite to hold the
post in place. I
then reinstalled the flash suppressor onto the barrel.
I now have an adjustable front sight post to get my
rifle accurately sighted in.
|
