Restoring a Yugo 24 Mauser
by Roy Seifert
Click here to purchase a
CD with this and all Kitchen Table Gunsmith Articles.
Disclaimer:
This article is for entertainment only and is not to
be used in lieu of a qualified gunsmith.
Please defer all firearms work to a qualified
gunsmith. Any loads
mentioned in this article are my loads for my guns and have
been carefully worked up using established guidelines and
special tools. The
author assumes no responsibility or liability for use of
these loads, or use or misuse of this article.
Please note that I am not a professional gunsmith,
just a shooting enthusiast and hobbyist, as well as a
tinkerer. This
article explains work that I performed to my guns without
the assistance of a qualified gunsmith.
Some procedures described in this article require
special tools and cannot/should not be performed without
them.
Warning:
Disassembling and tinkering with your firearm may
void the warranty. I
claim no responsibility for use or misuse of this article.
Again, this article is for entertainment purposes
only!
Tools
and firearms are the trademark/service mark or registered trademark
of their respective manufacturers.

Recently
during a 3-gun match my local gun club ran a side match for
military bolt-action rifles.
To be truthful bolt-action rifles never appealed to
me very much, and in fact I only owned one that I obtained
in a trade for a handgun.
At a recent gun show a friend pointed out a
Yugoslavian model 24 Mauser that he swore he would purchase
if he didn’t already have four other Mausers.
The bore looked in pretty good shape, the action was
butter-smooth, and the stock had no major faults.
The numbers didn’t match on the parts indicating it
went through an arsenal rebuild, but based on my friend’s recommendation, I purchased
it along with some cheap, surplus, corrosive ammo.
Initial
Assessment
After purchasing the rifle I completely disassembled it to see just
exactly what I had purchased. The
front and rear barrel bands, magazine floor plate and butt plate were somewhat
pitted and rusted with virtually no finish left.
The trigger guard, butt-stock, and rear sling swivel mount screws were
seriously buggered from someone using a standard hardware store tapered blade
screwdriver. These would have to
be cleaned up or replaced. The
trigger guard itself looked almost brand new with very little wear, rust or
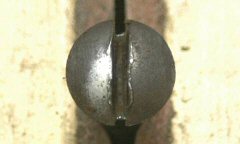
pitting on the inside, and outside. On
the left side of the barrel just past the step was a deep pit with lots of
rust. Not deep enough to affect
the safety of the rifle, but at some point water seeped into the gap between
the top of the stock and the hand guard, soaked the stock, and sat against the
metal of the barrel. So far I
haven’t seen anything that can’t be fixed.
Restoration
Plan
I wanted to keep the rifle as close to original as possible; in other
words not add any accessories or improvements that it didn’t originally come
with. A little research on the
Internet told me that the Yugoslavian Mausers had a slightly shorter action
than the standard 98K Mausers, so I couldn’t use many of the receiver
after-market accessories anyway. I
really just wanted a good looking shooter in close to original condition.
I had no plan to “sporterize” this rifle.
My restoration plan included the following:
-
Clean
and protect the barrel pit
-
Measure
chamber with go/no-go gauges.
-
Slug
the barrel.
-
Re-crown
the barrel to squeeze a little more accuracy out of it.
-
Re-blue
the front and rear barrel bands, butt plate, trigger
guard and floor plate.
-
Refinish
the stock
 Clean
and Protect the Barrel Pit Clean
and Protect the Barrel Pit
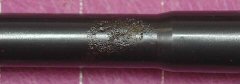
As
previously mentioned there was a deep pit on the left side
of the barrel just in front of the step, where the stock and
hand guard met. I
took a brass brush with gun oil and brushed in and around
the pit thoroughly. I
rinsed the barrel with brake parts cleaner to remove excel
oil and residue. I
brushed once more with the brass brush and gun oil and
rinsed again with brake parts cleaner.
Finally I applied a good coat of Breakfree CLP.
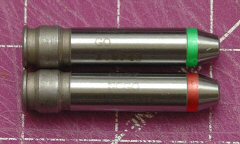
Chamber
Measurements
I
purchased a set of 8mm Mauser go/no-go gauges from Midway
USA.
The bolt closed easily on the go gauge, but would not
close on the no-go gauge.
Ok, this told me the chamber was within minimum
specifications. Live
rounds also chambered easily.
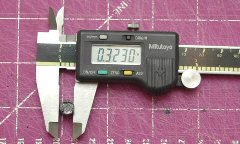 Slug
the Barrel Slug
the Barrel
I
took a .38 caliber pure lead round ball and drove it through
the well-oiled barrel. The
slug measured 0.323” which is what I expected to see.
Ok, so it will shoot standard 8mm Mauser .323
bullets.
Refinish
the Stock
The stock had the original dark, somewhat sticky military
finish. The wood
looked like walnut and had a very nice grain.
I wanted to strip off the old military finish and
refinish with Tru-Oil to bring out the luster and grain of the
wood. I refinished
the stock before I refinished any metal parts because I wanted
to sand the stock with those metal parts attached to prevent
rounding off any edges that joined metal.
Based on
Internet research I used Easy-Off oven cleaner to strip the
wood. 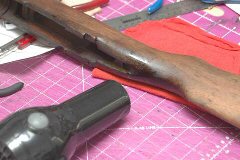 First I
removed all metal parts except the two barrel band springs.
(I just couldn’t remove these no matter what I
tried!) Then I
took the wood outside and gave it a liberal coating of oven
cleaner. This
stuff worked like magic; the old finish came right off.
After applying and removing 3 coats of oven cleaner I
went over the entire stock and hand guard with mineral
spirits. Finally,
I took my wife’s hair dryer and applied heat to the top of
the stock where the tang of the receiver sits.
This was very dark from years of cleaning fluids and
oil. The hair
dryer brought the oil right up out of the wood which I could
then wipe away. There
was so much oil that it took hours of heating and wiping.
First I
removed all metal parts except the two barrel band springs.
(I just couldn’t remove these no matter what I
tried!) Then I
took the wood outside and gave it a liberal coating of oven
cleaner. This
stuff worked like magic; the old finish came right off.
After applying and removing 3 coats of oven cleaner I
went over the entire stock and hand guard with mineral
spirits. Finally,
I took my wife’s hair dryer and applied heat to the top of
the stock where the tang of the receiver sits.
This was very dark from years of cleaning fluids and
oil. The hair
dryer brought the oil right up out of the wood which I could
then wipe away. There
was so much oil that it took hours of heating and wiping.
I don’t
know much about wood, but this appears to be a dark walnut.
It’s amazing that this would be found on a military
weapon. Once I got
as much oil out of the stock as I could I took a wet T-shirt
and laid it on the stock, then applied a hot iron.
This helped to raise any dents, and also raised the
grain. Once the
grain was raised I gently sanded with 600 grit paper to get
the stock nice and smooth.
I didn’t bother to fill any deep gouges since I felt
this added character to the stock.
Once
prepared I applied 3 coats of Birchwood Casey Tru-Oil
following the instructions.
The stock now has a nice soft luster.
 Re-Blue
Metal Parts Re-Blue
Metal Parts
First
I had to prepare all the parts I planned to re-blue.
I started by dressing the screw heads.
As the photo at the left shows, most of them had burrs raised
by someone using a tapered-blade screwdriver instead of a
hollow-ground parallel blade screwdriver.
I took a flat jeweler’s file and filed off the burrs.
Then I re-cut the slot using the same file.
I polished the head by chucking the screw in my hand
drill and holding the head against some 320 grit wet/dry paper
with the drill spinning.
The
bluing on much of the original hardware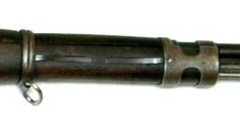 had long worn off.
The parts showed pitting and were an ugly plum brown
color.
I took the front and rear barrel bands, magazine floor
plate, rear sling swivel mount and butt plate and bead blasted
them in my blast cabinet.
This completely cleaned them and gave them a soft matte
finish in preparation for bluing.
I decided not to do the bayonet lug or the trigger
guard since they looked ok.
(Some purists reading this are probably cringing right
now because I removed the aged bluing.
Some would prefer to leave the plum color, but I wanted
to re-blue the parts.) had long worn off.
The parts showed pitting and were an ugly plum brown
color.
I took the front and rear barrel bands, magazine floor
plate, rear sling swivel mount and butt plate and bead blasted
them in my blast cabinet.
This completely cleaned them and gave them a soft matte
finish in preparation for bluing.
I decided not to do the bayonet lug or the trigger
guard since they looked ok.
(Some purists reading this are probably cringing right
now because I removed the aged bluing.
Some would prefer to leave the plum color, but I wanted
to re-blue the parts.)
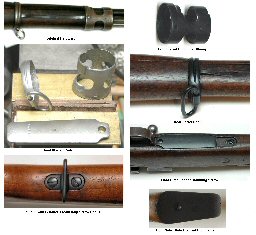 I
decided to cold-blue the parts using Vans Liquid Gun Blue.
I thoroughly degreased the bead-blasted parts using a
new toothbrush and TCE available from Brownells.
I poured some gun blue liquid into a small aluminum
pan, heated each part or screw with a hair dryer, and placed
the part in the gun blue liquid.
After about 5 minutes the parts were a deep, dark
blue-black color.
I removed them from the solution and doused them with
Outers gun oil to fix and seal the bluing. When you
click on the left photo, notice the cleaned up screw head
slots. I
decided to cold-blue the parts using Vans Liquid Gun Blue.
I thoroughly degreased the bead-blasted parts using a
new toothbrush and TCE available from Brownells.
I poured some gun blue liquid into a small aluminum
pan, heated each part or screw with a hair dryer, and placed
the part in the gun blue liquid.
After about 5 minutes the parts were a deep, dark
blue-black color.
I removed them from the solution and doused them with
Outers gun oil to fix and seal the bluing. When you
click on the left photo, notice the cleaned up screw head
slots.
Test
Firing
I took my Mauser to the range to test fire it and discovered
that the firing pin was too weak to ignite the military
surplus ammo I was using.
Someone probably stored it for a long period of time
with the firing pin cocked.
I ordered a 24-pound firing pin spring from Midway USA
but found it was too long.
I removed 3 coils from the spring and flattened the end
so it would fit on the bolt.
I pulled the bullet and powder from 3 of the military
surplus rounds and the rifle ignited the primers reliably.
The bolt is a bit harder to open because of the
stronger spring, but I’d rather have reliability.
At
100 yards I get about a 3-inch group, which is probably more
than I can expect from this military rifle, but that’s good
enough for a side match. Overall
I’m please with my purchase and I have another rifle for my
collection.
|

