Working on the Marlin Lever-Action Rifle Sear
by
Roy
Seifert
Click here to purchase a CD with this and all Kitchen Table
Gunsmith Articles.
Disclaimer:
This article is for entertainment only and is not to
be used in lieu of a qualified gunsmith.
Please defer all firearms work to a qualified
gunsmith. Any loads
mentioned in this article are my loads for my guns and have
been carefully worked up using established guidelines and
special tools. The
author assumes no responsibility or liability for use of
these loads, or use or misuse of this article.
Please note that I am not a professional gunsmith,
just a shooting enthusiast and hobbyist, as well as a
tinkerer. This
article explains work that I performed to my guns without
the assistance of a qualified gunsmith.
Some procedures described in this article require
special tools and cannot/should not be performed without
them.
Warning:
Disassembling and tinkering with your firearm may
void the warranty. I
claim no responsibility for use or misuse of this article.
Again, this article is for entertainment purposes
only!
Tools
and firearms are the trademark/service mark or registered trademark
of their respective manufacturers.
Working the Sear
Caution:
This procedure requires special tools.
Unless you are familiar with working with hammers and
sears, please do not attempt these procedures.
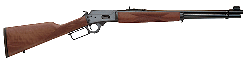
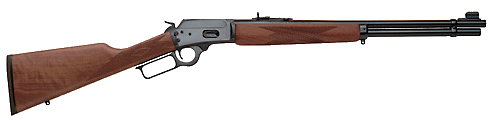
Currently in my collection I
have two Marlin lever-action rifles; a model 1895 CB in .45/70
caliber, and a model 1894 Cowboy Limited in .45LC.
Both sears were just rough cut as they came from the
factory. In fact,
the sear for the 1894 CB Ltd. wasn’t even square.
I performed the
following procedure to square and polish the sear, making the
trigger pull lighter and crisper.
Required Tools
I never attempt to cut/polish a sear without the correct
tools. Without the
correct tools I could round the surfaces making them unsafe
and/or inoperable. I
used the following tools to work the sears on my Marlins.
Procedure
NOTE:
I
Performed the
following procedure before making any adjustments to the
trigger return spring!
-
I
MADE SURE MY RIFLE WAS
UNLOADED AND THAT THERE WERE NO CARTRIDGES IN THE CHAMBER
OR MAGAZINE.
-
Disassembled
the rifle.
-
Removed
the trigger and sear from the trigger guard plate.
-
Installed
the Marlin sear onto the sear jig insert with the
sear-to-hammer engagement surface up and parallel with the
top edge, convex curve to the left.
-
Inserted
the sear jig insert into slot B of the jig so that the
sear surface was below the top of the jig.
-
Mounted
the jig in a vise so that I could access the height
adjusting screw, and the sear jig insert locking screw.
-
Placed
a ceramic stick or other flat object on top of the jig.
-
Loosened
the sear lock nut just enough so that the sear could
rotate.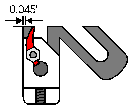
-
Using a feeler gauge, rotated the sear until the back of
the sear was 0.045” (45 thousands) away from the jig
wall.
-
Adjusted
the height adjusting screw to check that the sear
engagement surface was perfectly flat against the flat
object. Rotated
the sear until the engagement surface was perfectly flat
and parallel with the top of the jig.
-
Tightened
the sear lock nut making sure the sear did not rotate.
-
Used
a felt-tip marker to mark the sear engagement surface.
-
Took
a few strokes with the ceramic stick to ensure the surface
was flat. Adjusted
until the stick removed an equal amount of marker front to
back. This
indicated that the surface was flat.
-
If
the engagement surface was square, i.e. the entire surface
touched the flat object, I could go to step 17.
-
If
the engagement surface was not square, I cut it with the
India
stone. Adjusted
the height adjustment screw and cut the surface until it was
perfectly flat and square with the top of the jig.
-
Polished
with the hard Arkansas stone.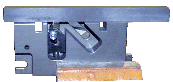
-
Polished
the engagement surface with the coarse ceramic stick until
it was shiny and flat.
Kept the polishing surface wet with water.
Ceramic sticks use water as the cutting agent.
-
Final
polished the surface with the fine ceramic stick.
Again, used water as the cutting agent.
-
Dried
the sear and applied a light coating of good quality gun
oil.
-
Reassembled
the rifle. The
trigger was now a bit lighter, but very crisp.
If
the trigger was not light enough I could now adjust the
trigger return spring tension.
Final Note
I’ve fired maybe 300 rounds through my 1895CB before taking
it apart to obtain the photo for this procedure.
I examined the sear engagement surface and found it to
be solid black. This
indicated that the entire surface was engaging the hammer,
i.e. the sear engagement surface was flat and square to the
hammer engagement surface, which was as it should be.
|