Improving
the FEG PA63 9x18 Makarov
by Roy Seifert
Click here to purchase a
CD with this and all Kitchen Table Gunsmith Articles.
Disclaimer:
This article is for entertainment only and is not to
be used in lieu of a qualified gunsmith.
Please defer all firearms work to a qualified
gunsmith. Any loads mentioned in this article are my loads for my guns and
have been carefully worked up using established guidelines
and special tools. The
author assumes no responsibility or liability for use of
these loads, or use or misuse of this article.
Please note that I am not a professional gunsmith,
just a shooting enthusiast and hobbyist, as well as a
tinkerer. This
article explains work that I performed to my guns without the
assistance of a qualified gunsmith.
Some procedures described in this article
require special tools and cannot/should not be performed
without them.
Warning:
Disassembling and tinkering with your firearm may
void the warranty. I
claim no responsibility for use or misuse of this article.
Again, this article is for entertainment purposes
only!
Tools
and firearms are the trademark/service mark or registered trademark
of their respective manufacturers.
Introduction
I have a concealed
carry permit (CCP) for the state of North Carolina, but
summers here get pretty hot and humid which precludes wearing
jackets, vests, or any other long garments to cover a holster.
A convenient method for summer-time carry is a
specially designed fanny pack.
They’re easy to use; I can carry my wallet, keys,
spare magazines, and a gun, and are so common that they’re
virtually invisible. However,
they are not designed for full-sized guns; therefore I needed
to find a small, lightweight pistol suitable for carrying in a
fanny pack.
I had been
reading an abundance of positive information about the
European Makarovs being imported into this country.
The 9x18 Makarov guns themselves are fairly inexpensive
($100 - $250) depending on where you buy.
9x18 Makarov ammo is like a .380 Auto on steroids, so I
decided to search for a Makarov.
While visiting a local gun store with a friend I found
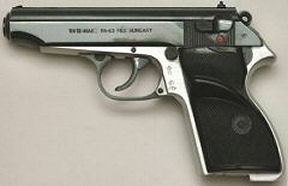
a Hungarian FEG PA-63 in 9x18 Makarov caliber.
This gun is almost an exact copy of a Walther PP
(larger than a PPK or PPKS) and
looked like it would fit my needs well.
The
Military standard PA-63 version sports a two-tone polished
aluminum frame with black slide, grips, trigger and hammer
assembly. To me
it’s an attractive little pistol.
Although the reflective frame was unusual for military
use, it was chosen due to its relative cheapness as well as
quicker build time. Problems
related to the durability of the aluminum frame were resolved
prior to the development of the PA-63 in 1961 with the
production of the FEG R-61 Police Pistol. The
addition of 0.1% titanium to the aluminum alloy solved
premature alloy frame wear problems inherent in the earlier
FEG aluminum framed pistols. This development was then
applied to all aluminum framed FEG guns including the PA-63.
Initial
Disassembly and Inspection
The first thing I do with a new gun is to completely
disassemble it. I
followed the disassembly instructions for a Walther PP, which
worked very well. I
cleaned and oiled everything and did some preliminary
inspection, not only for fit, function and wear, but also for
areas that could use some improvement.
This particular gun looked like it had not been fired
very much. During
my initial inspection it looked like someone had clipped a few
coils off the hammer spring.
One end of the spring was flattened and compressed like
it comes from the factory.
The other end was unevenly flattened, but not
compressed; a sure sign that someone had been working on it.
Magazine
Well
The magazine well was perfectly straight and made inserting a
magazine an exacting chore.
True this is not an IPSC or competition gun, but since
I plan to carry it for personal defense I wanted to improve
the ability to insert a magazine.
I put the frame in the machinist vice with the magazine
well up and leveled. I
used the cone cutter from my high-speed rotary tool to bevel
the inside of the magazine well.
Aluminum is very nice to work with, but I was careful
not to cut too deeply. After
I did the rough-cut on the mill I polished the bevel with
320-grit wet/dry paper on a Popsicle stick.
Not
all 9mm’s Are Alike
There are three types of 9mm ammo available for consumers.
They cannot, nor should not be used interchangeably.
They are:
- 9x19
also called 9mm Parabellum, or 9mm Luger developed in
Germany
. This is the
most widely known and popular of the 9mm cartridges, and
is the most widely used cartridge used by military and
police. It is
also the most powerful of the three.
Most modern firearms manufacturers have at least
one handgun model chambered for this cartridge.
The bullet diameter is .356.
- 9x18
Makarov – This cartridge was designed by Nikolai Makarov
after WWII for eastern bloc countries as an alternative to
the 9mm Parabellum. It
was the largest cartridge that could be used in a direct
blowback pistol. The
bullet diameter is .363 - .365 so standard 9mm bullets
cannot be used. It
is more powerful than a .380 auto, but less powerful than
a 9mm Parabellum.
- 9x17,
sometimes called 9mm short, 9mm Kurz, or better known as
the .380 auto was designed by John M. Browning and was
introduced in 1908 by Colt.
This is often considered the minimum caliber for
self defense and is commonly used in what are sometimes
referred to as “pocket pistols.”
The Walther PPK made famous by James Bond is
commonly chambered in .380 auto.
The bullet diameter is also .356.
At a local
gun show I purchased 500 rounds of Brown Bear 9x18 Makarov
jacketed hollow-point ammo manufactured in
Russia
. This ammo is
loaded a little hotter than standard Makarov ammo and I
intended to use this ammo for defense. My
first trip to the range exposed some problems with the PA-63
and the Brown Bear ammo:
- The
gun kicked like a mule!
The felt recoil was pretty serious.
This was due in part to the lighter aluminum alloy
frame and the heavier load.
- The
double-action trigger pull was very heavy and stiff.
This makes that first shot very inaccurate.
A friend once offered to sell me a real Walther PPK
but I decided not to purchase it because of the very stiff
trigger.
- The
sharp edges on the rear of the slide cut the web of my
thumb after only five rounds.
Ouch!
- The
sights were very difficult to pick up and use.
- The
bullets of the Brown Bear ammo were not all seated to the
same depth which caused feeding problems!
All of
these problems can be fixed; can you say “project gun?”
Ammunition
First I addressed the bullet seating problem.
With my calipers and a box of ammo I found most of the
rounds were seated to the same depth.
A few rounds were seated out too far which caused the
feeding problems.
I purchased
a set of Lee 9x18 Makarov reloading dies and set the seating
die to the shortest round.
I ran all of the remaining 500 rounds through this
seating die to ensure they were all at the same overall
length. This took
care of the feeding problems, and should result in better
accuracy since consistent bullet seating gives more consistent
ignition.
Parts
There are a couple of resources for parts for this little
pistol. Springs
are available from MidwayUSA
or Brownells.
I purchased Makarov recoil springs and Walther PP
hammer springs. Wolff
makes a recoil spring set for the Makarov with 15#, 17#
(factory), 19# and 21# springs.
They also make a hammer spring set for the Walther PP with
16#, 17#, 18#, and 19# low power springs.
Gun
Parts Corp. does not have specific parts for the FEG PA63,
however, they do carry parts for the Kassnar PMK-.380 which
appears to be the same pistol.
Reports indicate that most of the parts will work in
the PA63. I
purchased a spare firing pin, firing pin spring, and
ejector/slide lock for my spares kit.
Wolff Gunsprings
is now selling springs for the PA-63; hammer, recoil, and
magazine springs. Although the springs are listed for
the 9x18 Makarov, they will also fit the .380 Auto model.
When I wrote this article in 2010 I had to mix and match
springs as listed above, but if I was to do it over again, I
would purchase the Wolff FEG PA-63 springs.
Double-Action
Trigger Pull
Trigger pull can often be improved simply by replacing
springs. As
mentioned before MidwayUSA
sells a Walther PP hammer spring pack made by Wolff.
It comes with four springs; 16#, 17#, 18#, and 19#
weights. When
installing lighter springs, I always test reliability of
ignition with an empty case primed with a CCI primer.
CCI primers are somewhat harder than other primers; if
the gun will ignite a CCI primer every time, it will pretty
much ignite any other type of primer.
I had to
disassemble the frame to replace the hammer spring.
I followed the NRA takedown guide for the Walther PP.
I found the 16# spring wouldn’t even dent the primer
at all, even with multiple strikes!
The 17# spring took 4 or 5 strikes to fire the primer.
The 18# spring was erratic; it sometimes took 1,
sometimes 2 strikes to fire the primer, but the 19# spring
fired the primer every time.
So, I left the 19# hammer spring installed, and found
the double-action trigger pull was significantly lighter.
Unfortunately, my trigger pull gauge doesn’t go high
enough to measure the pull weight, so this was strictly
subjective on my part. However,
at a recent range session, a guy in the bay next to me also
had a PA-63 in .380 auto, and after trying my pistol, he
wanted to know what I did to lighten the trigger pull!
Felt
Recoil
This gun has a basic blowback action exactly like the original
Walther. Although
the 9x18 Makarov is weaker than the 9mm, the pressure is still
pretty high for a straight blowback action.
To improve reliability, reduce wear and tear on the
gun, and reduce felt recoil, I installed a heavier, Wolff 21#
Makarov recoil spring also available from MidwayUSA.
Installing
the spring was a simple matter of removing the slide, sliding
the original recoil spring off of the barrel, sliding the new
spring onto the barrel, and reinstalling the slide.
Using the Brown Bear ammo, the gun cycled and fed
reliably and felt recoil is somewhat reduced.
It required a little more muscle to pull back the slide
and charge the first round, but this was an acceptable
trade-off to controllable, comfortable shooting.
Rounding
the Rear Sharp Edges of the Slide
(or How to Prevent Needing First Aid to the Web of My Hand!)
The bottom rear corners of the slide where the vertical back
edge meets the bottom rails were left very sharp.
Because this gun doesn’t have much of a beavertail,
recoil would cause the gun to flip up, causing the rear of the
gun to depress deeper into the web of my hand so when the
slide came back these sharp corners would cut open my hand.
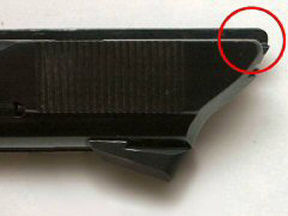
I removed
the slide from the gun and placed it upside down in a padded
vise. Using a
high-speed rotary tool with a fine sanding drum I carefully
rounded the two sharp corners at the bottom rear of the slide.
I then used a Craytex bit to polish the newly rounded
edges, then cold-blued the exposed metal.
After running 50 rounds through the gun my hand
survived with no cuts, scratches, or gouges.
Better
Sights
Up to this point modifications have been just replacing parts,
and performing some minor contouring to reduce the sharp
edges. Now it’s
time to do some real milling.
I purchased a set of white-dot fixed sights from Makarov.com.
Unfortunately, they no longer sell parts, but similar
sights can be purchased directly from Novak
Sights. Novak
sells fixed sights that fit a Colt Mustang or .380 auto which
work great on the PA-63. They
also sell a number of front sights with different heights; the
height I purchased was .180.
Installing
Front Sight
The dovetail of the front sight was 65 degrees x .330 x .05.
Using my dovetail
calculator I determined that I should use a 0.25 square
end bit to mill the pilot slot.
I removed
the slide from the frame, put painters tape on the sides, and
squared it in the machinist’s vise on my mill.
Using a dial indicator I positioned the center of the
bit 0.325” back from the front edge of the slide and 0.05”
down from the top and made a pass through the slide.
The original front sight was cast into the slide, so I
just milled it off. This
cut the pilot slot for the dovetail cutter.
This pilot slot prevents the dovetail cutter from
loading up and possibly breaking.
After
cutting the pilot slot, I removed the square end bit and
installed a 65 degree x .330 high speed steel dovetail cutter
available from Brownells.
I positioned the quill of the mill so the bottom of the
cutter was resting on the bottom of the pilot slot.
I set the RPM to 540, and using a lot of cutting oil,
and moving the cross slide very slowly, I cut the dovetail.
I removed
the slide from the machinist’s vise and put it in my bench
vise. I used a 65
degree dovetail file to carefully open up the dovetail just
until the front sight would start in the slot.
I cleaned the bottom of the sight and the dovetail slot
with acetone, then applied a drop of Loctite 609.
I used a nylon-tipped punch to drift the sight into the
dovetail until it was centered.
The sight came with a roll pin to anchor it in place,
but since the sight fit tightly in the dovetail, and I used
the Loctite 609, the sight was not going to move so I didn’t
use the roll pin.
Installing
Rear Sight
The dovetail for the fixed rear sight was 65 degrees x .300
and fit in a Novak-style cut.
I again squared the slide in the machinist’s vise.
I used a .25” square end bit to mill the rear of the
slide down to the bottom of the original sight dovetail.
Although the original rear sight was supposed to be
drift-adjustable for windage, I couldn’t get it to move, so
I just milled it off. I
moved the center of the bit 0.70” in from the rear edge of
the slide, and down to a depth of 0.075” below the flat I
just milled. I
again made one pass through the slide; this cut the pilot slot
for the dovetail cutter.
Again,
after cutting the pilot slot, I removed the square end bit and
installed a 65 degree x .300 high speed steel dovetail cutter
available from Brownells
and cut the rear dovetail as before.
I then used the 65-degree dovetail file to final-fit
the rear sight. I
took the gun to the range and discovered that it was shooting
left, but elevation was right on.
I drifted the rear sight a bit to the right and
tightened the set screw, now it shoots to point of aim.
Summary
This little gun is now a pleasure to shoot.
The sights are easy to pick up, trigger pull is smooth
and much lighter, recoil is less noticeable, and it doesn’t
cut my hand during recoil.
Because of the fixed barrel, this gun is also fairly accurate,
and even with fixed sights, shoots to point of aim with the
Brown Bear ammo. Someday, if I can find a set of adjustable sights I may
install them, but since the gun is hitting to point of aim, I
may just leave everything as is.
I recently
found an article on Makarov.com
regarding how to further improve the trigger of the PA-63.
This will probably be a forthcoming article.
|
