Milling a
Front Sight Dovetail
by Roy Seifert
Click here to purchase a
CD with this and all Kitchen Table Gunsmith Articles.
Disclaimer:
This article is for entertainment only and is not to
be used in lieu of a qualified gunsmith.
Please defer all firearms work to a qualified
gunsmith. Any loads
mentioned in this article are my loads for my guns and have
been carefully worked up using established guidelines and
special tools. The
author assumes no responsibility or liability for use of
these loads, or use or misuse of this article.
Please note that I am not a professional gunsmith,
just a shooting enthusiast and hobbyist, as well as a
tinkerer. This
article explains work that I performed to my guns without
the assistance of a qualified gunsmith.
Some procedures described in this article require
special tools and cannot/should not be performed without
them.
Warning:
Disassembling and tinkering with your firearm may
void the warranty. I
claim no responsibility for use or misuse of this article.
Again, this article is for entertainment purposes
only!
Tools
and firearms are the trademark/service mark or registered trademark
of their respective manufacturers.
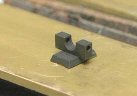
One of the
more advanced procedures I perform to my guns is to cut a
front sight dovetail, and of course, install the
corresponding sight. I purchased a 1911 .45 ACP slide
that didn't have a front sight so I decided to install a
fiber-optic front sight.
Since the slide did not come with any front sight
cuts I had to mill the dovetail.
This sight required a 65o x 0.330” width
x 0.075” depth dovetail.
Before
milling the dovetail, I had to make sure the slide was mounted
exactly perpendicular to the cross-slide table of the mill and
perfectly level so the sight would be straight.
First,
I squared my swivel vise.
I rotated the vise until the dial indicator read
0.000” across the fixed face of the vise.
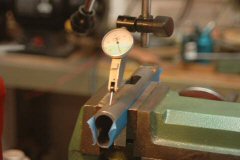
Next,
I installed the slide in the vise using a parallel.
I put blue tape on the sides to protect the slide
while clamped in the vise.
I ran my dial indicator across the top of the slide
to ensure it was perfectly level.

When
I cut a dovetail slot I cut out the center of the slot first
with a square end mill, then cut the angles with the
dovetail cutter.
This is called a pilot slot. The dovetail cutter is made of high speed steel (HSS) so it
is best not to load up the teeth by using it to cut the
entire dovetail. Ok, now it is time for some
higher math.
I knew
angle A was 65o, the depth B was 0.075”, and the
width C was 0.330”. I
needed to find the length of line D so I could subtract it
twice from line C to find the width of the cut.
I found that value using this formula:
C - (2 * B
/ tangent(A)) = cut width.
Substituting the values for the letters gave me:
0.330 - (2
* 0.075 / tangent(65)) = 0.260
(I did this with the scientific view of the calculator
that came with my computer software.
I have since created an Excel spreadsheet to perform
these calculations. Download
a copy by right-clicking here.)
Well, this
worked out to be 0.26” which is a hair over 1/4”.
Since I had a 1/4“ carbide end mill this is what I
used to make the initial cut.
Now
I needed to know where to position the center of the end
mill. I took my
calipers and measured the length of the sight, which was
0.5”. Since
the base was in the center of the sight, the midpoint was
0.25”.
I installed the 1/4” end mill bit in my mill.
I used a 0.010” feeler gauge and moved the front of
the slide until it was 0.010” away from the bit.
I set up the travel indicator and moved the piece
0.010” (thickness of feeler gauge) + 0.25” (distance to
middle of sight dovetail) + 0.125” (half the thickness of
the bit).
I added an additional 0.005” so the sight would be
back from the edge of the slide just a bit.
So I moved the bit a total of 0.010” + 0.25” +
0.125” + 0.005” = 0.39”.
I had now correctly positioned the bit to cut the pilot
slot.
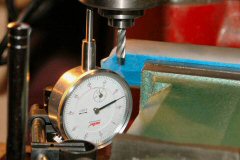
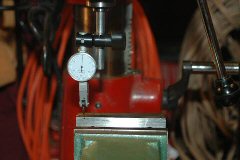
Since the depth of the sight dovetail was 0.075” I
adjusted my depth of cut to 0.075” below the top of the
slide.
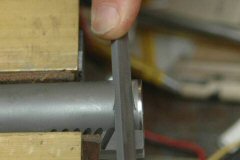
First, I positioned the slide under the center of the
bit, and then using a 0.010” feeler gauge moved the bit
down until it was touching the gauge.
I positioned the travel indicator so the point was on
the bottom of the spindle.
Then, I adjusted the depth of the spindle down
0.010” (thickness of feeler gauge) + 0.075” (depth of
sight dovetail).
Notice in the photo above the dial indicator
reads 0.085”.
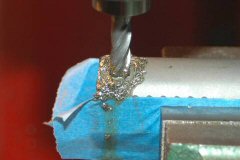
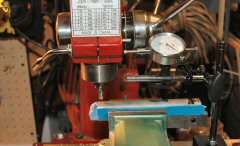
Ok, so now I was ready to cut the pilot slot.
I was using a carbide bit so I set the spindle speed
to 1500 RPM, but I didn’t want
to break my bit so I moved the cross-slide table fairly
slowly and used plenty of
cutting oil.
I replaced
the square end mill with a 65o x 0.330”
HSS dovetail cutter. I
positioned the work and lowered the bit so one tooth was
touching the bottom of the pilot slot, then locked the spindle
shaft at that depth. The
instructions for the bit say to never go above 700 RPM, so I
set the spindle speed to 540 RPM.
Again using plenty of cutting oil, I made a slow single
pass to finish cutting the dovetail.
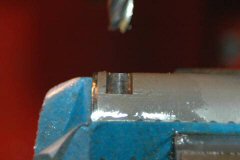
I cleaned off all the cutting oil from the slide by
spraying thoroughly with brake parts cleaner. 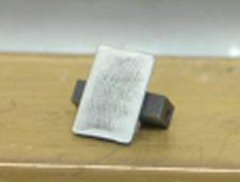
The front sight had a raised lip all around the
underside of the base so I set a piece of 600 grit paper on
a flat surface and rubbed the bottom of the sight until it
was flat.
I
took my sight base file and carefully filed the rear of the
dovetail cut in the slide until the sight would slide on
easily about 1/4 of the way into the dovetail.
I took only 3 or 4 light strokes with the file then
tried the sight. Once
I got the sight started, I set it in place with a brass punch.
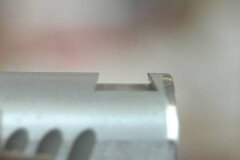
To complete the sight installation I removed the sight,
cleaned the sight base and dovetail with Acetone, then put a
drop of green Loctite 609 on the dovetail and re-installed the
sight. The Loctite
ensures the sight stays in place. 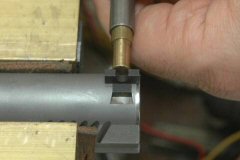
Here
I am tapping in the front sight. I used a brass punch so
I wouldn't mar the sight. I used regular bore copper
cleaner to clean off the brass residue. 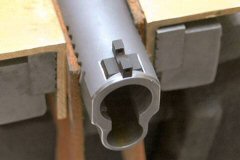
Here is the completed front
sight installation. Nice and clean, and the sight fits
tightly in the dovetail. This sight will never come off
during shooting. 
Now
I needed to install the colored optic fiber rod into the front
sight.
I had a choice of two colors, red or green.
I have never liked red sights because they seem to
disappear into the background, so I chose the green rod.
I cut the green rod and inserted it into the hole in
the sight leaving a bit exposed on each end.
I took a cigarette lighter and heated each end until it
ballooned thereby locking the rod into the sight. In the
photo above the slide has been parkerized. I
installed the fiber optic rod after I finished the slide.
That
green fiber optic rod really gathers the light and helps me
with quick target acquisition. The first time I used
this gun in a match I had no misses. Not bad for a
kitchen table gunsmith.
|
