Shortening a Ruger® Bisley Blackhawk® Barrel
by Roy Seifert
Click here to purchase a
CD with this and all Kitchen Table Gunsmith Articles.
Disclaimer:
This article is for entertainment only and is not to
be used in lieu of a qualified gunsmith.
Please defer all firearms work to a qualified
gunsmith. Any loads
mentioned in this article are my loads for my guns and have
been carefully worked up using established guidelines and
special tools. The
author assumes no responsibility or liability for use of
these loads, or use or misuse of this article.
Please note that I am not a professional gunsmith,
just a shooting enthusiast and hobbyist, as well as a
tinkerer. This
article explains work that I performed to my guns without
the assistance of a qualified gunsmith.
Some procedures described in this article require
special tools and cannot/should not be performed without
them.
Warning:
Disassembling and tinkering with your firearm may
void the warranty. I
claim no responsibility for use or misuse of this article.
Again, this article is for entertainment purposes
only!
Tools
and firearms are the trademark/service mark or registered trademark
of their respective manufacturers.
A
couple of years ago I found an ad on Gunbroker.com for a 7
1/2” Ruger® Bisley Blackhawk®.
From the very poor photo and description, the gun looked to be stainless
steel. My plan was
to shorten the barrel to 6”, which is 1/2“ longer than the
minimum requirement to use for hunting in my state.
To my great disappointment I discovered that the gun
was blued, not stainless, but it did come with pearlite grips.
Lesson learned, ask questions before buying.
My long time shooting friend, Dave, offered to buy it
from me since he already had a blued 7 1/2“ Bisley Blackhawk®
and wanted a matched set for cowboy shooting, so I sold it to
him for what I had in it.
Fast
forward a couple of years and Dave decided to get a pair of 5
1/2“ stainless New Model Vaqueros® to use for cowboy
shooting. At the
same time he decided to keep one 7 1/2“ Bisley for hunting,
but he wanted to shorten the barrel of the other one (the one
I sold him) to make it easier, to carry in a holster when in
the woods, but still be legal in our state. So,
Dave came over to my house and we went to work hacking on his
revolver barrel.
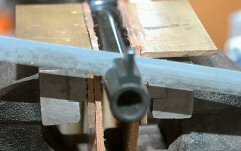
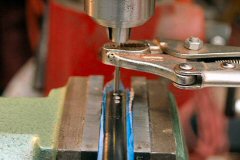
We
decided to cut the barrel off right behind the front sight
base. This would
make the barrel just a touch longer than six inches.
Dave used a regular hack saw to cut through the barrel.
Needless
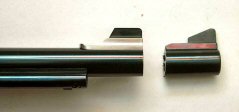
to say, by using a hack saw the cut was not square.
If you look at the last photo in this article, you can
clearly see the rearward angle of the cut on the leftover
piece. Fortunately
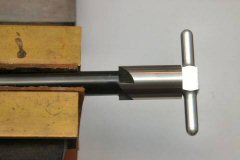
I had a 90-degree muzzle facing cutter and a .45 pilot bushing
which I purchased from Brownells.
The pilot bushing keeps the cutter square to the bore.
We used plenty of oil on the bushing and took turns
turning the cutter by hand until the muzzle was square.
Next
we took a 1/2“ 79-degree muzzle crowning cutter (also
available from Brownells)
to crown the muzzle. The
outside of the muzzle would remain flat, but 1/2“ of the
inside would be beveled and recessed.

To
remove the chatter marks left from the facing cutter we used
220 and 400-grit polishing sticks available from Boride
Engineered Abrasives.
We applied plenty of gun oil to the polishing sticks
and applied them in different positions to ensure the muzzle
stayed flat.
Next,
we took a brass muzzle lap (also from Brownells)
with some 400-grit lapping compound to finish leaving the
lands and grooves nice and sharp at the end of the muzzle.
Squaring and polishing the muzzle left the outside edge very
sharp. I took my high-speed rotary tool with a rubber abrasive
wheel to this sharp outside edge to round it off.
Finally, we took acetone to clean the muzzle and
applied some Birchwood-Casey® Perma Blue® Gun Blue Paste to
the exposed bare metal.
After we finished it looked almost factory.
Ok,
you can’t have a revolver without sights, so now we needed
to attach a new front sight.
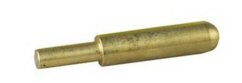
When I originally decided to cut the barrel I purchased
a screw-on stainless steel front sight base that takes
interchangeable sight blades made by Alpha
Precision Inc. I
also purchased the special centering punch to ensure I marked
the barrel correctly. Dave
and I cleaned the bottom of the sight base, and the top of the
barrel with acetone and applied some Loctite 609.
My wife’s hair drier helped to cure the Loctite in
short time.
This held the base in place just long enough so we
could mark where to drill the three mounting screw holes.
We double-checked, triple-checked, and
quadruple-checked to ensure we got the sight base positioned
correctly on the barrel. After
marking the three holes, a brisk tap with a rawhide mallet
popped the sight base off of the barrel.
I cleaned the barrel and sight base with acetone to
remove the Loctite.
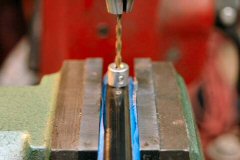
Following
the instructions found on Alpha Precision Inc.’s web site, I
took a #31 drill bit and installed a stop collar so I would
drill no more than 0.100” deep.
I lined the outside of the barrel with masking tape and
chucked the barrel in the machinist’s vise on my mill table
so it was level. I
carefully aligned the drill bit to the center mark, then
drilled up to the stop collar.
I
took a 6-48 bottoming tap and tapped the screw hole
immediately after I drilled it.
I used the chuck to keep the tap straight and centered.
The hole was not very deep so I could only tap about
three threads. After
completing the center hole, I drilled and tapped the two end
holes.
After
I tapped the holes I discovered that the screws were too long,
or the holes were too shallow.
I certainly didn’t want to drill the holes any
deeper, so I used my high-speed rotary tool and a cut off
wheel to shorten each screw by one thread.
We cleaned all the holes and screws with acetone then
applied a drop of Loctite blue to each hole and installed the
sight base. The
instructions recommended we use Loctite red, but that makes a
permanent installation and someday he may want to change the
sight base.
Finally
we installed the sight blade onto the base and applied a drop
of Loctite blue on the retaining set screw.
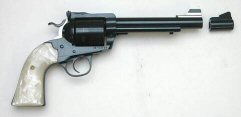
The stainless steel sight base makes an interesting
contrast to the blue barrel and sight blade.
The two-tone front sight matches the two-tone hammer.
So now Dave has a revolver that is easier to carry in
the woods, has replaceable front sight blades for different
loads, and a properly crowned muzzle to maintain accuracy.
Although
this is a fairly short article, it took us probably 6 hours
from the time Dave made the first cut until the revolver was
finished. And even
though we used my mill, this could also have been accomplished
with a drill press.
If I was to perform this job again, I would purchase a
0.120” square end bit and mill the screw holes in the
barrel. I would then be able to tap more threads and not
have to worry about trimming the screws. However,
this project was successful because I had the proper tools on
hand.
|
