The
Case of the Double-Tapping AR10
by Roy Seifert
Click here to purchase a
CD with this and all Kitchen Table Gunsmith Articles.
Disclaimer:
This article is for entertainment only and is not to
be used in lieu of a qualified gunsmith.
Please defer all firearms work to a qualified
gunsmith. Any loads
mentioned in this article are my loads for my guns and have
been carefully worked up using established guidelines and
special tools. The
author assumes no responsibility or liability for use of
these loads, or use or misuse of this article.
Please note that I am not a professional gunsmith,
just a shooting enthusiast and hobbyist, as well as a
tinkerer. This
article explains work that I performed to my guns without
the assistance of a qualified gunsmith.
Some procedures described in this article require
special tools and cannot/should not be performed without
them.
Warning:
Disassembling and tinkering with your firearm may
void the warranty. I
claim no responsibility for use or misuse of this article.
Again, this article is for entertainment purposes
only!
Tools
and firearms are the trademark/service mark or registered trademark
of their respective manufacturers.
Introduction
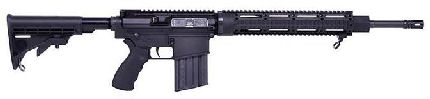
One of my long-time shooting buddies, Dave, brought me an
AR10 that was built by a different friend, James, from
commercially available parts. James had purchased a bare,
serialized lower and had it transferred through his FFL
dealer. He then purchased a lower parts kit and assembled
his lower. When Dave attempted to shoot this home-built
AR10, sometimes when he pulled the trigger the rifle would
fire two rounds, not just one! After about the third time
this happened Dave stopped shooting the rifle and brought
the lower receiver to me to have a look.
Initial
Inspection
I first wanted to test the function of the disconnector.
With my finger pressing the trigger I pulled the hammer back
so it would engage the disconnector. With my thumb on the
hammer to prevent it from hitting the frame, I released the
trigger. The disconnector released the hammer and it should
have been caught by the sear, but the hammer completely fell
to the front of the receiver, which would have caused a
second round to be fired. With my finger off the trigger,
when I pulled the hammer back the sear caught the trigger.
Based on
this initial inspection, here’s what was happening:
-
Dave
pulled the trigger.
-
The
sear released the hammer which fired a shot.
-
The
bolt being driven back cocked the hammer which was
caught by the disconnector.
-
Dave
released the trigger which caused the disconnector to
release the hammer.
-
The
hammer missed the sear which caused the rifle to fire a
second time causing the double-tap.
-
When
the bolt came back the second time the hammer was caught
by the sear because Dave had let off the trigger.
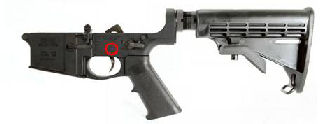
I
discovered that the trigger pin was not seated fully in the
receiver. It had slipped out of the left hole and was
protruding from the right side of the receiver causing the
trigger and disconnector to be crooked. The trigger and
disconnector being crooked in the receiver prevented the
disconnector and/or sear from catching the hammer. Ok, so
what caused the trigger pin to come out of the receiver?
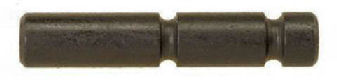
The
hammer and trigger pins are exactly the same for an AR10
(and AR15 by the way). The pin has two grooves to prevent
it from moving once seated in the receiver. When the pin is
used as the hammer pivot pin, there is a small spring in the
center of the hammer that fits in the middle groove of the
pin to prevent it from moving. When the pin is used as the
trigger/disconnector pivot pin, one leg of the hammer spring
sits in the outside groove to prevent the pin from moving.
Notice how the grooves are rounded; a tap on the pin with a
punch will unseat the pin. On James’ rifle I noticed that
the hammer spring leg was not setting in the groove of the
trigger pin.
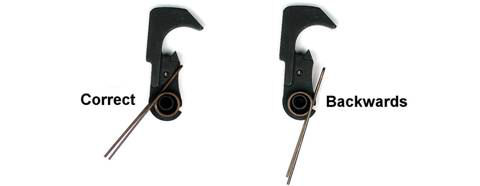
I removed
the hammer, trigger and disconnector from the receiver and
compared them to a set of AR15 trigger parts I had left over
from when I replaced the trigger group on my own AR15. I
immediately noticed that the hammer spring had been
installed backwards on James’ rifle! This caused the leg to
be set at such an angle that it would not contact the groove
in the pin. This was also causing the spring to be flexed
backwards.
I
installed the spring correctly, reinstalled the trigger
parts and found that the trigger/disconnector pin now would
not move because the leg of the hammer spring was sitting in
the groove correctly. When manually cycling the hammer with
the trigger pulled, the hammer engaged the disconnector.
When I released the trigger the hammer was caught by the
sear indicating the parts were now working correctly.
Range
Session
I went with Dave to the range to test the rifle. I loaded
two rounds in a magazine to make sure the trigger group was
functioning correctly. After each shot, I held the trigger
back, then carefully released it to ensure the disconnector
and sear were working properly. I could both hear and feel
the disconnector release the hammer and be caught by the
sear. I then loaded 5 rounds in a magazine and the rifle
continued to function properly. Problem fixed!
Summary
I’m all for building guns from parts and often times to fix
a gun all that is needed is a replacement part. However,
when working on any gun I always have a schematic (exploded
parts view) available to help with proper orientation and
location of parts. If a schematic is not available I use a
digital camera and take photos as I disassemble the gun so I
know how to reassemble it. As for installing a part
backwards; I’ve done it many times and will probably do it
again! We learn through our mistakes. To James credit he
built his rifle from parts having never disassembled one,
and it really is a beautiful, and now correctly functioning,
rifle.
|

