I have a
concealed carry permit for the state of
North Carolina
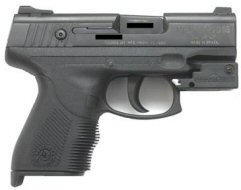
and I recently purchased a Taurus® 24/7 compact in .45 ACP.
After doing a lot of research on the Internet, I
found the Armalaser
RSS built especially for this pistol.
It is activated simply by touching the metal rear
with my trigger finger.
A frame-mounted laser provides many advantages,
especially in low light conditions, not to mention I am now
finding it difficult to focus on the front sight with my
tri-focal glasses!
One of
the problems with mounting a laser on a gun is finding a
holster that fits. Since
this will be my primary carry gun I needed a suitable
holster for it. Many
years ago I read an article in a gun magazine on how to make
your own custom leather holsters.
That year my wife bought me a leather crafting kit
from Tandy
Leather and I’ve been making my own holsters ever
since.
After
many years of trial and error, I’ve developed a holster
pattern that works well for me.
It is similar to a pancake holster with belt notches
so I can wear it outside the pants on my belt, with the
addition of two belt loops so I can wear it inside the pants
as well.
The
process for making a custom leather holster requires the
following steps:
Step
1:
Trace the outline of the gun for which I am
creating the holster.
Step
2:
Create the holster pattern around the gun
tracing, then cut out the pattern.
Step
3:
Trace the pattern onto 8-9 oz. leather, then
cut out the pieces.
Step
4:
Prepare and finish the leather.
Attach any snaps at this time.
Step
5:
Assemble the holster.
Step
6:
Wet-mold the holster to the gun.
Step
7:
Attach any additional hardware.
Step
1: Trace the Gun
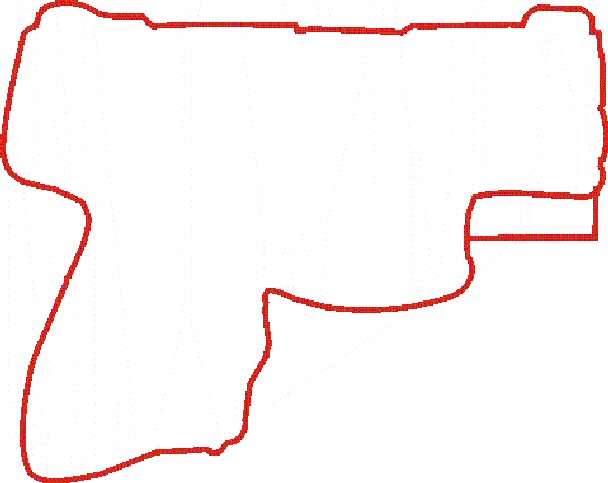
First
I made sure the gun was unloaded! I drew a
straight line with a felt- tipped pen and placed the top of
the gun along that line. I made sure the front sight
and center of rear sight were both on the line. Then I
rolled the gun over onto its side and used the felt-tipped
pen to trace around the entire gun.
This "rolling" of the gun accommodates any
thicknesses due to cylinders, etc. If the gun is too large to fit on a sheet of paper, I
place the grips outside of the paper.
The grips aren’t usually covered by leather.
When I
first started making holsters, I didn’t have a suitable
drawing program so I traced the gun on graph paper.
The graph paper made it easy to draw the final
pattern.
Step
2: Create and
Cut Out the Holster Pattern
I use
CorelDRAW® 12 to design all my holster
patterns. After the
gun was traced I scanned it into my PC and imported it into
CorelDRAW®. CorelDRAW®
comes with a program called CorelTRACE® which allows me to
convert the traced image into a line drawing.
Although this step isn’t necessary, it makes it
easier to manipulate the tracing.
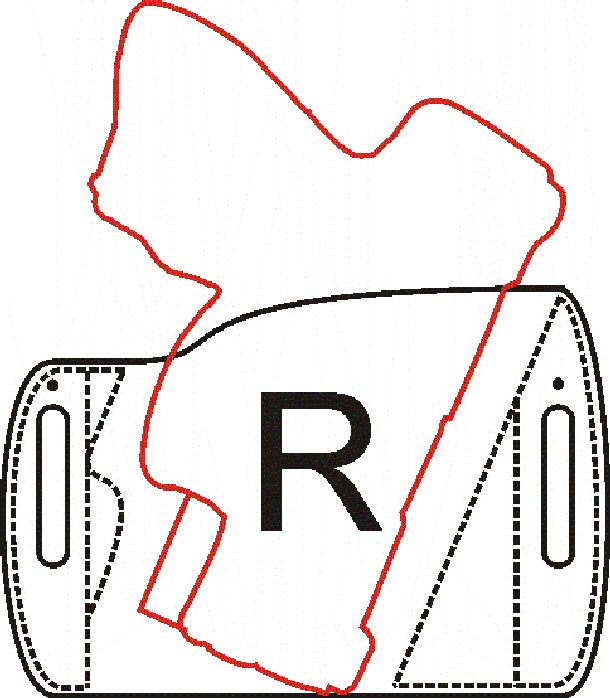
Once the
tracing is imported and converted I designed the pattern
around it. In
the pattern above, the gun is canted forward 23-degrees.
For me, this makes it easier to draw and the bottom
of the holster doesn’t dig into my hip. Also,
this gun only comes with extended magazines, so the forward
cant helps prevent the grip from protruding behind me.
In other words, the grip sits against my body.
I usually use red for the gun and black for the
holster to help distinguish between the two.
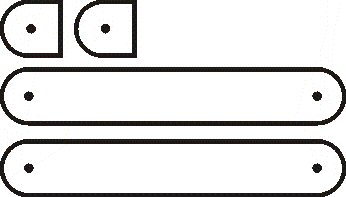
Typically,
a pancake holster is made of two identical halves that are
stitched together. The
dotted lines in the pattern above show where the holster
will be stitched. When
I create a pattern for a holster I leave 3/8” to 1/2“
around the outline of the gun to accommodate the thickness
of both the gun and the leather.
Since I am right-handed, and carry my guns on my
right side, I always create right-handed patterns.
One of the reasons I like using a draw program is
because I can get nice smooth curves.
My curves weren’t very smooth when I drew the
patterns by hand; even using graph paper.
There are
a few things I always watch out for when designing this type
of holster; trust me - this is the voice of experience
talking:
- I
left enough of a gap between the front of the pistol
grip and the top edge of the holster so I could get my
fingers around the grip.
I’ve made holsters before that looked good on
paper, but I couldn’t grip the gun because the holster
got in the way.
- I
also made sure there was no leather covering the point
where the trigger guard met the front of the grip.
Again, leather here could interfere with my
ability to grip and draw the gun.
- My
belt should cross the gun at the halfway point, or
higher; preferably at the center of gravity (where the
loaded gun balances on your finger).
Any lower and the gun will have a tendency to tip
outward, away from my body.
I like to have the gun fit snuggly against my
body.
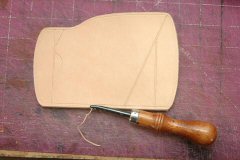
Once the
pattern was completed, I printed it out on regular printer
paper. Then I
cut out the pattern using regular scissors.
I used a ruler and a knife to cut the straight edges.
Since this pattern will be used for both the left and
right halves of the holster, I like to mark the front and
back of the pattern for left and right sides.
Since my pattern was a right-handed pattern, I put
the letter R on the side of the pattern with the
lines/printing. I
put a letter L on the back or clean side of the pattern.
Step
3: Trace the
Pattern onto Leather and Cut Out the Pieces
Leather is sold by ounces; but this refers to the thickness,
not the actual weight. One
ounce is equivalent to 1/64 of an inch.
I like to use 8-9 ounce leather for my holsters which
is 8/64” – 9/64” thick.
Most commercial holster makers use 5-6 oz. leather
because it leaves a nice mold of the gun when wet molded.
Unfortunately, holsters made of thinner leather have
a tendency to collapse; especially if worn inside the pants.
I prefer thicker leather, up to 10 oz., because it
holds its shape and won’t collapse.
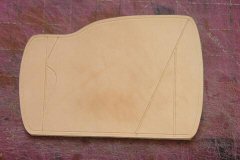
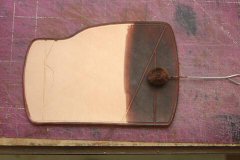
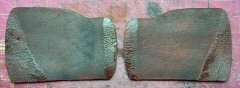
I took a
sponge and moistened the smooth side of the leather, then I
laid the pattern on the leather and traced around it with a
stylus or pencil. I
also traced the vertical stitching lines, not
the outside or edge stitching lines.
These will be cut with a grooving tool later.
I never use a pen because the oils from the ink can
smear and ruin the holster.
Then I flipped the pattern over and again used a
pencil to trace the pattern onto a different section of
leather.
After
tracing the pattern onto the leather, I used a sharp,
break-away knife to cut out the pieces.
I like to use the dime-store knives with break-away
blades that retract into a plastic handle.
Leather will dull a knife blade very quickly; the
breakaway blades are cheap, and by breaking off the dull
segment, a new, sharp segment is exposed.
Since I
planned to wear this holster inside the pants, I needed 4
additional pieces; 2 straps 4 3/4” x 3/4“ and two
spacers, 1/2“ x 3/4“.
I cut these from 7 oz. leather.
The straps are the belt loops and the spacers leave
space for my pants material between the belt loops and the
holster.
Step
4: Prepare and
Finish the Leather
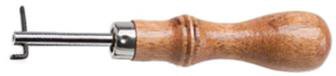
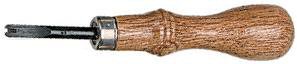
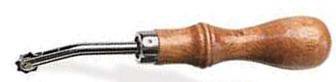
Next I
cut a stitching groove around the edge of the leather.
The leather should be dry for this step.
This groove allows the stitching to sit flush or
below the surface of the leather so it won’t wear.
The tool shown above is set to cut the groove 1/8”
in from the edge. I
then took a straight grooving tool and cut the stitching
grooves in the middle of the leather.
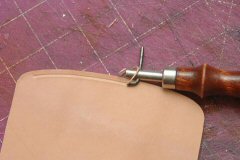
I then
removed the sharp edges of the leather with a beveling tool.
I beveled all around the outside (smooth) edge of
both pieces. I
beveled the inside (rough) edges only where the two pieces
would not be touching.
After beveling I took a wet sponge and moistened the
edges only where the gun would sit, not where the
pieces of leather would be touching, and used a slicker tool
to slick and round those edges.
I also beveled and slicked completely around both
sides of each belt loop, but I did not bevel the edges of
the spacers.
Now
it’s time to finish the leather.
I prefer an oil-based dye such as Fiebing’s Pro-Oil
Dye available from Tandy
Leather Factory. I
applied the dye first to the edges, then evenly over
the front and back surfaces until the dye sat liquid on the
surface and the leather absorbed the dye very slowly.
I finished both holster pieces, the straps and
spacers and set them up on edge to dry.
I usually let them dry over night.
After the
pieces were completely dry I applied the leather finish.
I use Fiebing’s Leather Balm with Atom Wax; a
combination of wax and oil, also available from Tandy
Leather Factory. This
finish does darken the color of the leather so I have to
make sure I apply it evenly, it will leave unsightly
streaks. I
applied the finish to both sides, then after the finish
dried, I buffed the leather with a soft cloth.
This made a soft, lustrous finish.
I finished all the pieces in this manner.
Step
5: Assemble and
Stitch the Holster
Now
it’s time to assemble the holster.
Pancake holsters are simple to assemble.
I applied leather glue to the inside areas of the two
holster halves that would be touching, i.e. inside of the
stitch lines. Leather
glue is a type of contact cement so I had to wait for the
glue to dry. After
the glue dried, I pressed the two halves together making
sure the edges were even.
I have a
$1,500 leather sewing machine that I use to stitch my
projects. But
for years I stitched my projects by hand.
Hand stitching is easy; here’s a simple method:
- I
run a #5 overstitch wheel in the groove I want to
stitch. The
overstitch wheel has evenly spaced teeth that leave
marks where the stitches should go.
- I
use a high speed rotary tool running at a moderate speed
with a 1/16” bit and drill a hole everyplace the
overstitch wheel left a mark.
- I
use two needles and waxed thread to saddle-stitch the
seam.

Saddle
stitching is very strong and involves running two threaded
needles through each hole, one from the front and one from
the back. I
start at one hole and run half of the thread through that
hole. I use a
piece of scrap leather to push the needle through the hole,
then a pair of pliers to finish pulling the needle through.
For the next hole I run the front needle through from
the front, then the back needle through the same hole from
the back. I then
pull the loose ends tight.
When I reach the end of the stitching, I then stitch
back 3 holes, then cut off the leftover thread.
This locks the stitching so it will not come apart.
With the
holster still flat I cut the belt notches.
I used a 3/8“ round punch to punch each end of the
notch, then used my knife to cut between the outside edges
of the holes. Once
the center is removed I used my beveling tool to bevel the
sharp edges. I
also punched a small hole above each notch to accommodate
the screw to attach the belt loop.
Finally,
I used my high speed rotary tool with a fine sanding drum
set at a low RPM and went over every stitched seam to make
them smooth and even. This
sanding process makes a lot of leather dust so I always wear
goggles and a mask to prevent the dust from entering my eyes
or lungs. After
sanding the seams I again beveled the edges with the
beveling tool to ensure there were no sharp edges.
Step
6: Wet Mold the
Holster to the Gun
First I
placed the gun into a plastic bag.
Usually, a gallon freezer bag works well.
Then I half filled a sink with water and immersed the
holster. With
the holster completely immersed I worked it with my hands
until it became soft and pliable.
This only took about 30 seconds.
I removed
the holster from the water and inserted the plastic-wrapped
gun as far as it would go.
I took my fingers and molded the leather to the shape
of the gun. Once
I got the leather molded I left the gun in the holster until
the outside was dry, then removed the gun to allow the
inside to dry. It
was interesting to note that while the holster was wet it
would activate the laser.
Once the holster was dry, however, I could insert and
remove the gun without activating the laser.
This
wet-molding process not only molds the holster to the shape
of the gun, but it also causes the leather to become stiff
which helps to prevent it from collapsing when I wear it
inside my pants.
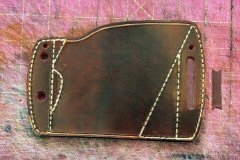
After the
holster was dry I applied another coat of leather finish,
then applied a dark brown edge dressing to the edges,
including the inside of the belt notches.
This provides protection to the edges and gives the
holster a professional look.
Step
7: Attach
Hardware
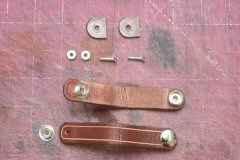
Although
not shown in the photos, I also finished the straps and
spacers in the same manner.
After they were dry and buffed I attached large
chrome snaps to the straps.
I ran a #6 screw through the bottom of the snap set,
through one end of the strap, through the spacer, then
through the small hole I punched in above the belt notch in
the holster. The
holes in the snaps are just large enough to accept a #6
screw. I used a
#6 nut to attach the screw to the back of the leather.
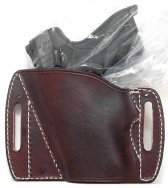
The
holster is now complete, and because of the wet molding
process, the gun fits perfectly.
The belt notches allow me to wear the holster on my
belt outside of the pants, and the belt loops allow me to
wear it inside the pants for deep concealability.
Finding a commercially-made holster that will
accommodate a laser is virtually impossible, but I can
always make one that will always be a perfect fit and will
meet my needs perfectly.