Resurrecting a 1911 .22 Conversion Unit
by Roy Seifert
Click here to purchase a
CD with this and all Kitchen Table Gunsmith Articles.
Disclaimer:
This article is for entertainment only and is not to
be used in lieu of a qualified gunsmith.
Please defer all firearms work to a qualified
gunsmith. Any loads
mentioned in this article are my loads for my guns and have
been carefully worked up using established guidelines and
special tools. The
author assumes no responsibility or liability for use of
these loads, or use or misuse of this article.
Please note that I am not a professional gunsmith,
just a shooting enthusiast and hobbyist, as well as a
tinkerer. This
article explains work that I performed to my guns without
the assistance of a qualified gunsmith.
Some procedures described in this article require
special tools and cannot/should not be performed without
them.
Warning:
Disassembling and tinkering with your firearm may
void the warranty. I
claim no responsibility for use or misuse of this article.
Again, this article is for entertainment purposes
only!
Tools
and firearms are the trademark/service mark or registered trademark
of their respective manufacturers.
 Over
15+ years ago, I purchased a Jarvis .22 long rifle (LR)
conversion unit for a 1911 frame.
The unit never worked correctly so I purchased a Ciener
unit, which has always functioned flawlessly.
I decided I wanted to see if I could make the Jarvis
unit function reliably, so I dug it out of the box where I had
it stored and went to work.
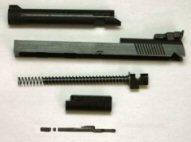
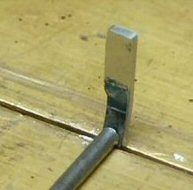
Apparently, somewhere along the way I had broken the
ejector, which you can see in the photo.
The ejector fit into a slot milled in the side of the
barrel. Just above
that slot was another slot milled for the steel slide.
The ejector was just floating in that slot.
Jarvis no longer manufactures this unit, but has given
manufacturing rights to Tactical Solutions.
I called Tactical Solutions and spoke with Dave who
agreed to send me a couple of replacement ejectors. Over
15+ years ago, I purchased a Jarvis .22 long rifle (LR)
conversion unit for a 1911 frame.
The unit never worked correctly so I purchased a Ciener
unit, which has always functioned flawlessly.
I decided I wanted to see if I could make the Jarvis
unit function reliably, so I dug it out of the box where I had
it stored and went to work.
Apparently, somewhere along the way I had broken the
ejector, which you can see in the photo.
The ejector fit into a slot milled in the side of the
barrel. Just above
that slot was another slot milled for the steel slide.
The ejector was just floating in that slot.
Jarvis no longer manufactures this unit, but has given
manufacturing rights to Tactical Solutions.
I called Tactical Solutions and spoke with Dave who
agreed to send me a couple of replacement ejectors.
In the mean
time, I wanted to perform some work on the unit to make it
function more reliably. I
also want to try to fabricate a new ejector, and modify the
design of the unit a little bit.
If my modifications didn’t work I could always go
back to the original design.
Resurrection
Plan
-
Polish
the slide rails so it slides effortlessly on the frame.
All of my 1911s are hand fitted so this slide fits
tightly on any of the frames I have.
-
Mill
a 1/16” hole vertically in the barrel to accept a roll
pin.
-
Fabricate
a new ejector out of tool steel.
-
Pin
the new ejector in place.
-
Tune
the recoil spring so it functions correctly.
I put
adjustable sights on it long ago, so this won’t have to be
done.
Polish
Slide Rails
I put the slide on the frame I planned to use and found there
was a high spot on the frame rails where the ejector was
mounted. I could
still move the slide, but the high spot caused it to bind.
I completely disassembled the frame and put some
Mothers® Mag & Aluminum polish on the rails at the point
of the high spot. This
is a very fine grit polish so it’s not so aggressive.
I realize this will also remove some metal from the
frame, but it shouldn’t be enough to matter.
I briskly moved the slide back and forth on the frame
to polish down the high spot so the slide moved freely.
After about 20 cycles, I put more polish on the rails.
I polished until the slide moved freely on the rails.
I cleaned the frame and slide with brake parts cleaner,
then lubricated with Break-Free CLP.
I mounted
the assembled conversion unit on the frame and test-fired one
round. The slide
cycled completely and cocked the hammer.
Of course, with no ejector, the shell casing stayed on
the extractor, and was fed back into the chamber when the
slide moved forward.
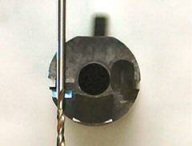 Mill
1/16” Hole in the Barrel Mill
1/16” Hole in the Barrel
I wanted to be able to pin the new ejector into the barrel.
If this modification didn’t work I could always use
the floating ejector. My
Ciener conversion unit has the ejector staked in a slot milled
in the side of the barrel, but I didn’t think I had enough
metal between the ejector slot and slide rail slot to be able
to stake it on both sides.
Also, staking is a more permanent installation, which I
didn’t want.
The above
photo shows a 1/16” drill bit in the approximate position
where I planned to mill the hole.
I wanted to get as close to the inside of the slide
rail slot as possible without breaking through.
Since the ejector slot is deeper than the slide rail
slot, this should be the mid-point of the ejector, and leave
plenty of clearance for the chamber and bore.
With the new ejector pressed against the inside of the
ejector slot and pinned in place, it should not move.
First, I
milled a 1/8” flat on the bottom of the barrel at the point
I planned to mill the 1/16” hole.
This made sure the 1/16” milling bit started flat and
didn’t wander, and made it easier to start a roll pin.
Then I took a 1/16” square end bit and plunged a hole
to the depth of the bit. Because
the bit was too short to go completely through the barrel, I
finished the hole with a 1/16” drill bit.
Fabricate
a New Ejector
I measured the thickness of the broken ejector and it came to
a bit over 0.046”, which was probably 3/64” (0.046875).
I went to Online
Metals and purchased a piece of 01 tool steel 18” x
1/2” x 3/64”. At
its widest point, the ejector measured a little less than
1/4” so I should have more than enough stock to fabricate
ejectors and make mistakes.
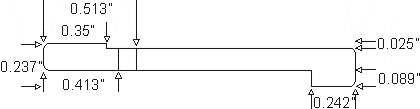
I carefully
measured the original ejector so I could fabricate a new one.
In the above diagram, the two vertical lines at
0.413” and 0.513” are where I will need to bend the
ejector so the hook will contact the case head, yet not rub
against the bottom of the slide.
Note:
Even though I used a CNC mill, you can fabricate an
ejector using files, but it takes a lot longer.
I used my
CAD program to create a diagram of two ejectors.
The 1/2“ tool steel stock allows me to cut out two
ejectors side by side. I
put the blank in my hobby CNC mill and cut out the two new
ejectors.
 I
didn’t have the depth set properly on my program so there
was some flashing left around the ejector.
I removed the flashing and broke the sharp edges with a
jeweler’s file. I
didn’t have the depth set properly on my program so there
was some flashing left around the ejector.
I removed the flashing and broke the sharp edges with a
jeweler’s file.
I marked the ejector with a blue marker and scribed lines
where I needed to put the bends.
I put the ejector in my vise up to the top line and
carefully bent it by hitting it with a small steel punch at
the point it stuck up above the vise jaws.
I lifted the ejector out to the next line, and bent it
the other way. In
the above photo, you can clearly see one of the scribe lines.
I installed
the ejector in the slot in the barrel and marked where to
drill the 1/16” hole. I
removed the ejector, drilled the hole, then pinned the ejector
in the barrel to test for fit.
The ejector fit tightly in the barrel slot, and it fit
into the slide and frame.
I removed
the new ejector, hung it from a paper clip, and heated it with
a propane torch until it glowed bright red.
I then dropped it into a cup of motor oil to quench it.
This hardened it so it will last a long time.
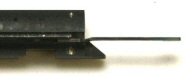 After
quenching the ejector, I reinstalled it in the barrel.
In the left photo, you can see the roll-pin hole and
the new ejector pinned in place.
Also, notice the slight bend that allows the ejector to
contact the case rim. The
barrel fits onto the slide and moves with nothing binding.
The entire unit fits on my 1911 frame, and again,
cycles with nothing binding.
I tested the new ejector with an empty case and a
loaded round just to see if it would eject, and it does.
I also tested with my Ciener magazine, and loaded
rounds fed and ejected. After
quenching the ejector, I reinstalled it in the barrel.
In the left photo, you can see the roll-pin hole and
the new ejector pinned in place.
Also, notice the slight bend that allows the ejector to
contact the case rim. The
barrel fits onto the slide and moves with nothing binding.
The entire unit fits on my 1911 frame, and again,
cycles with nothing binding.
I tested the new ejector with an empty case and a
loaded round just to see if it would eject, and it does.
I also tested with my Ciener magazine, and loaded
rounds fed and ejected.
I took the
unit to the range, and in the 15+ years since I purchased it,
it finally functioned flawlessly.
Using my Ciener magazine, it would feed rounds only if
the slide was moving at full speed.
If I tried to feed a round slowly, it would pop up out
of the magazine and the nose of the round would hang up on the
top edge of the chamber. Wow, this is both fun, and
cheap to shoot!
Well, I am
very pleased with my installation/modification.
The 3/64” x 1/2“ x 18” piece of tool steel cost
$10.00 plus $7.00 shipping.
I can get 10 or more ejectors out of that piece, which
comes to $1.70 each, which is about what Tactical Solutions
charged me for a new floating ejector.
When I
purchased the original Jarvis unit, it came with two ejectors.
I promptly broke one the day the unit arrived.
Trying to get the unit to function I broke the other
one; this is a weakness with this unit.
My modification has the following advantages:
- Fixed
installation – you don’t have to worry about getting
the ejector aligned properly, which is one reason the
floating ejector can be broken.
- Can’t
be lost – it’s pinned in place
- Easy
to replace – simply punch out the roll pin and replace
the ejector
To me, this
project represented true gunsmithing.
Rather than just replace a part, I modified a design
and fabricated a new part.
Only time and frequent use will tell just how durable,
and sensible, was my modification. Addendum
6/1/2008
I received the replacement ejector from Tactical
Solutions, and just like the original, it did not fit.
This was the original problem all along. So, my
modification worked and did improve the functionality and
reliability of the unit.
|
