Fitting
a 1911 Thumb Safety
by Roy Seifert
Click here to purchase a
CD with this and all Kitchen Table Gunsmith Articles.
Disclaimer:
This article is for entertainment only and is not to
be used in lieu of a qualified gunsmith.
Please defer all firearms work to a qualified
gunsmith. Any loads
mentioned in this article are my loads for my guns and have
been carefully worked up using established guidelines and
special tools. The
author assumes no responsibility or liability for use of
these loads, or use or misuse of this article.
Please note that I am not a professional gunsmith,
just a shooting enthusiast and hobbyist, as well as a
tinkerer. This
article explains work that I performed to my guns without
the assistance of a qualified gunsmith.
Some procedures described in this article require
special tools and cannot/should not be performed without
them.
Warning:
Disassembling and tinkering with your firearm may
void the warranty. I
claim no responsibility for use or misuse of this article.
Again, this article is for entertainment purposes
only!
Tools
and firearms are the trademark/service mark or registered trademark
of their respective manufacturers.
A couple
of years ago I built a 1911 .45 using an 80% frame.
I hand fitted all parts to produce an accurate,
functioning pistol. However,
I’ve always wanted to install an ambidextrous thumb safety
on this gun. Although
this article is for a non-ambidextrous safety, the process
is the same.
 Preparing
the Safety Preparing
the Safety
To begin, I removed all parts from the frame except for the
trigger and magazine release.
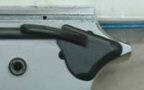
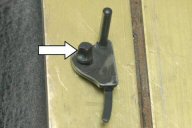
First, I made sure the back of the safety was
perfectly flat with no raised casting marks.
I filed any raised edges with a jeweler’s file.
Note in the photo how I had to polish off the raised
edge around the outside of the safety.
Fitting to the Frame
I installed the thumb safety so that it was flat against the
frame. I moved the
safety up and down to see if it would rotate freely in the
safety cutout slot in the frame.
My safety did not rotate freely and bound on the frame.
 First, I
looked in the frame for any burrs that might be blocking the
safety. I found
one, which I filed off with a jeweler’s file. First, I
looked in the frame for any burrs that might be blocking the
safety. I found
one, which I filed off with a jeweler’s file.
The safety
still would not completely rotate so I had to increase the gap
between the flat rear of the safety and the safety lug.
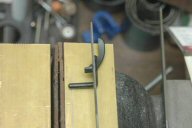
I mounted the safety in my vise and with a square
jeweler’s file with a safe edge carefully filed the inside
of the lug in order to increase the gap.
I worked carefully and only removed a little metal all
around the inside of the lug.
 I
re-installed the safety in the frame and again tried to rotate
the safety through its full travel.
Since it was still binding, I removed a little more
metal until it would rotate with no binding.
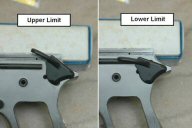
The top corner of the safety must at least reach the
bottom of the slide rail, or beyond, for the upper limit. I
re-installed the safety in the frame and again tried to rotate
the safety through its full travel.
Since it was still binding, I removed a little more
metal until it would rotate with no binding.
The top corner of the safety must at least reach the
bottom of the slide rail, or beyond, for the upper limit.
Fitting
to the Sear
Now that the safety rotated freely, I removed it and
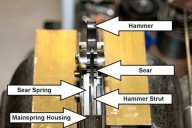
re-installed the sear, disconnector, and hammer.
Next, I installed the sear spring making sure that the
little tab at the bottom of the spring was in the slot in the
frame, and the flat at the top of the left most leaf was
against the bottom of the sear.
I installed the mainspring housing (MSH) making sure I
centered the hammer strut on the mainspring cap, then pinned
the MSH in place.
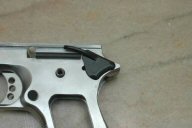
 I cocked
the hammer and tried to install the safety.
It would not go all the way into the frame because it
was hitting against the sear.
I lightly filed the engagement surface with a safe-edge
file only 2 or 3 strokes at a time until the safety would go
in and I could engage it, making sure it blocked the sear.
I cold-blued the surface I just filed to protect it
from corrosion. I cocked
the hammer and tried to install the safety.
It would not go all the way into the frame because it
was hitting against the sear.
I lightly filed the engagement surface with a safe-edge
file only 2 or 3 strokes at a time until the safety would go
in and I could engage it, making sure it blocked the sear.
I cold-blued the surface I just filed to protect it
from corrosion.
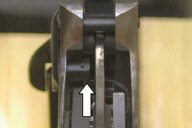
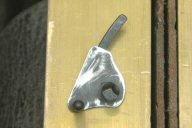
In
the right photo, the safety is in the up or engaged position.
You can see how the round part of the thumb safety is
touching the rear of the sear, which prevents it from moving.
I
reassembled the gun, and with the hammer cocked and the thumb
safety engaged, I pulled the trigger…hard!
There should be no movement of the sear.
I then released the thumb safety to see if the hammer
would fall. It
should not, and it did not.
Fitting
Ambidextrous Safety
To get the right side of the ambidextrous safety to fit I had
to grind the right side of the hammer and sear pivot pins so
they were flush or below the frame.
I had to be careful that I did not allow the pins
to heat up or I could damage the heat-treating.
Finally, I
had to file a cutout in the right grip panel to accommodate
the leg on the safety. This
leg prevents the right side of the safety from falling off.
I filed a little at a time, then installed the grip
panel to see if the safety was binding.
I continued to file until the safety would not bind
with the grip panel installed.
Conclusion
Fitting a thumb safety to a 1911 is an easy process, as long
as I go slow when filing the engagement surface.
In my experience, once a thumb safety is fit to a
particular frame and sear, it may not work in another gun.
This is due to differences in tolerances.
If I move a thumb safety to another gun, I always
perform the safety checks to ensure reliability.
|