1911
Action Job
by Roy Seifert
Click here to purchase a
CD with this and all Kitchen Table Gunsmith Articles.
Disclaimer:
This article is for entertainment only and is not to
be used in lieu of a qualified gunsmith.
Please defer all firearms work to a qualified
gunsmith. Any loads
mentioned in this article are my loads for my guns and have
been carefully worked up using established guidelines and
special tools. The
author assumes no responsibility or liability for use of
these loads, or use or misuse of this article.
Please note that I am not a professional gunsmith,
just a shooting enthusiast and hobbyist, as well as a
tinkerer. This
article explains work that I performed to my guns without
the assistance of a qualified gunsmith.
Some procedures described in this article require
special tools and cannot/should not be performed without
them.
Warning:
Disassembling and tinkering with your firearm may
void the warranty. I
claim no responsibility for use or misuse of this article.
Again, this article is for entertainment purposes
only!
Tools
and firearms are the trademark/service mark or registered trademark
of their respective manufacturers.

Introduction
I recently purchased a Rock Island Armory 1911A1-45 FS GI made
by Armscor
of the
Philippines
. This is a WWI
military pattern 1911 clone in .45 ACP with a parkerized
finish. It has a
few modern improvements such as a throated chamber, polished
feed ramp, and roll-over notch.
It got great reviews on the Internet and the price was
right.
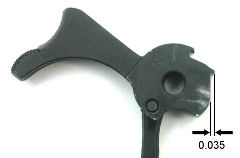
The trigger
let-off was heavy at 6 1/2 pounds and was long with a lot of
creep. This was
caused by rough cut hammer and sear engagement surfaces and
long hammer hooks. The
hammer hooks measured 35-thousandths of an inch; much too long
for a crisp trigger. So,
I needed to reduce the length of the hammer hooks and polish
and hammer and sear engagement surfaces.
CAUTION:
Working on hammer and sear engagement surfaces requires
special tools and cannot/ should not be performed without
them! Without the
use of these special tools the surfaces can become rounded and
uneven and could cause the firearm to become unsafe.
Tools
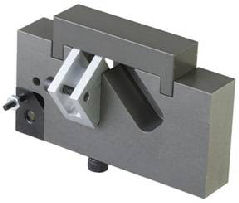
Many years
ago I purchased a Bob Marvel 1911 Auto Sear & Hammer Jig
from Brownells.
This jig allows me to work on both the hammer and sear;
other jigs on the market would only allow me to work on one or
the other.
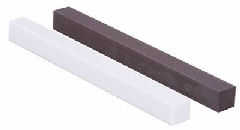
I also
purchased the recommended medium-fine and extra-fine ceramic
stones from Brownells.
These stones are perfectly flat and square and are the
right tool for this type of work.
The sharp edges fit into the corner of the hammer hooks
so the entire surface gets polished.
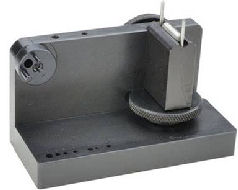
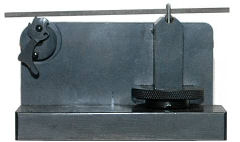
To reduce
the length of the hammer hooks I used a Power Custom Series I
Stoning Fixture that I also purchased from Brownells
along with the 45 adapter.
These can also be purchased from MidwayUSA.
For cutting I used a 220-grit silicon-carbide polishing
stick I purchased from Boride
Engineered Abrasives.
Their Gunsmith
Action Kit contains a number of different stones and grits
I regularly use for gunsmithing work.
Reducing
Hammer Hook Length
The instructions that came with the Marvel jig stated that the
hammer hooks should be reduced to 0.018” – 0.020”.
I decided to reduce the length to 0.025” and work
from there.
I removed
the hammer strut pin and hammer strut from the hammer.
I installed the 45 adapter onto the Power Custom Series
I Stoning Fixture then installed the hammer onto the adapter
with the hooks pointing up.
I used the 220-grit silicon-carbide stick coated with
gun oil and polished the hooks until they measured 0.025”.
The jig ensured that the ends of the hooks were even
and square. I went
very slowly here and measured often.
Because of the coarse stone it only took about 10-15
passes to get the proper length.
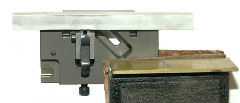
I installed
the hammer onto the Marvel jig following the instructions.
I used the black ceramic stick to perform the initial
polishing, then finished with the white ceramic stick.
Ceramic sticks use water as the cutting/cleaning agent;
I never use oil on a ceramic stick.

Next I
disassembled the frame and again following the Marvel jig
instructions, installed the sear onto the jig.
When adjusting the height if the sear above the top of
the jig I use a 0.0015” shim under the front of the
polishing stick and raise the height adjustment until the sear
is just touching the bottom of the stick.
If the sear is too high the angle of the sear would be
changed.
I used the
black ceramic stick to polish the sear so it was straight
across. Many sears
I have polished were cut crooked, but the jig ensures it is
cut straight. After
using the black stick, I used the white ceramic stick to final
polish the surface.
Finally I
cut the break-away angle on the rear of the sear so that about
0.020” of engagement surface was left.
This provides a nice, crisp trigger pull.
I used a
toothpick to apply a very small amount of Brownell’s
Action Lube Plus® to the corner of the hammer hooks
before reassembling the gun.
After the gun was assembled I cocked the hammer,
applied pressure to the rear of the hammer with the thumb of
my left hand, and pulled the trigger.
This is called “pushing the hammer” which helps the
hammer and sear seat together quicker.
Finally I allowed the slide to slam home with no
magazine in place to test if I had any hammer follow.
This is a very unsafe condition which usually results
in having to replace the hammer, sear, or both.
I did not have any hammer follow.
By the way, this should not be performed very often as
it can damage the slide and frame.
The sear
now breaks crisply and cleanly at 4 1/2 pounds with no grit or
creep. The
investment for tooling for jigs and stones can be fairly
expensive, but the results make the investment well
worthwhile. If I
had reduced the length of the hooks to 0.020 I could have
reduced the pull weight even farther.
I have a couple of 1911’s that I build from all
hand-fitted parts and their sears release at 2 3/4 pounds.
|
