Making a 1911 Front Sight Staking Tool
by Roy Seifert
Click here to purchase a
CD with this and all Kitchen Table Gunsmith Articles.
Disclaimer:
This article is for entertainment only and is not to
be used in lieu of a qualified gunsmith.
Please defer all firearms work to a qualified
gunsmith. Any loads
mentioned in this article are my loads for my guns and have
been carefully worked up using established guidelines and
special tools. The
author assumes no responsibility or liability for use of
these loads, or use or misuse of this article.
Please note that I am not a professional gunsmith,
just a shooting enthusiast and hobbyist, as well as a
tinkerer. This
article explains work that I performed to my guns without
the assistance of a qualified gunsmith.
Some procedures described in this article require
special tools and cannot/should not be performed without
them.
Warning:
Disassembling and tinkering with your firearm may
void the warranty. I
claim no responsibility for use or misuse of this article.
Again, this article is for entertainment purposes
only!
Tools
and firearms are the trademark/service mark or registered trademark
of their respective manufacturers.

Introduction
I recently purchased an Armscor Rock Island Armory M1911A1
to use for Wild Bunch match competition. I spent a lot of
time fine-tuning this gun to avoid having to shoot 500
rounds to break it in as suggested in the owner’s manual
(refer to my article
Fine-Tuning a Rock Island Armory M1911A1).
I
didn’t like the narrow WWI front sight that came with the
gun so I fabricated and installed a taller rear sight, and a
taller wider front sight. I have fabricated and installed
dovetail sights on 1911’s in the past (refer to my article
Milling a Front Sight Dovetail), but I wanted to
maintain the original factory installation by staking the
front sight in place. I found some sources on the Internet
that said to use a prick punch and 1/8” steel punch to peen
the end of the sight, but this came out ragged and looked
really ugly, and eventually the front sight became loose.
One reason the sight became loose was because the tenon was
too short so there wasn’t enough metal to peen and hold the
sight in place. My next version had a longer tenon, but
using the punch method still looked ragged and
unprofessional.
The
factory front sight staking was smooth and concave; very
professional looking. I’m guessing Armscor used a tool
similar to the one described below.
Front
Sight Staking Tool
Brownells sells a front sight staking tool
#080-817-000 but I thought I could fabricate my own a
lot cheaper. I found a drawing on the Internet for a 1911
front sight staking tool which I have reproduced below.
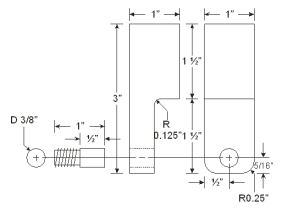
The
body of the tool is supposed to be made of steel and a 3/8”
bolt is used for the anvil. Since I had a lot of scrap
aluminum that I purchased off of ebay many years ago I
decided to make the body out of aluminum. Aluminum probably
won’t last as long as steel, but it should be plenty strong
enough for the few times I need to use it. I also had some
four-inch 3/8 x 16 bolts so cost to me should be $0.00.
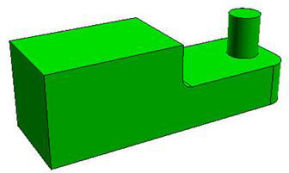
I
milled a piece of aluminum 1” x 1” x 3”, then milled 1/2”
off of the bottom half. I drilled a 5/16” hole 5/16” up
from the bottom and threaded it with a 3/8 x 16 tap.
To
fabricate the anvil I used a hack saw to cut off the
threaded part of a 3/8 bolt leaving 1/2” of threads. I then
cut the unthreaded shank leaving 1/2”. I applied some red
Loctite 271 to the threads and installed the anvil into the
3/8” tapped hole.
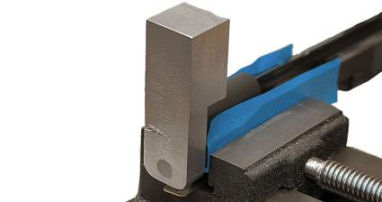
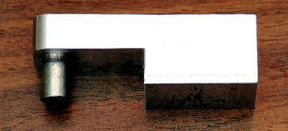
Ok, so
how does it work? The above photo shows the tool in place.
Notice the small piece of brass under the bottom of the
tool. The new front sight is laying on this piece of brass
to prevent the top of the sight from becoming deformed
during the staking process. The blue painter’s tape
prevents the sides of the slide from becoming scratched or
marred.
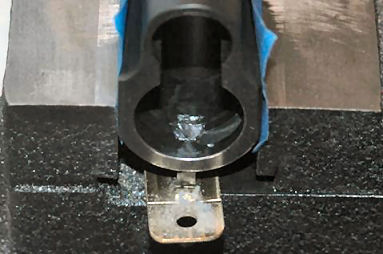
A few
gentle taps with a mallet and the tenon was perfectly peened.
This didn’t seem to affect the aluminum body at all. Notice
in the above photo how the peened end completely fills the
recess cut in the slide and is smooth and round. I couldn’t
do that with punches. Because the sight is now perfectly
staked in place it should last for thousands of rounds and
not shoot loose.
|